 |
FRONT BUMPER REMOVAL/INSTALLATION [(E)]
id0910008003x2
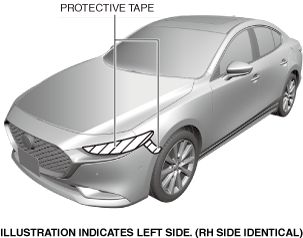
1. Affix the protective tape to the position (vehicle body side) shown in the figure to prevent scratches and damage.
am3zzw00023180
|
2. Disconnect the negative battery terminal. (See NEGATIVE BATTERY TERMINAL DISCONNECTION/CONNECTION [(E)].)
3. Remove the upper face. (See UPPER FACE REMOVAL/INSTALLATION [(E)].)
4. Remove the fasteners.
am3zzw00023181
|
5. Remove the screw which can be verified at the position where the front mudguard was bent back.
am3zzw00023182
|
6. Remove the screws and fasteners.
am3zzw00027454
|
7. Remove the bolts and fasteners which can be verified at the position where the front under cover No.1 was pulled back.
am3uuw00014305
|
8. Remove the bolts.
am3uuw00014306
|
9. Remove the fasteners.
10. Pull the rear end of the front bumper in the order of the arrows shown in the figure, and detach the front bumper hooks from the front bumper slider No.1.
am3uuw00014307
|
11. Pull the front bumper in the direction of the arrows shown in the figure.
am3uuw00014308
|
12. Disconnect the connectors.
am3zzw00032846
|
13. Remove the wiring harness clip.
14. While pressing the hook of the joint pipe in the direction of arrow (1) shown in the figure, pull the headlight cleaner hose in the direction of arrow (2) to disconnect the headlight cleaner hose from headlight cleaner motor. (with headlight cleaner system)
am3zzw00030992
|
15. Remove the front bumper.
16. Install in the reverse order of removal.
17. Perform the 360° view monitor system aiming. (with 360° view monitor system) (See 360°VIEW MONITOR SYSTEM AIMING.)
18. Perform the front radar sensor aiming adjustment. (with front radar sensor) (See FRONT RADAR SENSOR AIMING.)
am3zzw00037028
|
19. Perform the front side radar sensor aiming adjustment. (with front side radar sensor) (See FRONT SIDE/REAR SIDE RADAR SENSOR AIMING.)