 |
WATER PUMP REMOVAL/INSTALLATION [LF, L5]
id0112g3800700
1. Remove the battery cover. (See BATTERY REMOVAL/INSTALLATION [LF, L5].)
2. Disconnect the negative battery cable.
3. Remove the plug hole plate. (See PLUG HOLE PLATE REMOVAL/INSTALLATION [LF, L5].)
4. Remove the aerodynamic under cover No.2 and splash shield as a single unit. (See AERODYNAMIC UNDER COVER NO.2 REMOVAL/INSTALLATION.) (See SPLASH SHIELD REMOVAL/INSTALLATION.)
5. Drain the engine coolant. (See ENGINE COOLANT REPLACEMENT [LF, L5].)
6. Loosen the water pump pulley bolts before removing the drive belt.
7. Remove the generator drive belt with the A/C drive belt still installed and set it out of the way. (LF) (See DRIVE BELT REMOVAL/INSTALLATION [LF, L5].)
8. Remove the drive belt. (L5) (See DRIVE BELT REMOVAL/INSTALLATION [LF, L5].)
9. Remove the drive belt auto tensioner. (LF) (See ENGINE DISASSEMBLY/ASSEMBLY [LF, L5].)
10. Remove the drive belt idler pulley. (L5) (See ENGINE DISASSEMBLY/ASSEMBLY [LF, L5].)
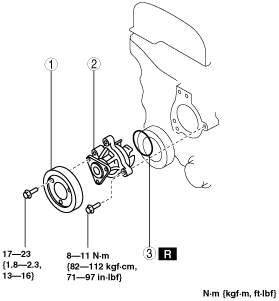
11. Remove in the order indicated in the table.
12. Install in the reverse order of removal.
13. Refill the engine coolant. (See ENGINE COOLANT REPLACEMENT [LF, L5].)
14. Inspect for engine coolant leakage. (See ENGINE COOLANT LEAKAGE INSPECTION [LF, L5].)
am3zzw00008599
|
|
1
|
Water pump pulley
|
|
2
|
Water pump
|
|
3
|
O-ring
(See O-ring Installation Note.)
|
O-ring Installation Note
1. Apply engine coolant to a new O-ring.
2. Install the O-ring.