 |
am3uuw00003264
GENERATOR REMOVAL/INSTALLATION [LF, L5]
id0117a8800200
1. Remove the battery cover. (See BATTERY REMOVAL/INSTALLATION [LF, L5].)
2. Disconnect the negative battery cable.
3. Remove the aerodynamic under cover No.2 and splash shield as a single unit. (See AERODYNAMIC UNDER COVER NO.2 REMOVAL/INSTALLATION.) (See SPLASH SHIELD REMOVAL/INSTALLATION)
4. Remove the generator drive belt with the A/C drive belt still installed and set it out of the way. (LF) (See DRIVE BELT REMOVAL/INSTALLATION [LF, L5].)
5. Remove the drive belt. (L5) (See DRIVE BELT REMOVAL/INSTALLATION [LF, L5].)
6. Remove the WU-TWC. (L5, R.H.D.) (See EXHAUST SYSTEM REMOVAL/INSTALLATION [LF, L5].)
7. Remove in the order indicated in the table.
8. Install in the reverse order of removal.
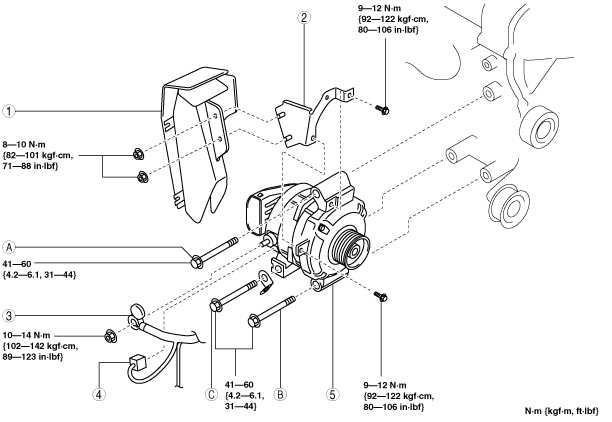
LF
am3uuw00003264
|
|
1
|
Terminal B cable
|
|
2
|
Generator connector
|
|
3
|
Generator
|
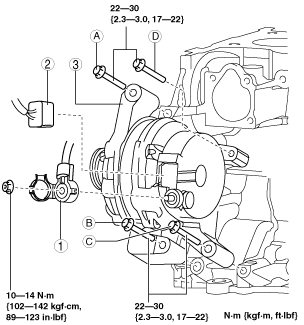
L5
am6xuw00002318
|
|
1
|
Generator duct
|
|
2
|
Generator duct bracket
|
|
3
|
Terminal B cable
|
|
4
|
Generator connector
|
|
5
|
Generator
|
Generator Duct Removal Note (L5)
1. Remove the generator duct from above the engine compartment.
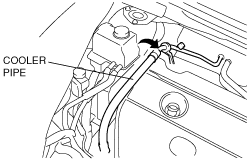
Generator Removal Note (L5, L.H.D.)
1. Set the cooler pipe out of the way. (See REFRIGERANT LINE REMOVAL/INSTALLATION.)
am3uuw00003265
|
2. Remove the generator from above the engine compartment.
am3uuw00003266
|
Generator Removal Note (L5, R.H.D.)
1. Remove the generator from below the engine compartment.
Generator Installation Note (LF)
1. Align the generator fixing hole with the engine side hole, then temporarily tighten the generator installation bolts in the order of A, B, C, and D.
2. Securely tighten the generator installation bolts in the order of A, B, C, and D.
Generator Installation Note (L5)
1. Tighten bolt A temporarily.
2. Tighten bolt B, C to the specified tightening torque.
3. Tighten bolt A to the specified tightening torque.
Generator Duct Installation Note (L5)
1. Install the generator duct to the generator duct bracket and tighten nuts temporarily.
2. Tighten nuts to the specified tightening torque.