 |
am3zzw00013315
FRONT LOWER ARM REMOVAL/INSTALLATION
id021300800600
1. Disconnect the front auto leveling sensor link lower side. (Vehicle with discharge headlight system) (See AUTO LEVELING SENSOR REMOVAL/INSTALLATION.)
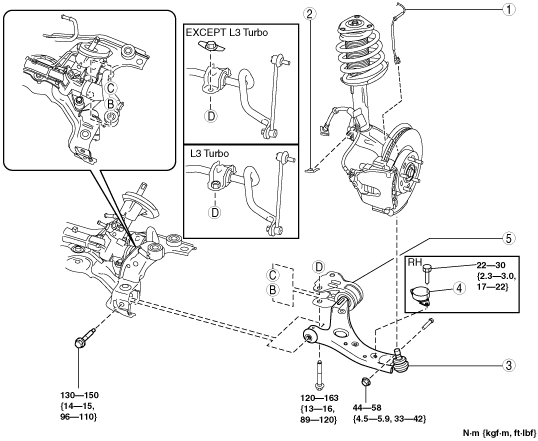
2. Remove in the order indicated in the table.
3. Install in the reverse order of removal.
4. Inspect the wheel alignment and adjust it if necessary. (See FRONT WHEEL ALIGNMENT.)
am3zzw00013315
|
|
1
|
Front ABS wheel-speed sensor wiring harness connector
|
|
2
|
Brake hose clip
|
|
3
|
Front lower arm ball joint
|
|
4
|
Dynamic damper (L3 Turbo)
|
|
5
|
Front lower arm
|
Front Lower Arm (RH) Removal Note [LF, MZR 2.0 DISI i-stop]
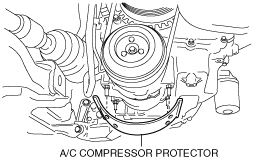
1. Remove the A/C compressor protector.
am3uuw00003224
|
2. Remove the front lower arm.
Front Lower Arm Installation Note
1. Install the front lower arm to the front crossmember and temporarily tighten the installation bolts.
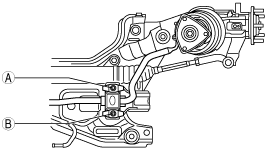
2. Completely tighten the bolts on the rear side of the front lower arm in the following order.
am3uuw00002828
|
3. Completely tighten the bolt on the front side of the front lower arm.
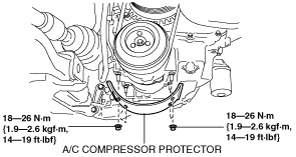
4. Install the A/C compressor protector. (Only when servicing right side of front lower arm on LF and MZR 2.0 DISI i-stop engine-equipped vehicle)
am3uuw00003225
|
Front Lower Arm Ball Joint Installation Note