 |
am3zzw00009708
CLOCK SPRING REMOVAL/INSTALLATION
id081000802000
1. Switch the ignition to off.
2. Disconnect the negative battery cable and wait for 1 min or more.
3. Remove the driver-side air bag module. (See DRIVER-SIDE AIR BAG MODULE REMOVAL/INSTALLATION.)
4. Remove the steering wheel. (See STEERING WHEEL AND COLUMN REMOVAL/INSTALLATION [WITHOUT ADVANCED KEYLESS ENTRY AND PUSH BUTTON START SYSTEM].)(See STEERING WHEEL AND COLUMN REMOVAL/INSTALLATION [WITH ADVANCED KEYLESS ENTRY AND PUSH BUTTON START SYSTEM].)
5. Remove the column cover. (See COLUMN COVER REMOVAL/INSTALLATION.)
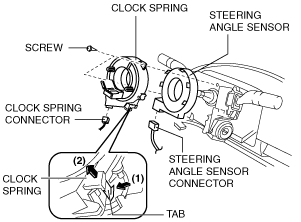
6. Remove the clock spring connector.
am3zzw00009708
|
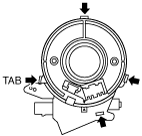
7. Remove the tab direction of the arrow shown in the figure.
8. Remove the screws.
9. Remove the clock spring.
10. Remove the steering angle sensor connector.
11. Remove the steering angle sensor. (See Steering Angle Sensor Removal Note.)
12. Install in the reverse order of removal. (See Clock Spring Installation Note.)
13. Verify that the air bag system warning light illuminates for approx. 6 s and goes out.
Clock Spring Installation Note
Steering Angle Sensor Removal Note
am3zzw00009709
|