FUEL INJECTOR INSPECTION[MZ-CD 1.6 (Y6)]
id0114c3800700
-
Note
-
Fuel Leakage Inspection
-
Warning
-
• Do not smoke or carry lighted tobacco or open flame of any type when working on or near any fuel related components. Highly flammable mixtures are always present and may ignite. Failure to follow these instructions may result in personal injury.
• This procedure involves fuel handling. Be prepared for fuel spillage at all times and always observe fuel handling precautions. Failure to follow these instructions may result in personal injury.
• Do not carry out any repairs to the fuel injection system with the engine running. The fuel pressure within the system can be as high as 1600 bar. Failure to follow this instruction may result in personal injury.
• Wait at least one minute after the engine stops before commencing any repair to the fuel injection system. Failure to follow this instruction may result in personal injury.
-
Caution
-
• Diesel fuel injection equipment is manufactured to very precise tolerances and fine clearances. It is therefore essential that absolute cleanliness is observed when working with these components. Always install blanking plugs to any open orifices or lines.
• Do not disassemble fuel injectors or clean the nozzles, even with an ultrasonic cleaner. Always install new fuel injectors when required.
• Always carry out the cleaning process before carrying out any repairs to the fuel injection system components to prevent foreign matter ingress to the components.
1. Clean the components of the engine and the fuel system.
2. Verify that the fuel pressure (M-MDS PID: FRP) has dropped to 0 kPa {0 Bar, 0 psi} and the fuel temperature (M-MDS PID: FRT) is below 30 °C {86 °F}.
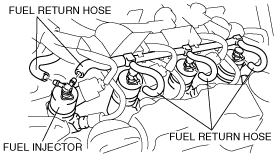
3. After disconnecting the five fuel return hoses from the fuel injectors, close off the fuel return hoses using the blanking plugs.
4. Connect the SST and the blanking plug to the fuel injectors.
5. Start the engine and allow it to idle for 1 min.
-
• The amount of fuel in the plastic hoses after 1 min, has elapsed can be used as a rough guide to indicate any discrepancies in the fuel return quantities.
• Allow the engine to idle for a further 4 min.
-
Note
-
• The measured fuel return quantities should not deviate by more than 20 % from each other.
• Any larger difference indicates a malfunction at the corresponding injector.
6. Read off the fuel return quantities using the scale on each plastic container (see example below):
-
• Container 1: 40 ml
• Container 2: 40 ml
• Container 3: 39 ml
• Container 4: 48 ml
7. The discrepancy in the fuel return quantity in container 4 indicates a malfunction at the injector of the corresponding cylinder.
-
• Inspect or replace the malfunctioning fuel injector.
Visual Inspection
1. Remove the fuel injector. (See FUEL INJECTOR REMOVAL/INSTALLATION[MZ-CD 1.6 (Y6)].)
2. Verify that there are no metal shavings on the fuel injector.
3. Visually inspect the fuel injector for the following:
-
• Damage
• Cracks
• Rusted sensor terminal
• Bent sensor terminal
-
― If there is any malfunction, replace the fuel injector.
4. Install the fuel injector. (See FUEL INJECTOR REMOVAL/INSTALLATION[MZ-CD 1.6 (Y6)].)
Resistance Inspection
1. Turn the engine switch to the LOCK position.
2. Disconnect the negative battery cable.
3. Disconnect the fuel injector connector.
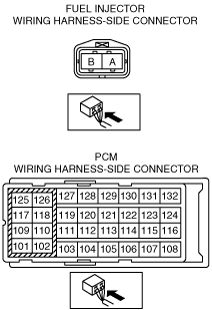
4. Inspect the resistance between fuel injector terminals A and B using a tester.
-
• If within the specification, perform the “Circuit Open/Short Inspection”.
• If not within the specification, replace the fuel injector.
-
Resistance (Reference)
-
Approx. 0.7 ohms [20 °C {68 °F}]
Circuit Open/Short Inspection
1. Disconnect the PCM connector. (See PCM REMOVAL/INSTALLATION[MZ-CD 1.6 (Y6)].)
2. Inspect the following wiring harnesses for an open or short circuit (continuity check).
-
Open circuit
-
• If there is no continuity, the circuit is open. Repair or replace the wiring harness.
-
― Fuel injector No.1 terminal A and PCM terminal 118
― Fuel injector No.2 terminal A and PCM terminal 126
― Fuel injector No.3 terminal A and PCM terminal 125
― Fuel injector No.4 terminal A and PCM terminal 117
― Fuel injector No.1 terminal B and PCM terminal 101
― Fuel injector No.2 terminal B and PCM terminal 110
― Fuel injector No.3 terminal B and PCM terminal 109
― Fuel injector No.4 terminal B and PCM terminal 102
-
Short circuit
-
• If there is continuity, the circuit is shorted. Repair or replace the wiring harness.
-
― Fuel injector No.1 terminal A and body ground
― Fuel injector No.2 terminal A and body ground
― Fuel injector No.3 terminal A and body ground
― Fuel injector No.4 terminal A and body ground
― Fuel injector No.1 terminal B and body ground
― Fuel injector No.2 terminal B and body ground
― Fuel injector No.3 terminal B and body ground
― Fuel injector No.4 terminal B and body ground
― Fuel injector No.1 terminal A and power supply
― Fuel injector No.2 terminal A and power supply
― Fuel injector No.3 terminal A and power supply
― Fuel injector No.4 terminal A and power supply
― Fuel injector No.1 terminal B and power supply
― Fuel injector No.2 terminal B and power supply
― Fuel injector No.3 terminal B and power supply
― Fuel injector No.4 terminal B and power supply