FUEL PUMP REMOVAL/INSTALLATION[MZ-CD 1.6 (Y6)]


id0114c3804100

Warning
•  Do not smoke or carry lighted tobacco or open flame of any type when working on or near any fuel related components. Highly flammable mixtures are always present and may ignite. Failure to follow these instructions may result in personal injury.
•  This procedure involves fuel handling. Be prepared for fuel spillage at all times and always observe fuel handling precautions. Failure to follow these instructions may result in personal injury.
•  Do not carry out any repairs to the fuel injection system with the engine running. The fuel pressure within the system can be as high as 1600 bar. Failure to follow this instruction may result in personal injury.
•  Wait at least one minute after the engine stops before commencing any repair to the fuel injection system. Failure to follow this instruction may result in personal injury.
Caution
•  Diesel fuel injection equipment is manufactured to very precise tolerances and fine clearances. It is therefore essential that absolute cleanliness is observed when working with these components. Always install blanking plugs to any open orifices or lines.
•  Do not disassemble fuel injectors or clean the nozzles, even with an ultrasonic cleaner. Always install new fuel injectors when required.
•  Always carry out the cleaning process before carrying out any repairs to the fuel injection system components to prevent foreign matter ingress to the components.

1.  Remove the battery cover. (See BATTERY REMOVAL/INSTALLATION[MZ-CD 1.6 (Y6)].)

2.  DIsconnect the negative battery cable.

3.  Remove the engine cover.

4.  Remove the under cover and splash shield (RH).

5.  Drain the engine coolant. (See ENGINE COOLANT REPLACEMENT[MZ-CD 1.6 (Y6)].)

6.  Remove the timing belt. (See TIMING BELT REMOVAL/INSTALLATION[MZ-CD 1.6 (Y6)].)

7.  Remove the EGR valve, EGR water cooler and pipe. (See EGR VALVE REMOVAL/INSTALLATION[MZ-CD 1.6 (Y6)].)

8.  Remove the glow plug lead stay. (See GLOW PLUG REMOVAL/INSTALLATION[MZ-CD 1.6 (Y6)].)

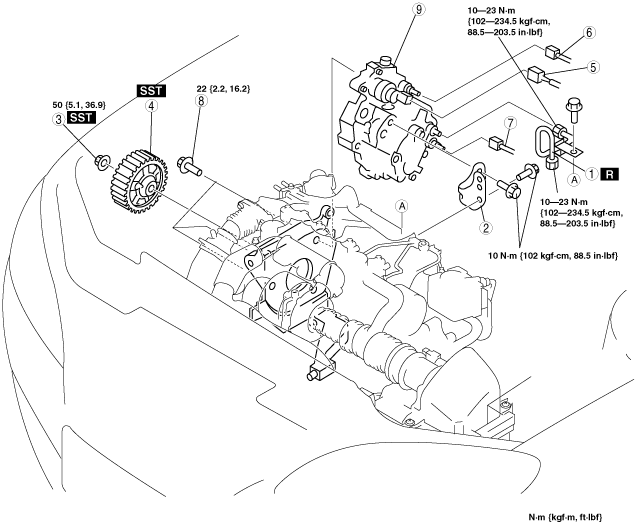
9.  Remove in the order indicated in the table.

10.  Install in the reverse order of removal.

11.  Inspect all related parts by performing “AFTER SERVICE PRECAUTION”. (See AFTER SERVICE PRECAUTION[MZ-CD 1.6 (Y6)].)

am3zzw00001485

1
High-pressure fuel pipe
2
Fuel pump support bracket
3
Fuel pump pulley nut
4
Fuel pump pulley
5
Fuel metering valve connector
6
Quick release connector (Type F)
7
Quick release connector (Type G)
8
Bolt
9
Fuel pump


High-pressure Fuel Pipe Removal Note

Caution
•  verify that the high-pressure fuel supply line remains in contact with both the fuel pump and the common rail until both unions have been detached and cleaned. Failure to follow this instruction may result in foreign matter penetration in the fuel injection system.

1.  Clean the fuel pump, fuel injection supply manifold, high-pressure fuel supply line and surrounding areas.

2.  Detach the high-pressure fuel supply line unions from the fuel pump and the common rail.

3.  Using the pneumatic vacuum gun, vacuum foreign material from the high-pressure fuel pipe, the fuel pump and the common rail.

4.  Remove the high-pressure fuel pipe.

5.  Install blanking plugs to the open threaded ports on the fuel pump and the common rail.


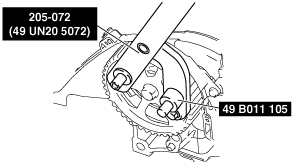
Fuel Pump Pulley Nut Removal Note

1.  Using the SST, hold the fuel pump pulley and remove the retaining nut.

am3zzw00001486


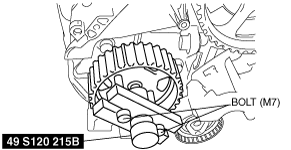
Fuel Pump Pulley Removal Note

1.  Using the SST, remove the fuel pump pulley.

am3zzw00001487


Fuel Pump Removal Note

1.  Support the fuel pump while removing the fuel pump retaining bolts.


Fuel Pump Pulley Nut Installation Note

1.  Using the SST, tighten the supply pump pulley retaining nut.

am3zzw00001486


High-pressure Fuel Pipe Installation Note

Caution
•  Remove the blanking plugs from the high-pressure fuel pipe, the fuel injector and the common rail at the last possible moment. Failure to follow this instruction may result in foreign matter penetration into the fuel injection system.
•  Do not allow the unions to hit the ends of the high-pressure fuel pipe line. Failure to follow this instruction may result in damage to the ends of the line and allow foreign material to penetrate the fuel injection system.
•  Make sure the tool used to tighten the high-pressure fuel pipe unions is used at the top of the unions as this is foreign material is most likely to penetrate. Failure to follow this instruction may result in damage to the unions.
Note
•  Maintain pressure on the high-pressure fuel pipe to keep the line in contact with the fuel injector cone and common rail while installing the unions.

1.  Using the pneumatic vacuum gun, vacuum foreign material from the area around the fuel injectors and the common rail.

2.  Remove the blanking plugs from the high-pressure fuel pipe, the fuel pump and the common rail.

3.  Install the new high-pressure fuel pipe.