|
am3zzw00003015
DRIVE PLATE REMOVAL/INSTALLATION[FN4A-EL]
id0517a1802500
1. Remove the transaxle. (See AUTOMATIC TRANSAXLE REMOVAL/INSTALLATION (ZY, Z6)[FN4A-EL].) (See AUTOMATIC TRANSAXLE REMOVAL/INSTALLATION (LF)[FN4A-EL].)
2. Remove in the order indicated in the table.
3. Install in the reverse order of removal.
am3zzw00003015
|
|
1
|
Drive plate mounting bolts
|
|
2
|
Adapter
|
|
3
|
Drive plate
|
Drive Plate Mounting Bolts Removal Note
1. Set the SST or equivalent against the drive plate.
am3zzw00003013
|
am3zzw00001261
|
2. Remove the bolts and the drive plate.
Drive Plate Installation Note
1. Clean the crankshaft thread holes before installing the new lock bolts.
2. Install the drive plate.
3. Install the adapter.
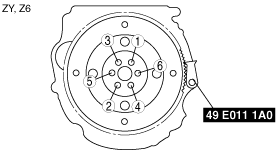
4. Set the SST or equivalent against the drive plate.
5. Tighten the drive plate mounting bolts in two or three steps in the order as shown in the figure.
am3zzw00003014
|
am3zzw00001263
|
6. Install the transaxle. (See AUTOMATIC TRANSAXLE REMOVAL/INSTALLATION (ZY, Z6)[FN4A-EL].) (See AUTOMATIC TRANSAXLE REMOVAL/INSTALLATION (LF)[FN4A-EL].)