|
am3zzw00000687
A/C COMPRESSOR REMOVAL/INSTALLATION[MZ-CD 1.6 (Y6)]
id0711b1801000
1. Disconnect the negative battery cable.
2. Discharge the refrigerant. (See REFRIGERANT CHARGING[MZ-CD 1.6 (Y6)].)
3. Remove the splash shield.
4. Remove the drive belt. (See DRIVE BELT REPLACEMENT[MZ-CD 1.6 (Y6)].)
5. Disconnect the magnetic clutch connector.
6. Remove in the order indicated in the table. Do not allow remaining compressor oil in the refrigerant line and A/C compressor to spill.
am3zzw00000687
|
|
1
|
Cooler hose (HI)
|
|
2
|
Cooler hose (LO) No.1
|
|
3
|
Magnetic clutch connector
|
|
4
|
A/C compressor
|
7. Install in the reverse order of removal.
8. Perform the refrigerant system performance test. (See REFRIGERANT SYSTEM PERFORMANCE TEST.)
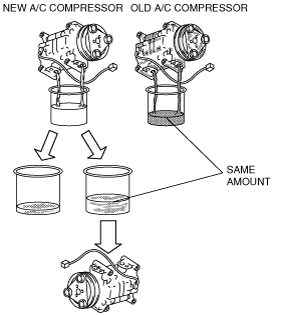
A/C Compressor Installation Note
1. Rotate new A/C compressor shaft six to eight revolutions while collecting refrigerant oil in a clean measuring device. Use this refrigerant oil to refill new compressor. Do not allow refrigerant oil to become contaminated.
2. Rotate old A/C compressor shaft six to eight revolutions while collecting refrigerant oil in a separate, clean measuring device.
3. Compare those oil amounts. The amount of the oil drained from the new A/C compressor should be greater than the old one.
4. Pour the same amount oil of drained from the old A/C compressor back into the new A/C compressor.
am3zzw00000688
|