PISTON INSPECTION
id011000502100
-
Caution
-
• If the piston is replaced, replace the piston, piston pin, and the snap ring as a single component.
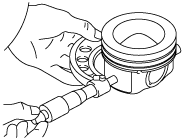
1. Measure the piston outer diameter using the micrometer. Perform the inspection at the following location.
-
• Vehicles with IDEVA:
10.4 mm {0.409 in} from the lower end of the piston (area with no coating on piston skirt)
Vehicles without IDEVA: 14.828 mm {0.584 in} from the lower end of the piston (area with no coating on piston skirt)
-
― If it is not within the specification, replace the piston.
-
Standard piston outer diameter
-
85.958—85.984 mm {3.3842—3.3851 in}
2. Measure the cylinder bore diameter. (See CYLINDER BLOCK INSPECTION.)
3. Calculate the cylinder-to-piston clearance from the cylinder bore diameter and the piston outer diameter.
-
• If the clearance exceeds the maximum specification, replace the piston or cylinder block.
-
Standard clearance between piston and cylinder
-
0.031—0.049 mm {0.0013—0.0019 in}
-
Maximum clearance between piston and cylinder
-
0.067 mm {0.0026 in}
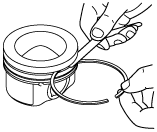
4. Measure the piston-to-ring groove clearance along the perimeter using a feeler gauge. For the O-ring, measure the clearance with the O-ring assembled to the piston.
-
• If the clearance exceeds the maximum specification, replace the piston or piston ring.
-
Standard clearance between piston ring and ring groove [Vehicles with IDEVA]
-
Top: 0.07—0.11 mm {0.003—0.004 in}
Second: 0.05—0.09 mm {0.002—0.003 in}
Oil: 0.03—0.07 mm {0.0012—0.0027 in}
-
Standard clearance between piston ring and ring groove [Vehicles without IDEVA]
-
Top: 0.10—0.14 mm {0.0040—0.0055 in}
Second: 0.05—0.09 mm {0.002—0.003 in}
Oil: 0.03—0.07 mm {0.0012—0.0027 in}
-
Maximum clearance between piston ring and ring groove [Vehicles with IDEVA]
-
Top: 0.16 mm {0.0063 in}
Second: 0.12 mm {0.0047 in}
Oil: 0.11 mm {0.0043 in}
-
Maximum clearance between piston ring and ring groove [Vehicles without IDEVA]
-
Top: 0.16 mm {0.0063 in}
Second: 0.12 mm {0.0047 in}
Oil: 0.11 mm {0.0043 in}
 bes2ze00000027