 |
aaxjjw00020371
AUTO LEVELING CONTROL MODULE REMOVAL/INSTALLATION
id091800805500
1. Disconnect the negative battery cable. (See NEGATIVE BATTERY CABLE DISCONNECTION/CONNECTION [SKYACTIV-G 1.5, SKYACTIV-G 2.0, SKYACTIV-G 2.5].) (See NEGATIVE BATTERY CABLE DISCONNECTION/CONNECTION [SKYACTIV-D 1.5].) (See NEGATIVE BATTERY CABLE DISCONNECTION/CONNECTION [SKYACTIV-D 2.2].) (See NEGATIVE BATTERY CABLE DISCONNECTION/CONNECTION [MZR 1.6].)
2. Remove the front scuff plate (LH). (See FRONT SCUFF PLATE REMOVAL/INSTALLATION.)
3. Remove the front side trim (LH). (See FRONT SIDE TRIM REMOVAL/INSTALLATION.)
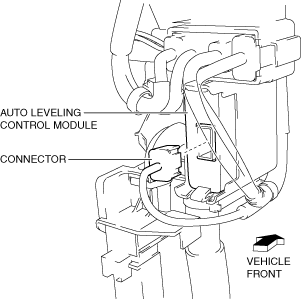
4. Disconnect the connector.
aaxjjw00020371
|
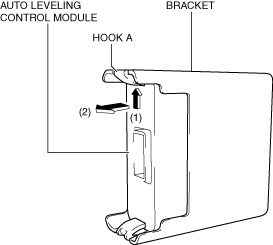
5. While pressing hook A of the bracket in the direction of arrow (1) shown in the figure, pull the auto leveling control module in the direction of arrow (2) to detach hook A of the bracket from the auto leveling control module.
aaxjjw00020372
|
6. While pressing hook B of the bracket in the direction of arrow (1) shown in the figure, pull the auto leveling control module in the direction of arrow (2) to detach hook B of the bracket from the auto leveling control module.
aaxjjw00020373
|
7. Remove the auto leveling control module.
8. Install in the reverse order of removal.
9. Perform the auto leveling control module automatic configuration using the following procedure.
10. Using the M-MDS, verify that DTCs U2300:54, U2300:55, or U2300:56 is not displayed.
11. If the auto leveling control module is replaced with a new one, perform the headlight auto leveling system initialization. (See HEADLIGHT AUTO LEVELING SYSTEM INITIALIZATION.)