VARIABLE VALVE TIMING ACTUATOR INSPECTION [MZR 1.5, MZR 1.6]


id0110s1801200

Caution
•  The variable valve timing actuator cannot be disassembled since it is a precision unit.

1.  Remove the battery cover. (See BATTERY REMOVAL/INSTALLATION [MZR 1.5, MZR 1.6].)

2.  Disconnect the negative battery cable. (See BATTERY REMOVAL/INSTALLATION [MZR 1.5, MZR 1.6].)

3.  Perform the following procedure.

Without set bolt
1.  Remove the fresh-air duct and the air cleaner as a single unit. (See INTAKE-AIR SYSTEM REMOVAL/INSTALLATION [MZR 1.5, MZR 1.6].)
With set bolt
1.  Set the air cleaner cover out of the way. (See INTAKE-AIR SYSTEM REMOVAL/INSTALLATION [MZR 1.5, MZR 1.6].)
2.  Remove the fresh-air duct and the air cleaner case as a single unit. (See INTAKE-AIR SYSTEM REMOVAL/INSTALLATION [MZR 1.5, MZR 1.6].)

4.  Remove the ignition coils. (See IGNITION COIL REMOVAL/INSTALLATION [MZR 1.5, MZR 1.6].)

5.  Set the wiring harness out of the way.

6.  Remove the cylinder head cover. (See TIMING CHAIN REMOVAL/INSTALLATION [MZR 1.5, MZR 1.6].)

7.  Remove the splash shield (RH). (See SPLASH SHIELD REMOVAL/INSTALLATION.)

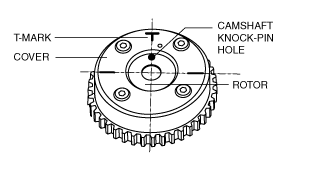
8.  Verify that the camshaft knock pin hole of the variable valve timing actuator and the T- mark of the cover are aligned and fixed as shown in the figure.

am3zzw00006265

•  If the camshaft knock pin hole and the T-mark of the cover do not align, rotate the crankshaft two times in the direction the engine rotates, and then verify that they are aligned.
―  If it does not align, replace the variable valve timing actuator.
•  If under any condition the variable valve timing actuator makes a hitting noise directly after the camshaft exceeds maximum lift while rotating the crankshaft two times in the direction of engine rotation, replace the variable valve timing actuator as it has not been fixed.

9.  Install in the reverse order of removal.