 |
am6zzw00000654
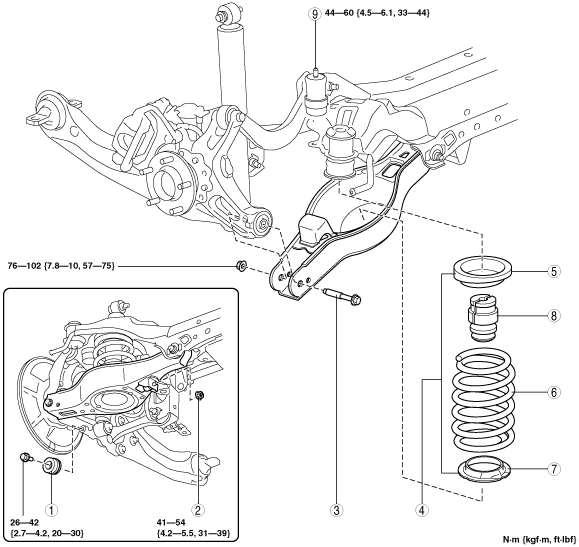
REAR COIL SPRING REMOVAL/INSTALLATION
id021400800700
1. When working on the right side of the vehicle, disconnect the rear auto leveling sensor link. (Vehicle with discharge headlight system) (See AUTO LEVELING SENSOR REMOVAL/INSTALLATION.)
2. Remove in the order indicated in the table.
3. Install in the reverse order of removal.
4. Inspect the rear wheel alignment. (See REAR WHEEL ALIGNMENT.)
am6zzw00000654
|
|
1
|
Dynamic damper (if equipped)
|
|
2
|
Rear stabilizer control link lower side nut
|
|
3
|
Rear lower arm outer side bolt
|
|
4
|
Rear coil spring component
|
|
5
|
Upper spring seat rubber
|
|
6
|
Rear coil spring
|
|
7
|
Lower spring seat
|
|
8
|
Bound stopper
|
|
9
|
Bound stopper (body side)
|
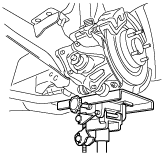
Rear Lower Arm Outer Side Bolt Removal Note
1. Support the lower arm with a jack.
am6zzw00002618
|
2. Loosen the inner bolt of the lower arm.
3. Remove the outer bolt of the lower arm.
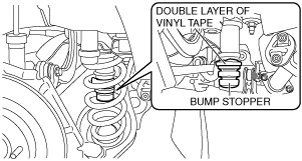
Rear Coil Spring Removal Note
1. Affix a double layer of vinyl tape to bump stopper installation area.
am6zzw00003639
|
2. Lower the jack slowly and remove the rear coil spring.
Rear Coil Spring Installation Note
1. Affix a double layer of vinyl tape to bump stopper installation area.
am6zzw00003639
|
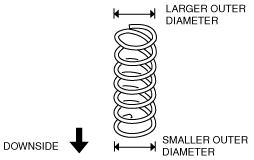
2. Install the coil spring so that the smaller outer diameter faces downside.
am6zzw00000656
|
3. Position the jack under the lower arm and jack up slowly.
4. Install the lower arm (outer side) bolt.