|
am6zzw00001482
RECEIVER/DRIER REMOVAL/INSTALLATION
id071100801400
1. Disconnect the negative battery cable.
2. Drain the refrigerant. (See REFRIGERANT CHARGING.)
3. Remove the front bumper. (See FRONT BUMPER REMOVAL/INSTALLATION.)
4. Remove in the order indicated in the table. Do not allow compressor oil to spill.
am6zzw00001482
|
|
1
|
Bolt
|
|
2
|
Nut
|
|
3
|
Receiver/drier
(See Receiver/Drier Removal Note.)
|
|
4
|
Bracket
|
5. Install in the reverse order of removal. (See Receiver/Drier Installation Note (2).)
6. Perform the refrigerant system performance test. (See REFRIGERANT SYSTEM PERFORMANCE TEST.)
Receiver/Drier Removal Note
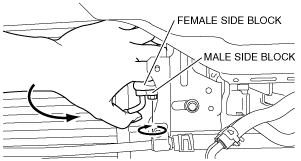
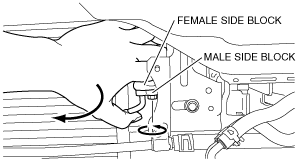
1. Disconnect the block joint type pipes by grasping female side of the block with hand holding firmly, then loosen the connection bolt.
acxuuw00000789
|
Receiver/Drier Installation Note (1)
1. Tighten the bolt of joint by hand.
am6zzw00002728
|
2. Tighten the joint to the specified torque.
Receiver/Drier Installation Note (2)
1. When installing a new receiver/drier, add a supplemental amount of compressor oil into the refrigeration cycle.