 |
ac5wzw00009871
STARTER REMOVAL/INSTALLATION [SKYACTIV-D 2.2]
id0119h8800200
Operation After Replacing Starter
|
Step |
Action |
|---|---|
|
1
|
Switch the ignition ON (engine off).
|
|
2
|
Apply the parking brake firmly.
|
|
3
|
Shift the selector lever to the N position. (ATX)
Shift the shift lever to the neutral position. (MTX)
|
|
4
|
Depress and release the accelerator pedal 12 times with the brake pedal depressed.
|
|
5
|
Long-press the i-stop OFF switch (for 5 s or more).
|
|
6
|
Switch the ignition off.
|
|
7
|
Start the engine.
|
|
8
|
Verify that the i-stop warning light (amber) turns off.
• If the light does not turn off, switch the ignition off and repeat the procedure from Step 1.
|
|
9
|
Switch the ignition off and disconnect the negative battery terminal. (See NEGATIVE BATTERY TERMINAL DISCONNECTION/CONNECTION.)
|
|
10
|
Verifying battery condition initialization setting (i-stop setting). (See BATTERY CONDITION INITIALIZATION SETTING (i-stop SETTING).)
|
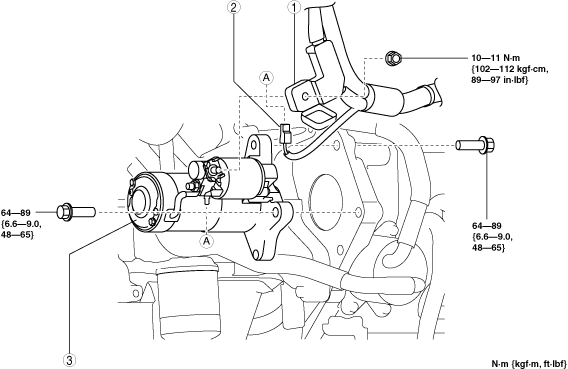
Starter Removal/Installation
1. Disconnect the negative battery terminal. (See NEGATIVE BATTERY TERMINAL DISCONNECTION/CONNECTION.)
2. Remove the air cleaner component. (See INTAKE-AIR SYSTEM REMOVAL/INSTALLATION [SKYACTIV-D 2.2].)
3. Remove the front under cover No.1 and No.2. (See FRONT UNDER COVER No.1 REMOVAL/INSTALLATION.) (See FRONT UNDER COVER No.2 REMOVAL/INSTALLATION.)
4. Disconnect the charge air cooler outlet hose from the intake shutter valve, and set the hose out of the way. (See INTAKE-AIR SYSTEM REMOVAL/INSTALLATION [SKYACTIV-D 2.2].)
5. Remove in the order indicated in the table.
6. Install in the reverse order of removal.
ac5wzw00009871
|
|
1
|
Terminal B cable
|
|
2
|
Terminal S connector
|
|
3
|
Starter
(See Starter removal note.)
(See Starter installation note.)
|
Starter removal note
1. Remove the starter upper bolt from above the engine compartment.
2. Remove the ATF oil cooler water hose bracket installation bolt shown in the figure, and set the water hose out of the way.
ac5wzw00006732
|
3. Remove the two starter lower bolts and the starter from below the engine compartment.
Starter installation note
am6zzw00012310
|

