 |
am6zzw00015963
EXPANSION VALVE REMOVAL/INSTALLATION
id071100800400
Replacement Part
|
O-ring (cooler hose (LO))
Quantity: 1
Location of use: A/C unit
|
O-ring (cooler pipe)
Quantity: 1
Location of use: A/C unit
|
O-ring (expansion valve)
Quantity: 2
Location of use: expansion valve
|
L.H.D.
SKYACTIV-G 2.0, SKYACTIV-G 2.5
1. Disconnect the negative battery terminal. (See NEGATIVE BATTERY TERMINAL DISCONNECTION/CONNECTION.)
2. Discharge the refrigerant. (See REFRIGERANT RECOVERY.) (See REFRIGERANT CHARGING.)
3. Remove the plug hole plate. (See PLUG HOLE PLATE REMOVAL/INSTALLATION [SKYACTIV-G 2.5 (WITH CYLINDER DEACTIVATION)].) (See PLUG HOLE PLATE REMOVAL/INSTALLATION [SKYACTIV-G 2.0, SKYACTIV-G 2.5 (WITHOUT CYLINDER DEACTIVATION)].)
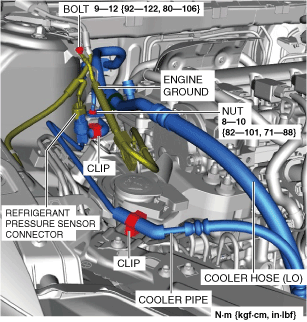
4. Disconnect the refrigerant pressure sensor connector.
am6zzw00015963
|
5. Remove the bolt.
6. Disconnect the engine ground.
7. Remove the nut.
8. Remove the clips.
9. Remove the bolt.
ac5uuw00004633
|
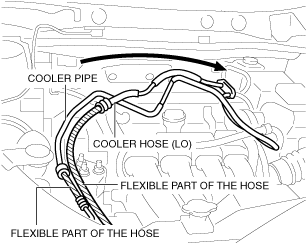
10. Disconnect the cooler hose (LO) and cooler pipe. Do not allow compressor oil to spill.
11. Set the cooler hose (LO) and cooler pipe aside as shown in the figure while being careful not to let remaining oil in the pipes to spill.
ac5uuw00007075
|
12. Remove the bolts.
ac5uuw00007076
|
13. Remove the expansion valve. Do not allow compressor oil to spill.
14. Install in the reverse order of removal.
15. Perform the refrigerant system performance test. (See REFRIGERANT SYSTEM PERFORMANCE TEST.)
SKYACTIV-G 2.5T, SKYACTIV-D 2.2
1. Disconnect the negative battery terminal. (See NEGATIVE BATTERY TERMINAL DISCONNECTION/CONNECTION.)
2. Discharge the refrigerant. (See REFRIGERANT RECOVERY.) (See REFRIGERANT CHARGING.)
3. Remove the plug hole plate. (SKYACTIV-G 2.5T) (See PLUG HOLE PLATE REMOVAL/INSTALLATION [SKYACTIV-G 2.5T].)
4. Remove the engine cover. (SKYACTIV-D 2.2) (See ENGINE COVER REMOVAL/INSTALLATION [SKYACTIV-D 2.2].)
5. Remove the washer tank bracket. (See WASHER TANK REMOVAL/INSTALLATION.)
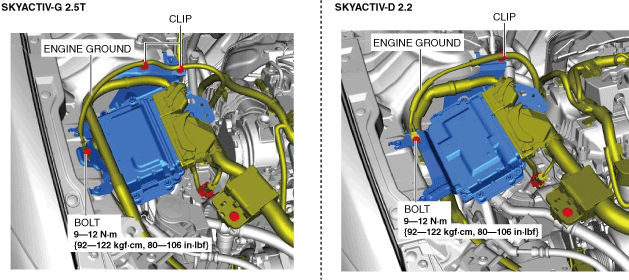
6. Detach the clips.
am6zzw00015964
|
7. Remove the bolt.
8. Disconnect the engine ground.
9. Disconnect the connector.
am6zzw00015965
|
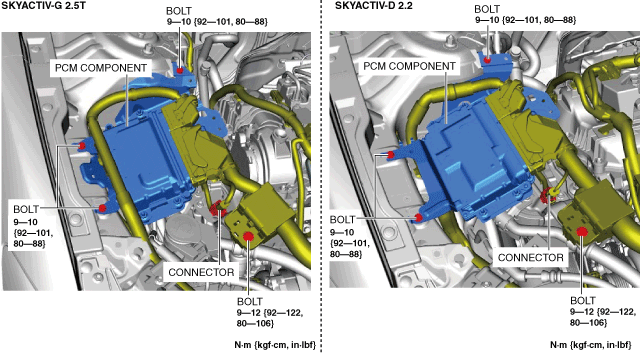
10. Remove the bolts.
11. Set the PCM component out of the way.
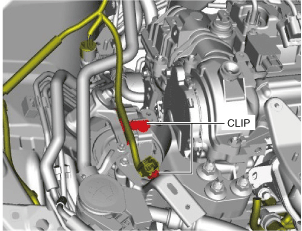
12. Detach the clips.
am6zzw00015966
|
13. Disconnect the refrigerant pressure sensor connector.
am6zzw00015967
|
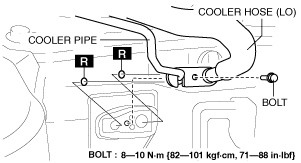
14. Remove the clips.
15. Remove the nut.
16. Remove the bolt.
ac5uuw00008494
|
17. Disconnect the cooler hose (LO) and cooler pipe. Do not allow compressor oil to spill.
18. Set the cooler hose (LO) and cooler pipe aside as shown in the figure while being careful not to let remaining oil in the pipes to spill.
ac5uuw00008495
|
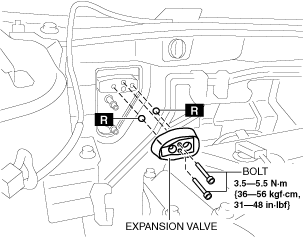
19. Remove the bolts.
ac5uuw00008496
|
20. Remove the expansion valve. Do not allow compressor oil to spill.
21. Install in the reverse order of removal.
22. Perform the refrigerant system performance test. (See REFRIGERANT SYSTEM PERFORMANCE TEST.)
R.H.D.
1. Disconnect the negative battery terminal. (See NEGATIVE BATTERY TERMINAL DISCONNECTION/CONNECTION.)
2. Discharge the refrigerant. (See REFRIGERANT RECOVERY.) (See REFRIGERANT CHARGING.)
3. Remove the plug hole plate. (SKYACTIV-G 2.0, SKYACTIV-G 2.5, SKYACTIV-G 2.5T) (See PLUG HOLE PLATE REMOVAL/INSTALLATION [SKYACTIV-G 2.5 (WITH CYLINDER DEACTIVATION)].) (See PLUG HOLE PLATE REMOVAL/INSTALLATION [SKYACTIV-G 2.0, SKYACTIV-G 2.5 (WITHOUT CYLINDER DEACTIVATION)].) (See PLUG HOLE PLATE REMOVAL/INSTALLATION [SKYACTIV-G 2.5T].)
4. Remove the engine cover. (SKYACTIV-D 2.2) (See ENGINE COVER REMOVAL/INSTALLATION [SKYACTIV-D 2.2].)
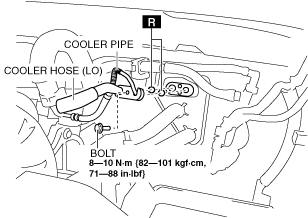
5. Remove the bolt and disconnect the cooler hose (LO) and cooler pipe. Do not allow compressor oil to spill.
am6zzw00015968
|
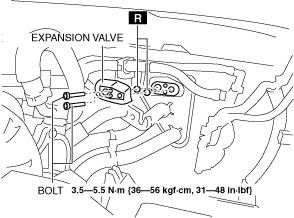
6. Remove the bolt.
am6zzw00015969
|
7. Remove the expansion valve. Do not allow compressor oil to spill.
8. Install in the reverse order of removal.
9. Perform the refrigerant system performance test. (See REFRIGERANT SYSTEM PERFORMANCE TEST.)