 |
am6zzw00018350
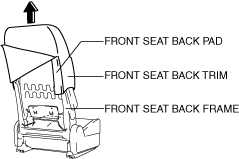
FRONT SEAT BACK TRIM REMOVAL/INSTALLATION
id091300912000
Replacement Part
|
Band
Quantity:3
Location of use:Front seat back frame
|
Band
Quantity:1
Location of use:Wiring harness
|
Front seat back decoration plate
Quantity:1
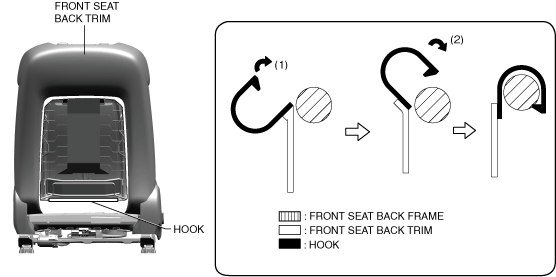
Location of use:Front seat back trim
|
Removal
With front seat back decoration plate
1. Switch the ignition off (LOCK).
2. Disconnect the negative battery terminal and wait for 1 min or more. (See NEGATIVE BATTERY TERMINAL DISCONNECTION/CONNECTION.)
3. Remove the headrest.
4. Remove the front seat. (See FRONT SEAT REMOVAL/INSTALLATION.)
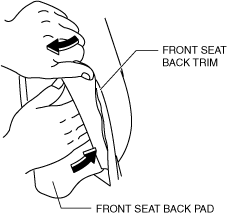
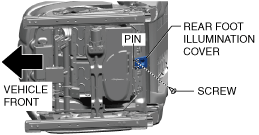
5. Remove the screw.
am6zzw00018350
|
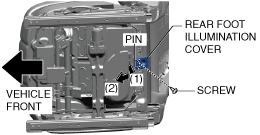
6. Move the rear foot illumination cover in the order of arrows (1) and (2) shown in the figure and remove the pin.
7. Remove the rear foot illumination cover.
8. Disconnect the rear foot illumination connector.
am6zzw00018351
|
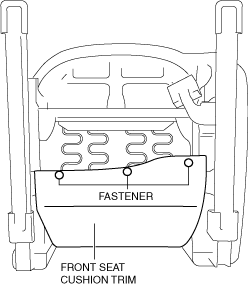
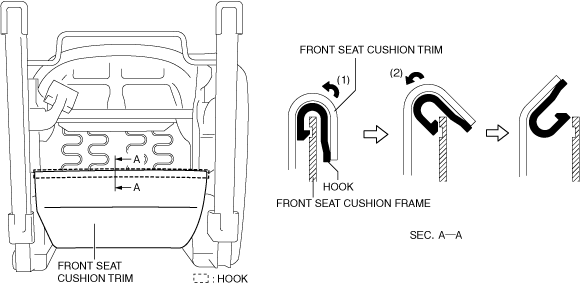
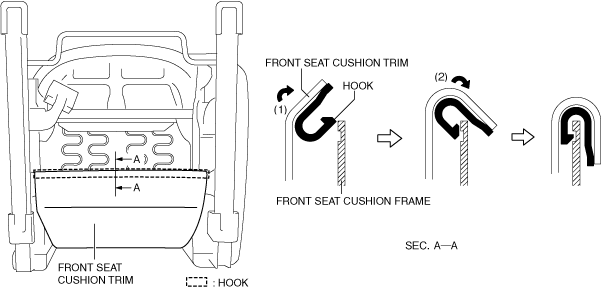
9. Remove the fasteners and set the front seat cushion trim away from the front seat cushion frame.
am6zzw00018365
|
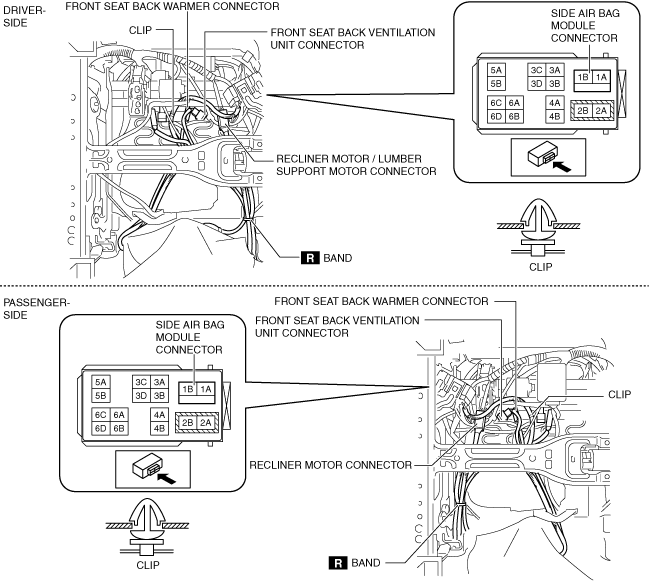
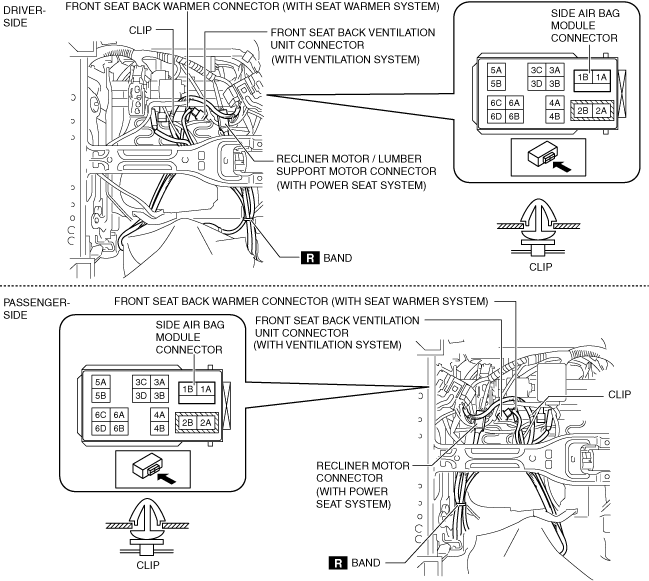
10. Disconnect the connectors shown in the figure.
am6xuw00013152
|
11. Detach the clip.
12. Cut the band.
13. Move the remover tool in the direction of the arrow shown in the figure, and remove the clips from the front seat back frame.
am6zzw00018354
|
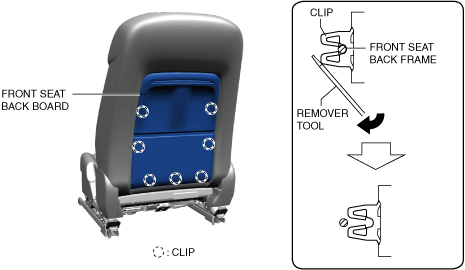
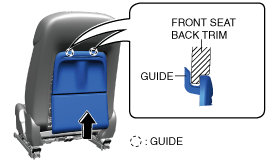
14. Move the front seat back board in the direction of the arrow shown in the figure to release the guides, and remove the front seat back board from the front seat back trim.
am6zzw00018355
|
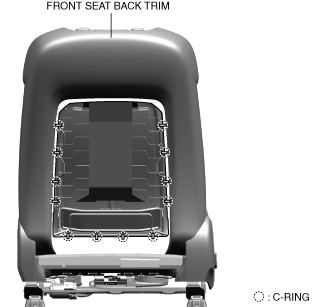
15. Remove the C-rings.
am6zzw00018356
|
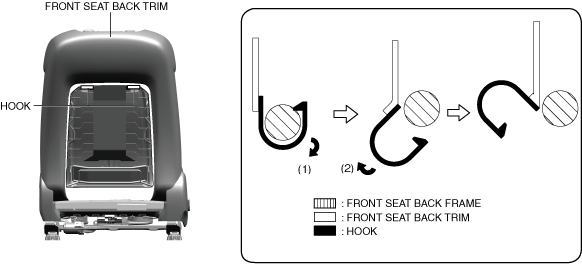
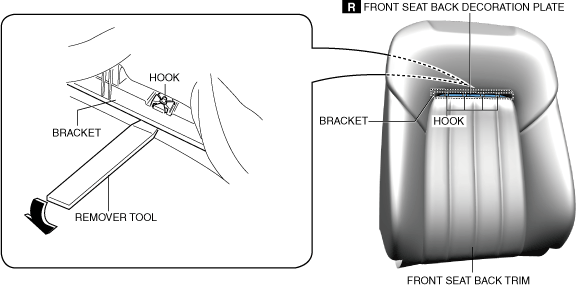
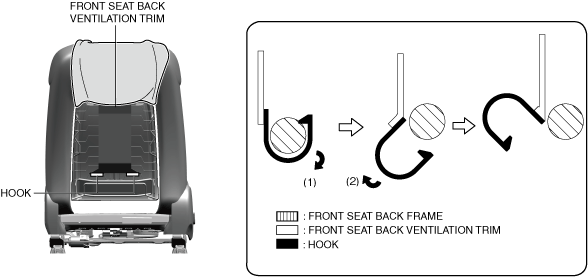
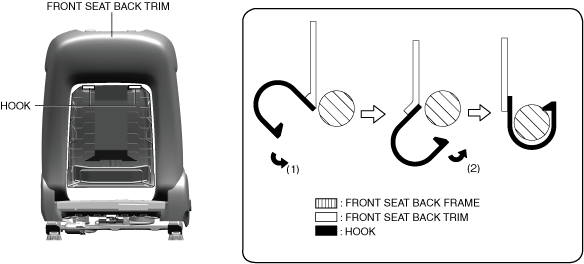
16. Move the hook in the order of arrows (1) and (2) shown in the figure and remove the front seat back trim hooks from the front seat back frame.
am6zzw00018357
|
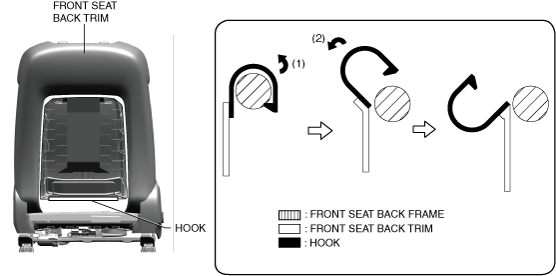
17. Move the hook in the order of arrows (1) and (2) shown in the figure and remove the front seat back trim hooks from the front seat back frame.
am6zzw00018358
|
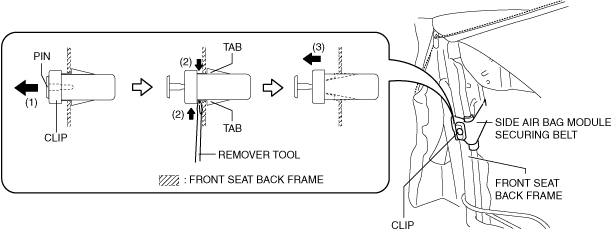
18. Pull out the pin in the direction of arrow (1) shown in the figure.
ac5wzw00007023
|
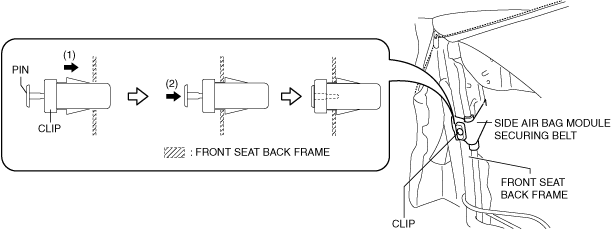
19. Move the remover tool in the direction of arrows (2) shown in the figure, pull the clip in the direction of arrow (3) with the tabs pressed, and remove the side air bag module securing belt from the front seat back frame.
20. Cut the bands.
am6xuw00013157
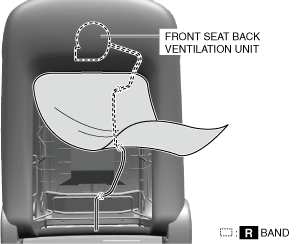
|
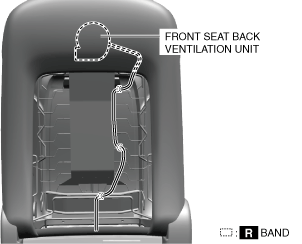
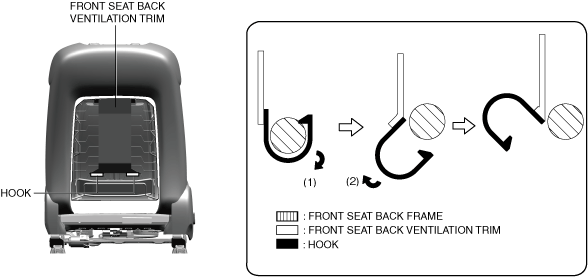
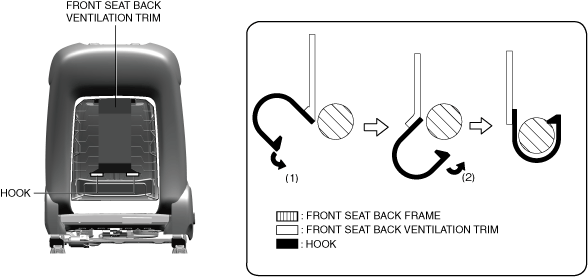
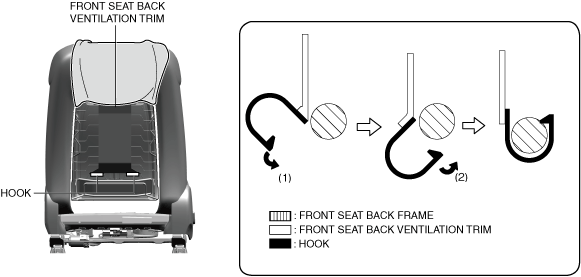
21. Move the hook in the order of arrows (1) and (2) shown in the figure and remove the front seat back ventilation trim hooks from the front seat back frame.
am6zzw00018360
|
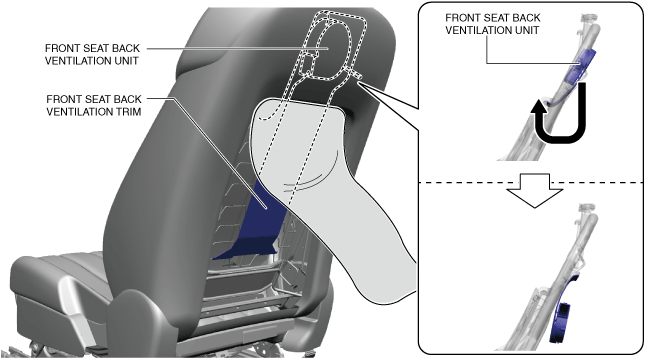
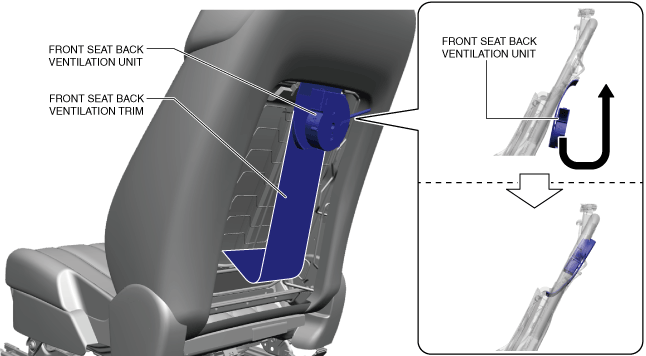
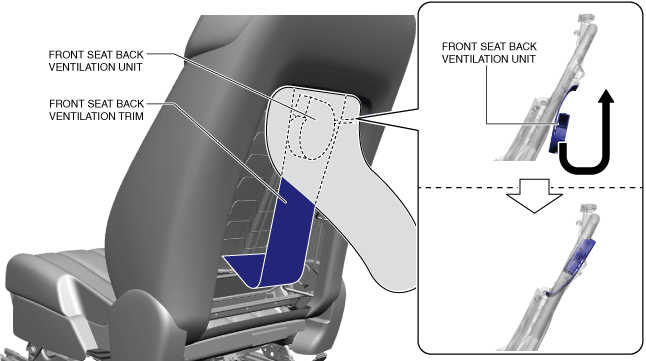
22. Move the front seat ventilation unit in the direction of the arrow shown in the figure.
am6xuw00013158
|
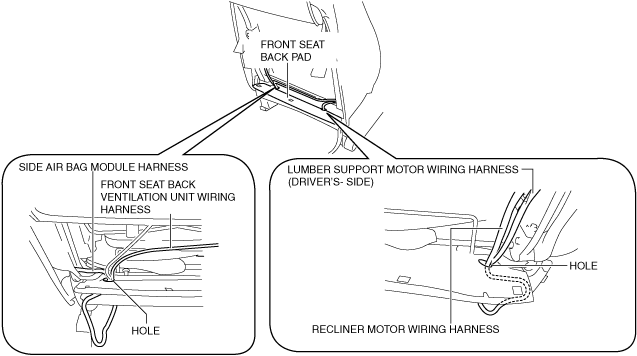
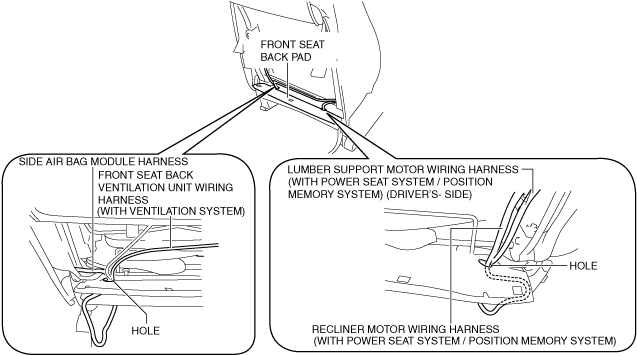
23. Pull the wiring harnesses shown in the figure out through the holes in the front seat back pad.
am6xuw00013153
|
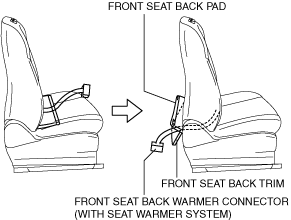
24. Pull out the front seat back pad, and the front seat back trim and front seat back warmer wiring harness toward the front of the front seat.
am6xuw00013160
|
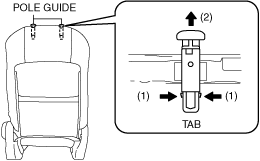
25. While pressing the tabs in the direction of arrows (1) shown in the figure, pull the pole guides in the direction of arrow (2) and remove the pole guides from the front seat back frame.
am6xuw00013161
|
26. Lift up the front seat back trim and front seat back pad in the direction of the arrow as a single unit and remove it from the front seat back frame.
am6zzw00012410
|
27. Insert the remover tool into the positions shown in the figure.
am6zzw00018362
|
28. Move the remover tool in the direction of the arrow shown in the figure and remove the bracket from the front seat back pad frame.
29. Remove the C-rings.
am6xuw00013149
|
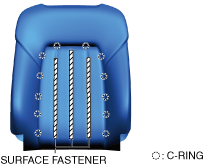
30. Unfasten the surface fasteners, then remove the front seat back trim from the front seat back pad.
31. When replacing the front seat back decoration plate, perform the following procedure.
am6zzw00018364
|
Without front seat back decoration plate
1. Switch the ignition off (LOCK).
2. Disconnect the negative battery terminal and wait for 1 min or more. (See NEGATIVE BATTERY TERMINAL DISCONNECTION/CONNECTION.)
3. Remove the headrest.
4. Remove the front seat. (See FRONT SEAT REMOVAL/INSTALLATION.)
5. Remove the fasteners and set the front seat cushion trim away from the front seat cushion frame. (With power seat system)
am6zzw00018365
|
6. Move the hook in the order of arrows (1) and (2) shown in the figure and set the front seat cushion trim away from the front seat cushion frame. (Without power seat system)
am6zzw00018352
|
7. Disconnect the connectors shown in the figure.
am6xuw00013171
|
8. Detach the clip.
9. Cut the band.
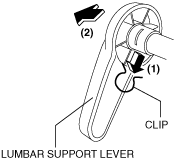
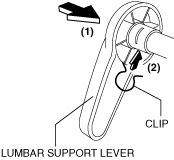
10. Remove the clip in the direction of the arrow (1) shown in the figure and remove the lumbar support lever in the direction of the arrow (2). (With manual lumbar support lever)
aatjjw00010345
|
11. Move hook A in the order of arrows (1) and (2) shown in the figure and detach it from hook B.
am6zzw00012535
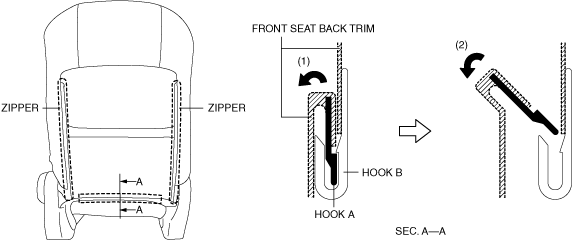
|
12. Unzip the zippers.
13. Remove the hooks.
am6xuw00009799
|
14. Remove the C-rings.
am6zzw00014527
|
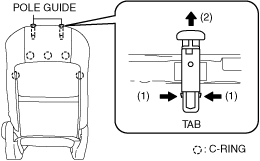
15. While pressing the tabs in the direction of arrows (1) shown in the figure, pull the pole guides in the direction of arrow (2) and remove the pole guides from the front seat back frame.
16. Pull out the pin in the direction of arrow (1) shown in the figure.
ac5wzw00007023
|
17. Move the remover tool in the direction of arrows (2) shown in the figure, pull the clip in the direction of arrow (3) with the tabs pressed, and remove the side air bag module securing belt from the front seat back frame.
18. For vehicles with seat ventilation system, perform the following procedure.
am6xuw00013177
|
am6zzw00015460
|
am6xuw00013176
|
19. Pull the wiring harnesses shown in the figure out through the holes in the front seat back pad.
am6xuw00013154
|
20. Pull out the front seat back pad, and the front seat back trim and front seat back warmer wiring harness (with seat warmer system) toward the front of the front seat.
am6zzw00012409
|
21. Lift up the front seat back trim and front seat back pad in the direction of the arrow as a single unit and remove it from the front seat back frame.
am6zzw00012410
|
22. Remove the C-rings.
am6zzw00018367
|
23. Unfasten the surface fasteners, then remove the front seat back trim from the front seat back pad.
Installation
With front seat back decoration plate
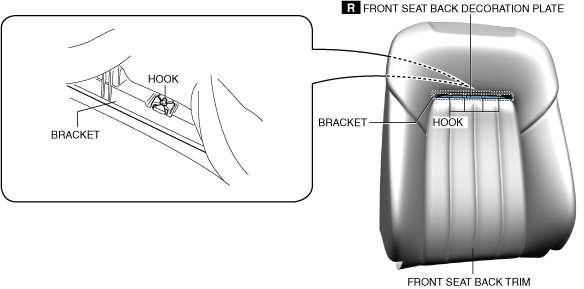
1. If the front seat back decoration plate was replaced, insert the front seat back decoration plate into the hook positions shown in the figure and install it to the bracket.
am6zzw00018368
|
2. Align the surface fasteners to the front seat back pad installation positions, and then fasten the surface fasteners by pressing them from the surface of the front seat back.
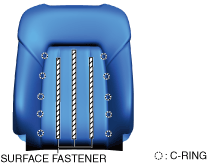
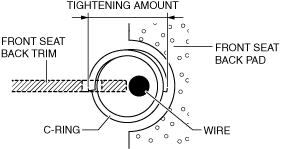
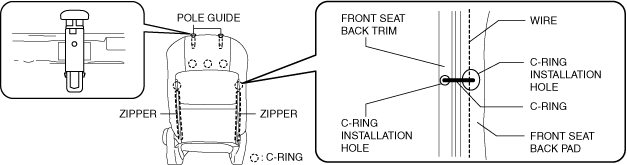
3. Align the C-ring installation holes of the front seat back trim with the C-ring installation holes of the front seat back pad and install the C-rings to the positions shown in the figure.
am6xuw00013150
|
am3zzw00036681
|
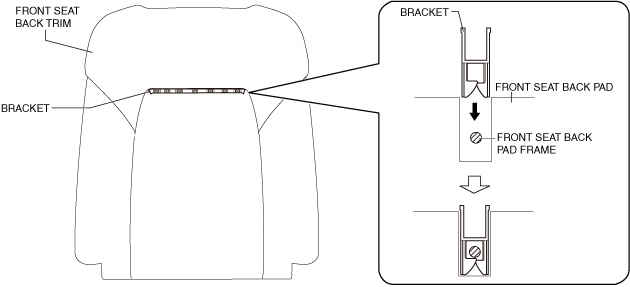
4. Press the bracket in the direction of the arrow shown in the figure and install the bracket to the frame.
am6zzw00018382
|
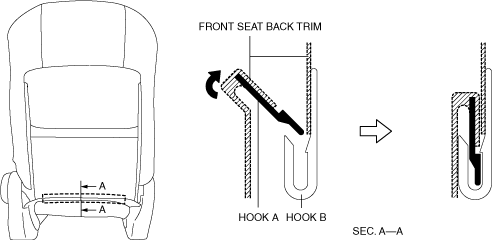
5. Press the front seat back pad inward while pulling the front seat back trim outward.
ac5wzw00007033
|
6. Align the front seat back trim with the shape of the front seat back pad while pressing the front seat back pad outward.
am6zzw00018473
|
7. Install the front seat back trim and the front seat back pad as a single unit to the front seat back frame.
ac5wzw00007034
|
8. Pull out the front seat back pad, front seat back trim, and front seat back warmer wiring harness rearward of the front seat.
am6xuw00013162
|
9. Pass the wiring harnesses shown in the figure through the holes in the front seat back pad.
am6xuw00013153
|
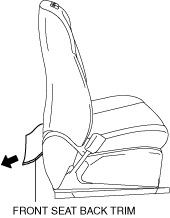
10. Pull the front seat back trim in the direction of the arrow shown in the figure and remove the wrinkles on the front seat back trim.
ac5wzw00007040
|
11. Move the front seat ventilation unit in the direction of the arrow shown in the figure.
am6xuw00013159
|
12. Move the hook in the order of arrows (1) and (2) shown in the figure and attach the front seat back ventilation trim hooks to the front seat back frame.
am6zzw00018386
|
13. Install the bands to the positions shown in the figure.
am6xuw00013157
|
14. Move the clip in the direction of arrow (1) shown in the figure and install the side air bag module securing belt to the front seat back frame.
am6zzw00014528
|
15. Press the pin in the direction of arrow (2) shown in the figure.
16. Move the hook in the order of arrows (1) and (2) shown in the figure and attach the front seat back trim hooks to the front seat back frame.
am6zzw00018387
|
17. Move the hook in the order of arrows (1) and (2) shown in the figure and attach the front seat back trim hooks to the front seat back frame.
am6zzw00018388
|
18. Align the C-ring installation holes of the front seat back trim and the front seat back frame, and install the C-rings.
am6zzw00018356
|
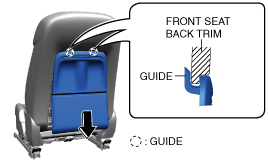
19. Move the front seat back board in the direction of the arrow shown in the figure and engage the guides to the front seat back trim.
am6zzw00018389
|
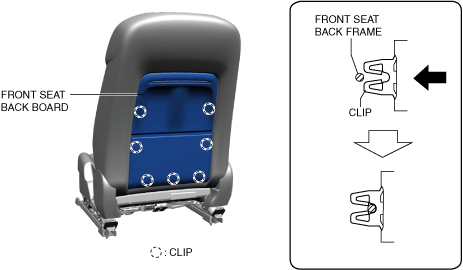
20. Press the front seat back board at the clip installation positions shown in the figure and install the clips to the front seat back frame.
am6zzw00018390
|
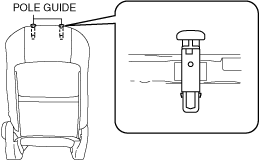
21. Install the pole guides to the front seat back frame.
am6xuw00013163
|
22. Connect the connectors shown in the figure.
am6xuw00013152
|
23. Install the clip.
24. Install the band.
25. Install the fasteners and install the front seat cushion trim to the front seat cushion frame.
am6zzw00018365
|
26. Connect the rear foot illumination connector.
am6zzw00018351
|
27. Install the rear foot illumination cover while aligning it with the pin position.
am6zzw00018391
|
28. Install the screw.
29. Install the front seat. (See FRONT SEAT REMOVAL/INSTALLATION.)
30. Install the headrest.
31. Connect the negative battery terminal. (See NEGATIVE BATTERY TERMINAL DISCONNECTION/CONNECTION.)
Without front seat back decoration plate
1. Align the surface fasteners to the front seat back pad installation positions, and then fasten the surface fasteners by pressing them from the surface of the front seat back.
2. Align the C-ring installation holes of the front seat back trim with the C-ring installation holes of the front seat back pad and install the C-rings to the positions shown in the figure.
am6zzw00018392
|
am3zzw00036681
|
3. Press the front seat back pad inward while pulling the front seat back trim outward.
ac5wzw00007033
|
4. Align the front seat back trim with the shape of the front seat back pad while pressing the front seat back pad outward.
am6zzw00018473
|
5. Install the front seat back trim and the front seat back pad as a single unit to the front seat back frame.
ac5wzw00007034
|
6. Pull out the front seat back pad, front seat back trim, and front seat back warmer wiring harness (With seat warmer system) rearward of the front seat.
ac5wzw00007035
|
7. Pass the wiring harnesses shown in the figure through the holes in the front seat back pad.
am6xuw00013154
|
8. Pull the front seat back trim in the direction of the arrow shown in the figure and remove the wrinkles on the front seat back trim.
ac5wzw00007040
|
9. For vehicles with seat ventilation system, perform the following procedure.
am6xuw00013178
|
am6zzw00015150
|
am6xuw00013177
|
10. Move the clip in the direction of arrow (1) shown in the figure and install the side air bag module securing belt to the front seat back frame.
am6zzw00014528
|
11. Press the pin in the direction of arrow (2) shown in the figure.
12. Install the pole guides to the front seat back frame.
am6zzw00012522
|
13. Align the front seat back trim with the installation hole of the front seat back pad, and install the C-rings.
am3zzw00036681
|
14. Fasten the zippers.
15. Install the lumbar support lever in the direction of the arrow (1) shown in the figure and install the clip in the direction of the arrow (2). (With manual lumbar support lever)
am6zzw00012523
|
16. Move hook A in the direction of the arrow shown in the figure and install it to hook B.
am6zzw00012538
|
17. Connect the connectors shown in the figure.
am6xuw00013171
|
18. Install the clip.
19. Install the band.
20. Move the hook in the order of arrows (1) and (2) shown in the figure and install the front seat cushion trim to the front seat cushion frame. (Without power seat system)
am6zzw00018394
|
21. Install the fasteners and install the front seat cushion trim to the front seat cushion frame. (With power seat system)
am6zzw00018365
|
22. Install the front seat. (See FRONT SEAT REMOVAL/INSTALLATION.)
23. Install the headrest.
24. Connect the negative battery terminal. (See NEGATIVE BATTERY TERMINAL DISCONNECTION/CONNECTION.)