 |
am6zzw00017798
WINDSHIELD WIPER MOTOR AND LINK REMOVAL/INSTALLATION
id091900001200
Oil and Chemical Type
|
Grease
Type: Lithium grease
|
1. Disconnect the negative battery terminal. (See NEGATIVE BATTERY TERMINAL DISCONNECTION/CONNECTION.)
2. Remove the windshield wiper arm and blade. (See WINDSHIELD WIPER ARM AND BLADE REMOVAL/INSTALLATION.)
3. Disconnect the windshield washer hose from the joint pipe. (See WINDSHIELD WASHER HOSE REMOVAL/INSTALLATION.)
4. Remove the cowl grille. (See COWL GRILLE REMOVAL/INSTALLATION.)
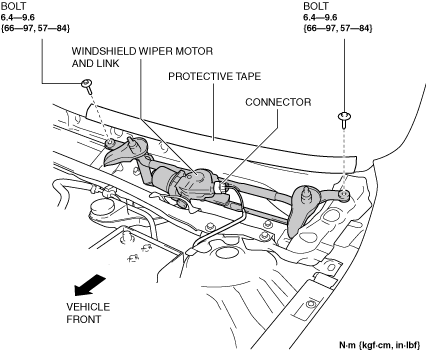
5. Affix protective tape to the area where the windshield end interferes with the windshield wiper motor and link as shown in the figure.
am6zzw00017798
|
6. Disconnect the windshield wiper motor connector.
7. Remove bolts.
8. Move the windshield wiper motor and link in the order of the arrows (1) and (2) to remove the securing rubber from the vehicle.
am6xuw00009934
|
9. Remove the windshield wiper motor and link from the vehicle in the order of the arrows (1) and (2) while being careful not to allow the windshield end to interfere with the windshield wiper motor and link.
am6xuw00009935
|
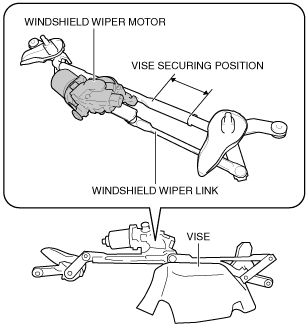
10. Fix the position of the windshield wiper link shown in the figure with a vise.
am6xuw00009936
|
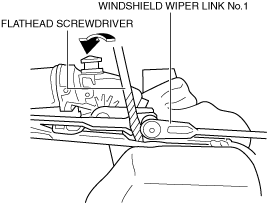
11. Insert a tape-wrapped flathead screwdriver into the position as shown in the figure, move the flathead screwdriver in the direction of the arrow, and remove the windshield wiper motor and ball joint for the windshield wiper link No.1. (See Ball Joint Assembly Note.)
am6xuw00009937
|
12. Insert a tape-wrapped flathead screwdriver into the position as shown in the figure, move the flathead screwdriver in the direction of the arrow, and remove the windshield wiper motor and ball joint for the windshield wiper link No.2. (See Ball Joint Assembly Note.)
am6xuw00009938
|
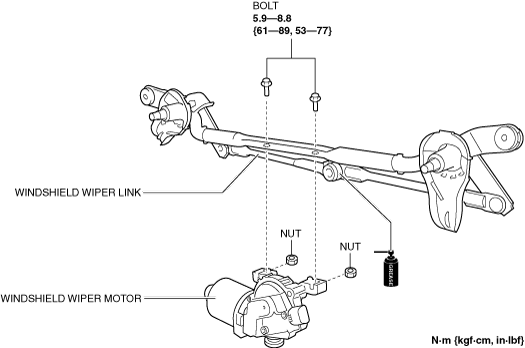
13. Remove bolts securing the windshield wiper motor and windshield wiper link, and remove nuts from windshield wiper motor.
am6xuw00009939
|
14. Remove the windshield wiper motor from the windshield wiper link.
15. Install in the reverse order of removal.
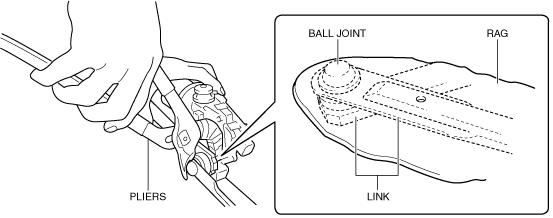
Ball Joint Assembly Note
1. When assembling the ball joint, use a clean rag to protect the link and squeeze using a pair of protective tape-wrapped pliers.
am6xuw00009940
|