1. Disconnect the negative battery cable.
2. Remove the propeller shaft. (See PROPELLER SHAFT REMOVAL/INSTALLATION [JA5AX-EL].)
3. Remove the TWC. (See EXHAUST SYSTEM REMOVAL/INSTALLATION [L3 4WD].)
4. Remove the front tires and splash shield of right side.
5. Remove the under cover.
6. Remove the drive shaft of right side. (See FRONT DRIVE SHAFT REMOVAL/INSTALLATION [L8, LF, L3, MZR-CD (RF Turbo)].)
7. Remove the joint shaft. (See JOINT SHAFT REMOVAL/INSTALLATION [L8, LF, L3, MZR-CD (RF Turbo)].)
8. Remove the exhaust manifold insulator. (See EXHAUST SYSTEM REMOVAL/INSTALLATION [L3 4WD].)
9. Remove the exhaust manifold. (See EXHAUST SYSTEM REMOVAL/INSTALLATION [L3 4WD].)
10. Remove in the order shown in the figure.
11. Install in the reverse order of removal.
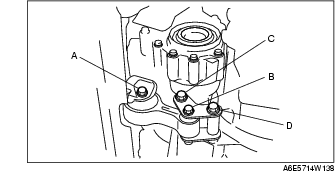
1. Loosen the bolt A.
2. Remove the bolt B.
3. Remove the bolt C and D.
1. Tighten the bolt C and D.
2. Lightly tighten the bolt B, then bolt A.
3. Tighten the bolt B and A.
Tightening torque
1. Lightly tighten the bolt A.
2. Tighten the bolt B, then bolt C.
3. Tighten the bolt A.
Tightening torque