am6zzw00007608
|
POWER BRAKE UNIT REMOVAL/INSTALLATION
id041100801800
1. For R.H.D., remove the insulator. (See EXHAUST SYSTEM REMOVAL/INSTALLATION [L8, LF, L3 2WD].) (See EXHAUST SYSTEM REMOVAL/INSTALLATION [L3 Turbo].) (See EXHAUST SYSTEM REMOVAL/INSTALLATION [MZR-CD (RF Turbo)].)
2. Remove the master cylinder. (See MASTER CYLINDER REMOVAL/INSTALLATION.)
3. Remove the windshield wiper arm and blade. (See WINDSHIELD WIPER ARM AND BLADE REMOVAL/INSTALLATION.)
4. Remove the cowl grille. (See COWL GRILLE REMOVAL/INSTALLATION.)
5. Remove the windshield wiper motor. (See WINDSHIELD WIPER MOTOR REMOVAL/INSTALLATION.)
6. Remove the cowl panel. (See COWL PANEL REMOVAL/INSTALLATION.)
7. For L.H.D., remove the A/C bracket.
8. For L.H.D. (2WD (MTX), 4WD (ATX)), remove the ABS (ABS/TCS) HU/CM or DSC HU/CM. (See ABS/TCS HU/CM REMOVAL/INSTALLATION [MTX].) (See DSC HU/CM REMOVAL/INSTALLATION [2WD (MTX), 4WD (ATX)].)
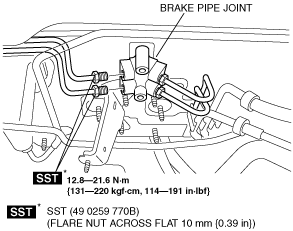
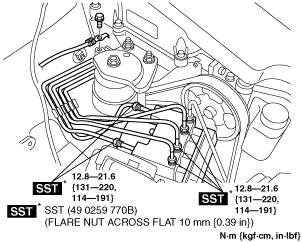
9. For R.H.D., when working on the 2WD (ATX) and 4WD (MTX), move the brake pipe aside by following procedures.
am6zzw00007608
|
am6zzw00007609
|
10. For R.H.D., remove the alternator cover.
11. For R.H.D., remove the insulator.
12. For R.H.D., remove the vacuum pipe bracket.
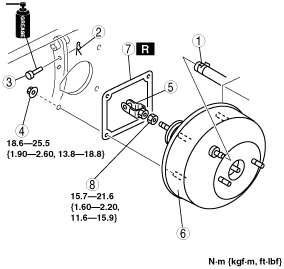
13. Remove in the order indicated in the table.
am6zzw00007610
|
|
1
|
Vacuum hose
|
|
2
|
Snap pin
|
|
3
|
Clevis pin
|
|
4
|
Nut
|
|
5
|
Fork
|
|
6
|
Power brake unit
|
|
7
|
Gasket
|
|
8
|
Nut
|
14. Remove the brake switch. (See BRAKE PEDAL REMOVAL/INSTALLATION.)
15. Install in the reverse order of removal.