INTAKE-AIR SYSTEM REMOVAL/INSTALLATION [LF, L3]
id0113008019b3
-
Warning
-
• When the engine and intake-air system are hot, they can badly burn. Turn off the engine and wait until they are cool before removing the intake-air system.
-
• Fuel vapor is hazardous. It can easily ignite, causing serious injury and damage. Always keep sparks and flames away from fuel.
-
• Fuel line spills and leakage are dangerous. Fuel can ignite and cause serious injuries or death and damage. Fuel can also irritate skin and eyes. To prevent this, always complete the "Fuel Line Safety Procedure". (See BEFORE REPAIR PROCEDURE [LF, L3].)
1. Disconnect the negative battery cable.
2. Remove the plug hole plate. (See PLUG HOLE PLATE REMOVAL/INSTALLATION [L3].)
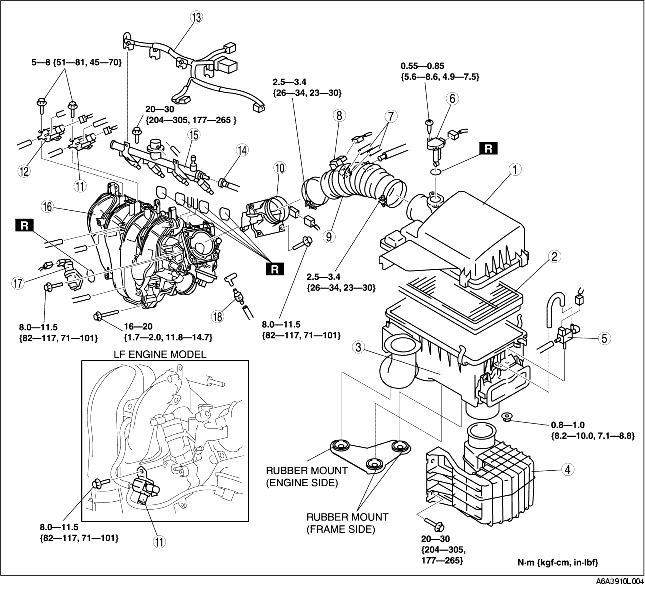
3. Remove in the order indicated in the table.
4. Install in the reverse order of removal.
5. Complete the "AFTER REPAIR PROCEDURE". (See AFTER REPAIR PROCEDURE [LF, L3].)
|
1
|
Air cleaner cover
|
|
2
|
Air cleaner element
|
|
3
|
Air cleaner case
|
|
4
|
Resonance chamber
|
|
5
|
VAD control solenoid valve (L3)
|
|
6
|
Mass air flow sensor
|
|
7
|
Vacuum hose (purge solenoid valve)
|
|
8
|
Purge solenoid valve
|
|
9
|
Air hose
|
|
10
|
Throttle body
|
|
11
|
Variable tumble control solenoid valve
|
|
12
|
VIS control solenoid valve (L3)
|
|
13
|
Fuel injector connector
|
|
14
|
Plastic fuel hose
|
|
15
|
Fuel distributor
|
|
16
|
Intake manifold
|
|
17
|
IAC valve
|
|
18
|
VAD check valve (L3)
|
Resonance Chamber Removal Note
1. Remove the front mudguard (LH) before removing the resonance chamber.
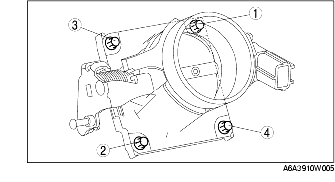
Throttle Body Installation Note
1. Tighten the throttle body installation nuts in the order shown.
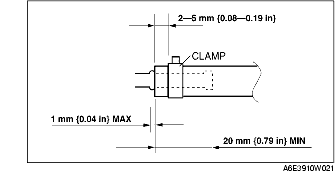
Vacuum Hose (Purge Solenoid Valve) Installation Note
1. Fit the vacuum hose (purge solenoid valve) onto the respective fittings, and install clamps as shown.
Air Cleaner Case Installation Note
-
Note
-
• Before assembling the air cleaner, verify that the rubber mounts have not fallen off from the air cleaner bracket (3 locations).
-
• Always install the air cleaner case using the following procedure.
-
• When inserting the rubber mounts into the air cleaner case, soapy water can be applied.
1. Verify that the rubber mounts are set in the air cleaner bracket (3 locations).
2. Install the projections on the frame side (2 locations).
3. Verify that the projections on the frame side are installed securely.
4. Install the projection on the engine side (remaining location).
5. Verify that the projection on the engine side installed securely.