 |
ac5uuw00000999
REAR WINDOW GLASS REMOVAL
id091200000600
4SD
1. Disconnect the negative battery cable. (See NEGATIVE BATTERY CABLE DISCONNECTION/CONNECTION [SKYACTIV-G 2.0, SKYACTIV-G 2.5].) (See NEGATIVE BATTERY CABLE DISCONNECTION/CONNECTION [SKYACTIV-G 2.0, SKYACTIV-G 2.5 (WITHOUT i-stop)].) (See NEGATIVE BATTERY CABLE DISCONNECTION/CONNECTION [SKYACTIV-D 2.2].)
2. Remove the following parts:
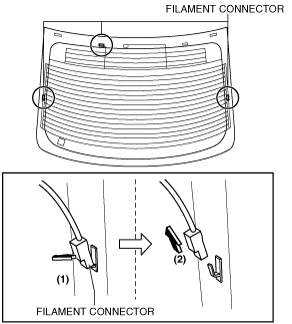
3. Disconnect the filament connectors in the direction of the arrow in the order of (1), (2) shown in the figure.
ac5uuw00000999
|
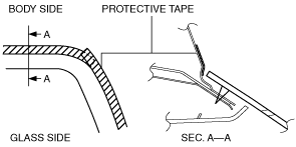
4. Apply protective tape along the edge of the body.
am6zzw00011441
|
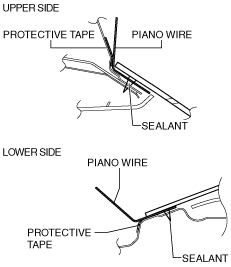
5. Avoiding the pin on the inside of the vehicle, insert piano wire which has been cut to sufficient length.
Vehicles without lower molding
am6zzw00012229
|
Vehicles with lower molding
am6zzw00012230
|
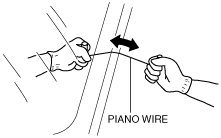
6. Wind each end of piano wire around a bar.
7. Secure one end of piano wire, and while pulling the other end, cut the sealant around the rear window glass.
ac5wzw00001326
|
8. Pinch pins from the inside of the vehicle and detach it.
ac5uuw00001002
|
9. Remove the rear window glass.
WGN
1. Disconnect the negative battery cable. (See NEGATIVE BATTERY CABLE DISCONNECTION/CONNECTION [SKYACTIV-G 2.0, SKYACTIV-G 2.5].) (See NEGATIVE BATTERY CABLE DISCONNECTION/CONNECTION [SKYACTIV-G 2.0, SKYACTIV-G 2.5 (WITHOUT i-stop)].) (See NEGATIVE BATTERY CABLE DISCONNECTION/CONNECTION [SKYACTIV-D 2.2].)
2. Remove the following parts:
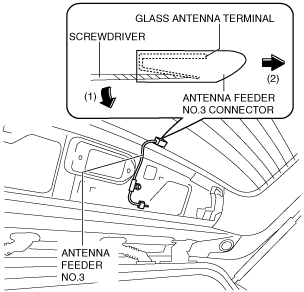
3. Using a screwdriver wrapped in protective tape, pull the antenna feeder No.3 connector in the direction of the arrow (2) shown in the figure while pressing glass antenna terminal in the direction of the arrow (1) shown in the figure, and disengage the glass antenna terminal from the antenna feeder No.3 connector. (with RDS (radio data system))
ac5wzw00003059
|
4. Disconnect the antenna feeder No.3 connector. (with RDS (radio data system))
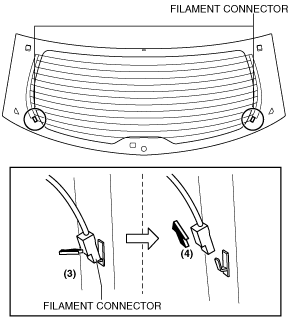
5. Disconnect the filament connectors in the direction of the arrow in the order of (3), (4) shown in the figure.
ac5uuw00001001
|
6. Apply protective tape along the edge of the body.
am6zzw00011441
|
7. Avoiding the pin on the inside of the vehicle, insert piano wire which has been cut to sufficient length.
am6zzw00012229
|
8. Wind each end of piano wire around a bar.
9. Secure one end of piano wire, and while pulling the other end, cut the sealant around the rear window glass.
ac5wzw00001326
|
10. Pinch pins from the inside of the vehicle and detach it.
ac5uuw00001003
|
11. Remove the rear window glass.