 |
am6zzw00009232
PARKING LIGHT BULB REMOVAL/INSTALLATION
id091800804200
SKYACTIV-G 2.0, SKYACTIV-G 2.5
1. Turn the steering wheel to full right lock. (Parking light bulb (LH))
2. Disconnect the negative battery cable. (See NEGATIVE BATTERY CABLE DISCONNECTION/CONNECTION [SKYACTIV-G 2.0, SKYACTIV-G 2.5 (WITHOUT i-stop)].) (See NEGATIVE BATTERY CABLE DISCONNECTION/CONNECTION [SKYACTIV-G 2.0, SKYACTIV-G 2.5].)
3. Partially peel back the mudguard (LH). (Parking light bulb (LH)) (See MUDGUARD REMOVAL/INSTALLATION.)
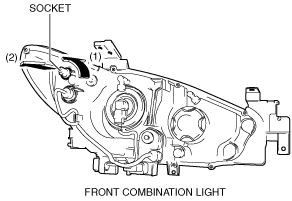
4. Rotate the socket in the direction of the arrow (1) shown in the figure and remove it from the front combination light in the direction of the arrow (2) shown in the figure.
am6zzw00009232
|
5. Remove the parking light bulb.
am6zzw00009233
|
6. Install in the reverse order of removal.
SKYACTIV-D 2.2
1. Turn the steering wheel to full lock.
2. Disconnect the negative battery cable. (See NEGATIVE BATTERY CABLE DISCONNECTION/CONNECTION [SKYACTIV-D 2.2].)
3. Partially peel back the mudguard. (See MUDGUARD REMOVAL/INSTALLATION.)
4. Rotate the socket in the direction of the arrow (1) shown in the figure and remove it from the front combination light in the direction of the arrow (2) shown in the figure.
am6zzw00009232
|
5. Remove the parking light bulb.
am6zzw00009233
|
6. Install in the reverse order of removal.
