 |
am6zzw00002499
DIAGNOSTIC ASSIST FUNCTION [HANDS-FREE TELEPHONE (HF/TEL) SYSTEM]
id0902g0804500
With Audio Unit
Starting procedure
1. Launch the on-board diagnostic test mode. (See STARTING PROCEDURE FOR ON-BOARD DIAGNOSTIC TEST MODE [HANDS-FREE TELEPHONE (HF/TEL) SYSTEM].)
2. To stop the on-board diagnostic test mode, ignition is switched to off.
Diagnostic assist code table
|
Content/function |
|---|
Software version verification
1. Launch the on-board diagnostic test mode. (See STARTING PROCEDURE FOR ON-BOARD DIAGNOSTIC TEST MODE [HANDS-FREE TELEPHONE (HF/TEL) SYSTEM].)
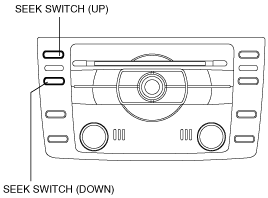
2. Press the SEEK switch to display the oldest error code of the error codes that have been recorded.
am6zzw00002499
|
3. Press the SEEK switch (down).
4. Verify the software version.
am6zzw00002500
|
5. To stop the on-board diagnostic test mode, ignition is switched to off.
Connection condition verification
1. Launch the on-board diagnostic test mode. (See STARTING PROCEDURE FOR ON-BOARD DIAGNOSTIC TEST MODE [HANDS-FREE TELEPHONE (HF/TEL) SYSTEM].)
2. Press SEEK switch to display the software version.
am6zzw00002499
|
3. Press the SEEK switch (down).
4. Verify the connected unit.
am6zzw00002501
|
5. To stop the on-board diagnostic test mode, ignition is switched to off.
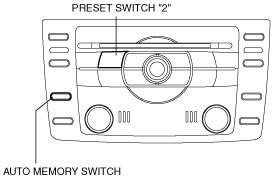
Password Reset
1. Switch the ignition to ACC or ON.
2. While pressing the AUTO MEMORY switch, simultaneously press the Preset switch”2” for 2 s or more.
am6zzw00002512
|
3. Verify the “Clear” is displayed in the information display.
am6zzw00002513
|
4. To stop the on-board diagnostic test mode, ignition is switched to off.
With Car-navigation Unit
Starting procedure
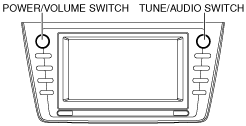
1. Switch the ignition to ACC or ON.
2. Turn the audio power to on.
3. While pressing the POWER/VOLUME switch, simultaneously press the TUNE/AUDIO switch for 200 ms or more.
am6zzw00002445
|
4. Press the “Diagnostic assist code input switch”, and input the diagnostic assist code.
5. Select “ENTER”.
6. Cancel the diagnostic assist function by turning off the POWER/VOLUME switched off.
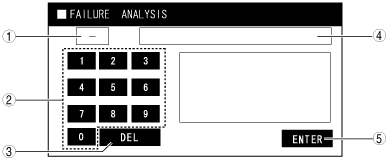
Diagnostic assist code input screen
aprjjw00002670
|
|
No. |
Name |
Content/function |
|---|---|---|
|
1
|
Diagnostic assist code
|
Display the diagnostic assist code.
|
|
2
|
Diagnostic assist code input switch
|
Input the diagnostic assist code.
|
|
3
|
DEL
|
Clear the diagnostic assist code.
|
|
4
|
Diagnostic content
|
Display the diagnostic content.
|
|
5
|
ENTER
|
Go to the diagnostic assist function.
|
Diagnostic assist code table
|
No. |
Content/function |
|---|---|
|
37
|
|
|
38
|
|
|
39
|
Diagnostic assist code “37”connection condition verification
1. Press the “Diagnostic assist code input switch”, and input the diagnostic assist code “37”.
2. Select “ENTER”.
|
Inspection |
Display |
Action |
|
|---|---|---|---|
|
• Launch the connection condition mode.
• Verify the connection condition.
|
AVN CONNECT
|
The HF/TEL unit connection condition is normal.
|
|
|
AVN CON ERR
|
Verify the HF/TEL unit connection condition. (See HANDS-FREE TELEPHONE (HF/TEL) UNIT REMOVAL/INSTALLATION.)
|
||
3. Press the POWER/VOLUME switch to return to the diagnostic assist code input screen.
4. Press the POWER/VOLUME switch to release the diagnostic assist function.
Diagnostic assist code “38” software version verification
1. Press the “Diagnostic assist code input switch”, and input the diagnostic assist code “38”.
2. Select “ENTER”.
|
Inspection |
Display |
Action |
|
|---|---|---|---|
|
• Launch the software version verification mode.
• Software version verification.
|
Display the software version.
|
—
|
|
3. Press the POWER/VOLUME switch to return to the diagnostic assist code input screen.
4. Press the POWER/VOLUME switch to release the diagnostic assist function.
Diagnostic assist code “39” password reset
1. Press the “Diagnostic assist code input switch”, and input the diagnostic assist code “39”.
2. Select “ENTER”.
|
Inspection |
Display |
Action |
|
|---|---|---|---|
|
• Launch the password reset mode.
|
PASSWD CLEAR
|
—
|
|
3. Press the POWER/VOLUME switch to return to the diagnostic assist code input screen.
4. Press the POWER/VOLUME switch to release the diagnostic assist function.