 |
ar8wzw00000874
INTAKE MANIFOLD DISASSEMBLY/ASSEMBLY [13B-MSP]
id0113z3805700
1. Remove the intake manifold. (See INTAKE MANIFOLD REMOVAL/INSTALLATION [13B-MSP].)
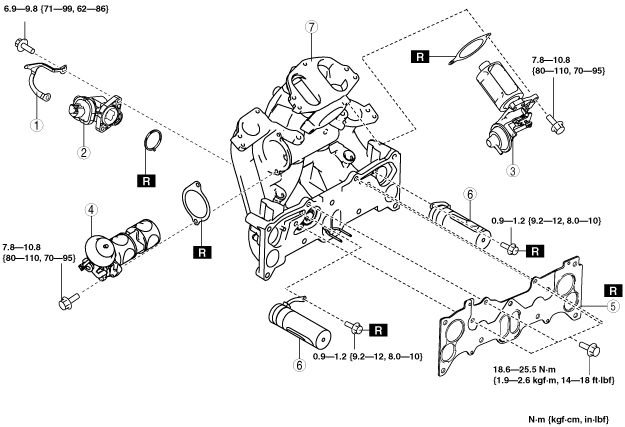
2. Remove in the order indicated in the table.
3. Install in the reverse order of removal.
ar8wzw00000874
|
|
1
|
Bracket
|
|
2
|
APV motor
(See APV Motor Installation Note.)
|
|
3
|
VDI valve
|
|
4
|
SSV
|
|
5
|
Gasket
|
|
6
|
APV
(See APV Removal Note.)
(See APV Installation Note.)
|
|
7
|
Intake manifold
|
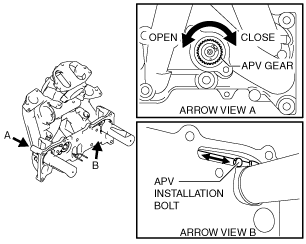
APV Removal Note
1. Rotate the APV gear by hand to a position which allows removal of the APV installation bolt.
ar8uuw00003351
|
2. Remove the APV installation bolt and the APV.
APV Installation Note
1. Install the APV using a new APV installation bolt.
2. Rotate the APV gear manually with the APV pointed perpendicular to the ground and verify that the APV can be rotated smoothly.
azzjjw00000132
|
APV Motor Installation Note
1. Install the intake manifold. (See INTAKE-AIR SYSTEM REMOVAL/INSTALLATION [13B-MSP].)
2. Rotate the APV gear manually and verify that it can be rotated smoothly (approx. three-quarter rotation).
3. Install a new gasket, APV motor and bracket.