 |
atraaw00003037
A/C COMPRESSOR REMOVAL/INSTALLATION [L3]
id071100804100
1. Disconnect the negative battery cable.
2. Discharge the refrigerant from the system. (See DISCHARGING AND RECOVERY.)
3. Remove the drive belt. (See DRIVE BELT REMOVAL/INSTALLATION[L3].)
4. Disconnect the magnetic clutch connector.
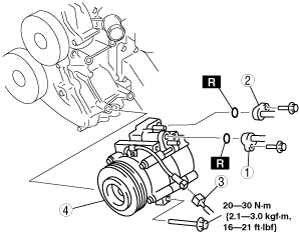
5. Remove in the order indicated in the table. Do not allow remaining compressor oil in the A/C compressor and pipes to spill.
atraaw00003037
|
|
1
|
Cooler hose (LO)
|
|
2
|
Cooler hose (HI)
|
|
3
|
Magnetic clutch connector
|
|
4
|
A/C compressor
|
6. Install in the reverse order of removal.
7. Perform the refrigerant system performance test. (See REFRIGERANT SYSTEM TESTS.)
A/C Compressor Installation Note
1. When replacing the A/C compressor, remove the following amount of compressor oil from the new A/C compressor.