FRONT SEAT CUSHION DISASSEMBLY/ASSEMBLY [DRIVER'S SEAT]
id0913008018a1
Disassembly
-
Warning
-
• Always wear safety glasses when repairing an air bag supplemental restraint system (SRS) vehicle and when handling an air bag module. This will reduce the risk of injury in the event of an accidental operation (deployment).
-
• Carry a live side air bag module with the air bag and tear seam pointed away from your body. This will reduce the risk of injury in the event of an accidental operation (deployment).
-
• Do not set a live side air bag module down on the cover tear seam. This will reduce the risk of injury in the event of an accidental operation (deployment).
-
• After operation (deployment), the air bag surface can contain deposits of sodium hydroxide, a product of the gas generating combustion that is irritating to the skin. Wash your hands with soap and water afterward.
-
• Never probe the connectors on the air bag module with a tester. Doing so can result in air bag operation (deployment), and personal injury.
-
• The air bag sensor is important for proper SRS air bag system operation. If a vehicle equipped with an air bag supplemental restraint system (SRS) is involved in a collision, inspect the sensor mounting bracket and wiring harness connectors for deformation. Replace and properly position the sensor or any other damaged supplemental restraint system (SRS) components whether or not the air bag has operated (deployed).
-
• To avoid accidental operation (deployment) and possible personal injury, the backup power supply must be depleted before repairing or replacing any front or side air bag system components and before servicing, replacing, adjusting or causing impact to components near the front or side air bag sensors, such as doors, instrument panel, console, door latches, strikers, seats and hood latches.
-
• Refer to this manual to determine location of the crash zone sensors before work.
-
• The side air bag sensors are located at or near the base of the B-pillar.
-
• To deplete the backup power supply, disconnect the battery negative cable and wait for one minute or more. Be sure to disconnect auxiliary batteries and power supplies (if equipped).
-
• The SST (diagnostic simulator) is for air bag system (SRS) servicing only. Before using the vehicle, it must be removed. Failure to remove it could result in personal injury and loss of vehicle safety standards.
-
Note
-
• If a seat equipped with a seat mounted side air bag system is being serviced, the air bag system (SRS) must be deactivated. (See AIR BAG SYSTEM DEACTIVATION PROCEDURES.)
-
• The SST (diagnostic simulator) must be installed under the seats to the floor connector that is connected to the side air bag and the pre-tensioner seat belt (if equipped).
-
• Diagnostics or servicing are not to be performed on a side air bag system or a pre-tensioner seat belt (if equipped) with the seat in the vehicle. Prior to attempting to diagnose/service the side air bag system or a pre-tensioner seat belt (if equipped), the seat must be removed from the vehicle and the SST (diagnostic simulator) must be installed to the side air bag and pre-tensioner seat belt floor connector. The SST (diagnostic simulator) must be removed prior to operating the vehicle.
-
• Diagnostics may be performed on seat systems other than the side air bag system or a pre-tensioner seat belt (lumbar, climate control, heat, power seat track)(if equipped) with the seat installed in the vehicle as long as the SST (diagnostic simulator) is installed under the seat to the side air bag and a pre-tensioner seat belt floor connector.
-
• After diagnosing/repairing a seat system the SST (diagnostic simulator) must be removed before operating the vehicle.
-
• If a side air bag operation (deployment) has taken place, a new seatback pad, seatback trim, and side air bag module must be installed. A new seatback frame should be installed if necessary.
All vehicles
1. Move the front seats forward.
2. Disconnect the negative battery cable and wait for 1 min or more.
Vehicles with side air bag
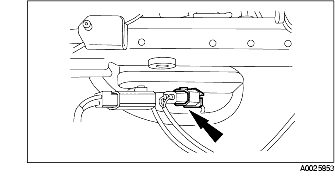
1. Disconnect the driver-side side air bag module connector.
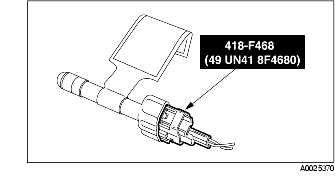
2. Connect the SST (diagnostic simulator) to the vehicle wiring harness-side connector of the driver-side side air bag module.
All vehicles
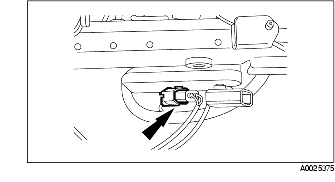
1. Disconnect the driver-side pre-tensioner seat belt connector.
2. Connect the SST (diagnostic simulator) to the vehicle wiring harness-side connector of the driver-side pre-tensioner seat belt.
3. Disconnect the passenger-side pre-tensioner seat belt connector.
4. Connect the SST (diagnostic simulator) to the vehicle wiring harness-side connector of the passenger-side pre-tensioner seat belt.
Vehicles with side air bag
1. Disconnect the passenger-side side air bag module connector.
2. Connect the SST (diagnostic simulator) to the vehicle wiring harness-side connector of the passenger-side side air bag module.
All vehicles
1. Lower the glove compartment.
-
(1) Press the locking tabs.
2. Disconnect the passenger-side air bag module connector.
3. Connect the SST (diagnostic simulator) to the dashboard wiring harness-side connector of the passenger-side air bag module.
4. Remove the driver-side air bag module. (See DRIVER-SIDE AIR BAG MODULE REMOVAL/INSTALLATION.)
5. Connect the SST (diagnostic simulator) to the steering column wiring harness-side connector of the driver-side air bag module.
6. Connect the negative battery cable.
7. Diagnose the air bag system (SRS). (See DTC INSPECTION.)(See PID/DATA MONITOR INSPECTION.)
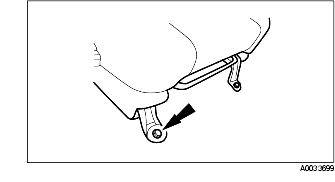
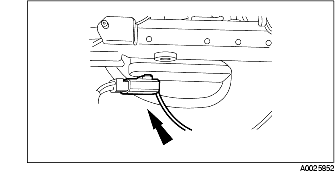
8. Remove the slide adjuster rear covers.
9. Remove the floor bolts.
10. Move the driver-side seat rearward.
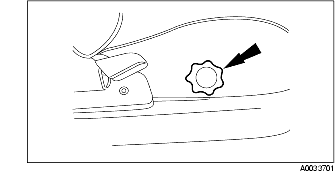
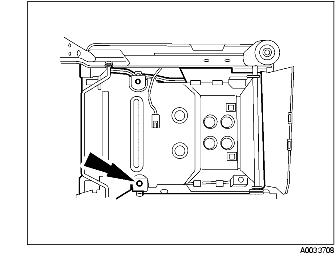
11. Remove the slide adjuster front covers.
12. Remove the driver-side seat.
-
(1) Remove the floor bolts.
-
Caution
-
• Use care when handling a seat. Dropping a seat or sitting on one not secured in the vehicle may result in damaged parts.
13. Remove the lift dial (if equipped).
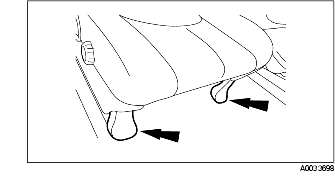
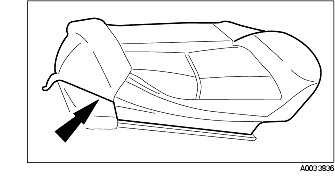
14. Disengage the seat cushion trim clips.
15. Remove the seat cushion.
-
(1) Remove the four bolts.
16. Loosen the seat cushion clips.
17. Separate the seat cushion trim from the seat cushion pad.
Assembly
-
Warning
-
• Always wear safety glasses when repairing an air bag supplemental restraint system (SRS) vehicle and when handling an air bag module. This will reduce the risk of injury in the event of an accidental operation (deployment).
-
• Carry a live side air bag module with the air bag and tear seam pointed away from your body. This will reduce the risk of injury in the event of an accidental operation (deployment).
-
• Do not set a live side air bag module down on the cover tear seam. This will reduce the risk of injury in the event of an accidental operation (deployment).
-
• After operation (deployment), the air bag surface can contain deposits of sodium hydroxide, a product of the gas generating combustion that is irritating to the skin. Wash your hands with soap and water afterward.
-
• Never probe the connectors on the air bag module with a tester. Doing so can result in air bag operation (deployment), and personal injury.
-
• The air bag sensor is important for proper SRS air bag system operation. If a vehicle equipped with an air bag supplemental restraint system (SRS) is involved in a collision, inspect the sensor mounting bracket and wiring harness connectors for deformation. Replace and properly position the sensor or any other damaged supplemental restraint system (SRS) components whether or not the air bag has operated (deployed).
-
• To avoid accidental operation (deployment) and possible personal injury, the backup power supply must be depleted before repairing or replacing any front or side air bag system components, and before servicing, replacing, adjusting, or causing impact to components near the front or side air bag sensors, such as doors, instrument panel, console, door latches, strikers, seats and hood latches.
-
• Refer to this manual to determine location of the crash zone sensors before work.
-
• The side air bag sensors are located at or near the base of the B-pillar.
-
• To deplete the backup power supply, disconnect the battery negative cable and wait for one minute or more. Be sure to disconnect auxiliary batteries and power supplies (if equipped).
-
• The SST (diagnostic simulator) is for air bag system (SRS) servicing only. Before using the vehicle, it must be removed. Failure to remove it could result in personal injury and loss of vehicle safety standards.
-
Note
-
• If a seat equipped with a seat mounted side air bag system is being serviced, the air bag system (SRS) must be deactivated. (See AIR BAG SYSTEM DEACTIVATION PROCEDURES.)
-
• The SST (diagnostic simulator) must be installed under the seats to the floor connector that is connected to the side air bag and the pre-tensioner seat belt (if equipped).
-
• Diagnostics or servicing are not to be performed on a side air bag system or a pre-tensioner seat belt (if equipped) with the seat in the vehicle. Prior to attempting to diagnose/service the side air bag system or a pre-tensioner seat belt (if equipped), the seat must be removed from the vehicle and the SST (diagnostic simulator) must be installed to the side air bag and pre-tensioner seat belt floor connector. The SST (diagnostic simulator) must be removed prior to operating the vehicle.
-
• Diagnostics may be performed on seat systems other than the side air bag system or a pre-tensioner seat belt (lumbar, climate control, heat, power seat track)(if equipped) with the seat installed in the vehicle as long as the SST (diagnostic simulator) is installed under the seat to the side air bag and a pre-tensioner seat belt floor connector.
-
• After diagnosing/repairing a seat system the SST (diagnostic simulator) must be removed before operating the vehicle.
-
• If a side air bag operation (deployment) has taken place, a new seatback pad, seatback trim, and side air bag module must be installed. A new seatback frame should be installed if necessary.
All vehicles
1. Install the seat cushion trim to the seat cushion pad.
2. Connect the seat cushion clips.
3. Install the seat cushion.
-
(1) Install the four bolts.

4. Connect the seat cushion trim clips.
5. Install the lift dial (if equipped).
6. Install the driver-side seat.
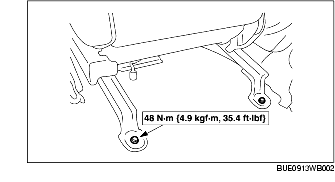
-
(1) Install the floor bolts to the slide adjuster.
-
Caution
-
• Use care when handling a seat. Dropping a seat or sitting on one not secured in the vehicle may result in damaged parts.
7. Install the slide adjuster front covers.
8. Move the driver-side seat forward.
9. Install the floor bolts to the slide adjuster.
10. Install the slide adjuster rear covers.
11. Disconnect the negative battery cable and wait for 1 min or more.
Vehicles with side air bag
1. Remove the SST (diagnostic simulator) from the vehicle wiring harness-side connector of the driver-side side air bag module.
-
Warning
-
• The SST (diagnostic simulator) is for air bag system (SRS) servicing only. Before using the vehicle, it must be removed. Failure to remove it could result in personal injury and loss of vehicle safety standards.
2. Connect the driver-side side air bag module connector.
All vehicles
1. Remove the SST (diagnostic simulator) from the vehicle wiring harness-side connector of the driver-side pre-tensioner seat belt.
-
Warning
-
• The SST (diagnostic simulator) is for air bag system (SRS) servicing only. Before using the vehicle, it must be removed. Failure to remove it could result in personal injury and loss of vehicle safety standards.
2. Connect the driver-side pre-tensioner seat belt connector.
3. Connect the negative battery cable.
4. Diagnose the air bag system (SRS) with the remaining SST (diagnostic simulator) still in place. (See DTC INSPECTION.) (See PID/DATA MONITOR INSPECTION.)
5. Disconnect the negative battery cable and wait for 1 min or more.
6. Remove the SST (diagnostic simulator) from the vehicle wiring harness-side connector of the passenger-side pre-tensioner seat belt.
-
Warning
-
• The SST (diagnostic simulator) is for air bag system (SRS) servicing only. Before using the vehicle, it must be removed. Failure to remove it could result in personal injury and loss of vehicle safety standards.
7. Connect the passenger-side pre-tensioner seat belt connector.
Vehicles with side air bag
1. Remove the SST (diagnostic simulator) from the vehicle wiring harness-side connector of the passenger-side side air bag module.
-
Warning
-
• The SST (diagnostic simulator) is for air bag system (SRS) servicing only. Before using the vehicle, it must be removed. Failure to remove it could result in personal injury and loss of vehicle safety standards.
2. Connect the passenger-side side air bag module connector.
All vehicles
1. Remove the SST (diagnostic simulator) from the dashboard wiring harness-side connector of the passenger-side air bag module.
-
Warning
-
• The SST (diagnostic simulator) is for air bag system (SRS) servicing only. Before using the vehicle, it must be removed. Failure to remove it could result in personal injury and loss of vehicle safety standards.
2. Connect the passenger-side air bag module connector.
3. Raise the glove compartment.
-
(1) Press the locking tabs.
4. Remove the SST (diagnostic simulator) from the steering column wiring harness-side connector of the driver-side air bag module.
-
Warning
-
• The SST (diagnostic simulator) is for air bag system (SRS) servicing only. Before using the vehicle, it must be removed. Failure to remove it could result in personal injury and loss of vehicle safety standards.
5. Install the driver-side air bag module. (See DRIVER-SIDE AIR BAG MODULE REMOVAL/INSTALLATION.)
6. Connect the negative battery cable.
7. Diagnose the air bag system (SRS). (SeeDTC INSPECTION.) (See PID/DATA MONITOR INSPECTION.)
8. Inspect the air bag system (SRS) for correct operation.