Timing Belt: Service and Repair
TIMING BELT REMOVAL AND INSTALLATION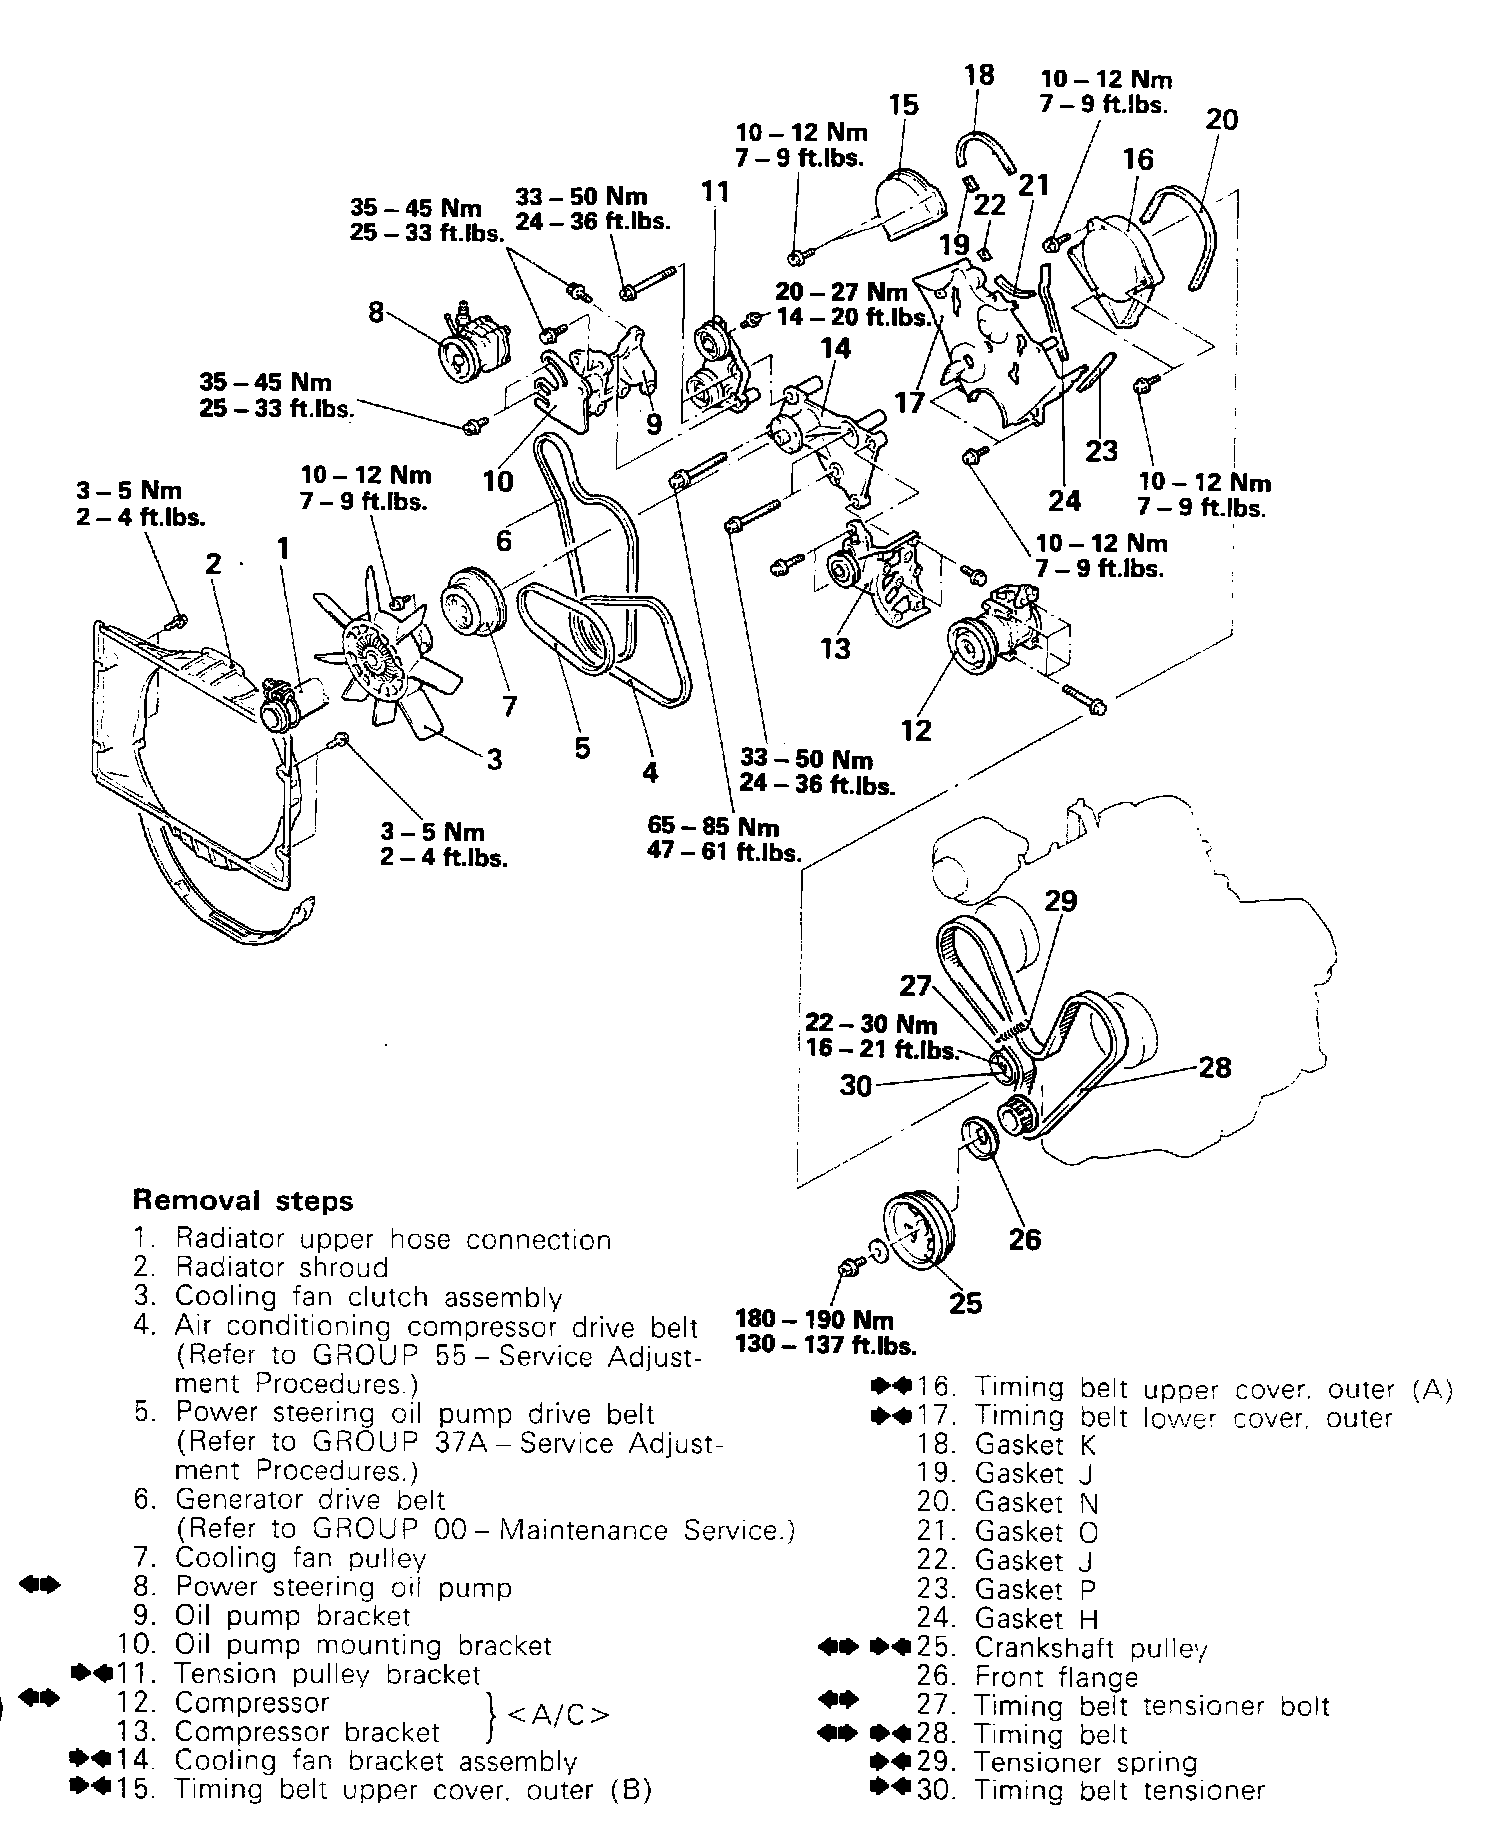
SERVICE POINTS OF REMOVAL

ADHESIVE POINTS
8. Removal of power steering oil pump.
Remove the power steering oil pump from The bracket and hook it at the body side.
NOTE:
- Move the power steering oil pump with the pressure hose and return hose still connected.
12. Removal of compressor.
Remove the compressor from the bracket and hook it at the body side.
NOTE:
- Move the compressor with the high-pressure hose and low-pressure hose still connected.
25. Removal of crankshaft pulley

(1) Using the special tool and a disused drive belt. stop the rotation of the crankshaft pulley.
CAUTION:
- This drive belt will be damaged. Do Not use the engine's drive belt.
- Never use a damaged drive belt.
(2) Remove the crankshaft pulley bolt.
27. Loosening timing belt tensioner bolt
(1) Loosen the timing belt tensioner bolt.

(2) Loosen the timing belt tensioner bolt and turn the timing belt tensioner counterclockwise along the elongated hole.

28. Removal of timing belt.
When the timing belt is to be reused, in order to allow reinstallation of the belt so that it travels in the sane direction as before it was removed, mark the direction of travel with an arrow before removing it.
CAUTION:
- As water or oil on the belt can seriously reduce its usable life, ensure that the timing belt, sprocket, and tensioner stay clean and dry while removed, and never wash them. Parts that have become too dirty should be replaced.
- When any of the parts are oily, check to see whether there are any oil leaks in any of the oil seals or the cam shaft oil seal on the front of the engine.
INSPECTION
Timing belt

- Check the belt in detail. If the following flaws are evident replace belt with a new one.
(1) Hardened back surface rubber. Back surface glossy. Non-elastic and so hard that even if a finger nails is forced into it, no mark is produced.

(2) Cracked back surface rubber
(3) Cracked or exfoliated canvas
(4) Cracked tooth bottom
(5) Side of belt cracked

(6) Side of belt badly worn
NOTE:
- Normal belt should have clear-cut sides as if cut with a sharp knife.

(7) Badly worn teeth Initial stage:
Canvas on load side tooth flank worn (fluffy canvas fibers, rubber gone and color changed to white, and unclear canvas texture)
Last stage:
Canvas on load side tooth flank worn down and rubber exposed (tooth width reduced)
(8) Missing tooth
Timing belt tensioner

When rotating the pulley, it does not rotate smoothly. If backlash or irregular noise is observed, replace the timing belt tensioner.
SERVICE POINTS OF INSTALLATION
30. Installation of timing belt tensioner/29. Tensioner spring
(1) Attach the tensioner and the timing belt tensioner.

(2) Engage the top of the tensioner spring on the water pump pin. Attach the hook in the direction shown in the drawing.

(3) Turn the timing belt tensioner to the extreme counter clockwise along the elongated hole and temporarily fix the timing belt tensioner.
28. Installation of timing belt

(1) Align the timing marks of the camshaft sprockets (on the right and left sides) and the crankshaft sprocket. (At the top dead point of the No. 1 cylinder compression stroke)
(2) First, route the timing belt on the crankshaft sprocket, then on the camshaft sprocket on the side without slackness in the tight side.
(3) Next. run the timing belt onto the water pump pulley, the camshaft sprocket on the left side. and the timing belt tensioner.
(4) Apply force counterclockwise to the camshaft sprocket on the right side. When the tight side of the belt is fault, check that the timing marks are all aligned.
(5) Attach the flange.
(6) Back off the fixing bolts of the temporarily tightened tensioner one or two turns and tighten the timing belt with the tensioner spring force.

(7) Using the special tool, turn the crankshaft two turns in the normal rotating direction (clockwise).
NOTE:
- Turn smoothly. but not in the opposite direction (counterclockwise).
(8) Re-align the sprockets timing marks and tighten the tensioner fixing bolts.
25. Installation of crankshaft pulley

(1) Using the special tool and a disused drive belt. stop the rotation of the crankshaft pulley.
CAUTION:
- This drive belt will be damaged. Do Not use the engine's drive belt.
- Never use a damaged drive belt.
17. Installation of timing belt lower cover outer/16. Timing belt upper cover outer (A)/15. Timing belt upper cover outer (B)

Since the mounting bolts of timing cover are different in size depending on location, insert them \with care.
14. Installation of cooling fan bracket assembly/11. Tension pulley bracket


Cooling fan bracket and tension pulley bracket installation bolt size and torque are different and caution must be paid to ensure that they are properly installed.