Case Components


Case Components

1. Install counter front bearing to the transmission case.
2. Install oil gutter to transmission case.
3. Install breather to transmission case.
CAUTION: Do not reuse breather.

4. Apply recommended sealant to the transmission case adapter plate mounting surface as shown in the figure.
^ Use Genuine Silicone RTV or the equivalent.
CAUTION: Complete remove all moisture and oil, etc., from the transmission case and adapter plate mounting surfaces.

5. Place the adapter plate in the transmission case, using soft hammer to tap the adapter plate to install it into the transmission case.

6. Install snap ring to main drive gear bearing, using snap ring pliers.
CAUTION: Do not reuse snap ring.

7. Tighten baffle plate mounting nut to the specified torque. Refer to MT-21, "Case Components".

8. Apply multi-purpose grease to the lip of the front cover oil seal. Using a drift, to install oil seal approximately 8.55 - 9.55 mm (0.336 - 0.376 inch) above from the front cover edge surface.
Tool number: KV38102100 (J-25803-01)
CAUTION:
^ Do not reuse front cover oil seal.
^ When installing, do not incline the front cover oil seal.

9. Install front cover gasket and front cover to the transmission case.
CAUTION: Do not reuse gasket.
10. Temporary tightening 2 bolts in the positions shown in the figure.

11. Temporary tightening remaining 9 bolts, tighten bolts to the specified torque.
CAUTION: Four bolts pointed by arrows in the figure are not reusable.

12. Tighten bolts to the specified torque in order as shown on the figure. Refer to MT-21, "Case Components"

13. Install washer to the withdrawal lever ball pin and then install it to front cover. Tighten withdrawal lever ball pin to the specified torque. Refer to MT-21, "Case Components".
14. Install rear extension oil gutter to rear extension, and then tighten bolt to specified torque. Refer to MT-21, "Case Components".
15. Install reverse idler shaft, reverse idler needle bearing, reverse idler gear, and reverse idler thrust washer to the adapter plate.

16. Apply multi-purpose grease to the striking rod oil seal lip, and then using the drift to install striking rod oil seal.
Tool number: ST35291000 ( - )
CAUTION:
^ Do not reuse striking rod oil seal.
^ When installing, do not incline the striking rod oil seal.

17. Apply multi-purpose grease to the lip of the rear oil seal. Using a drift to install rear oil seal. 1.2 - 2.2 mm (0.047 - 0.087 inch) above from the rear extension edge surface.
Tool number: ST33400001 (J-26082)
CAUTION:
^ Do not reuse rear oil seal.
^ When installing, do not incline the rear oil seal.

18. Apply recommended sealant to the adapter plate rear extension mounting surface as shown in the figure.
^ Use Genuine Silicone RTV or the equivalent.
CAUTION: Completely remove all moisture, oil, etc., from the adapter plate and rear extension mounting surfaces.

19. Install rear extension to the adapter plate and then tighten mounting bolts to the specified torque in order as shown on the figure. Refer to MT-21, "Case Components".
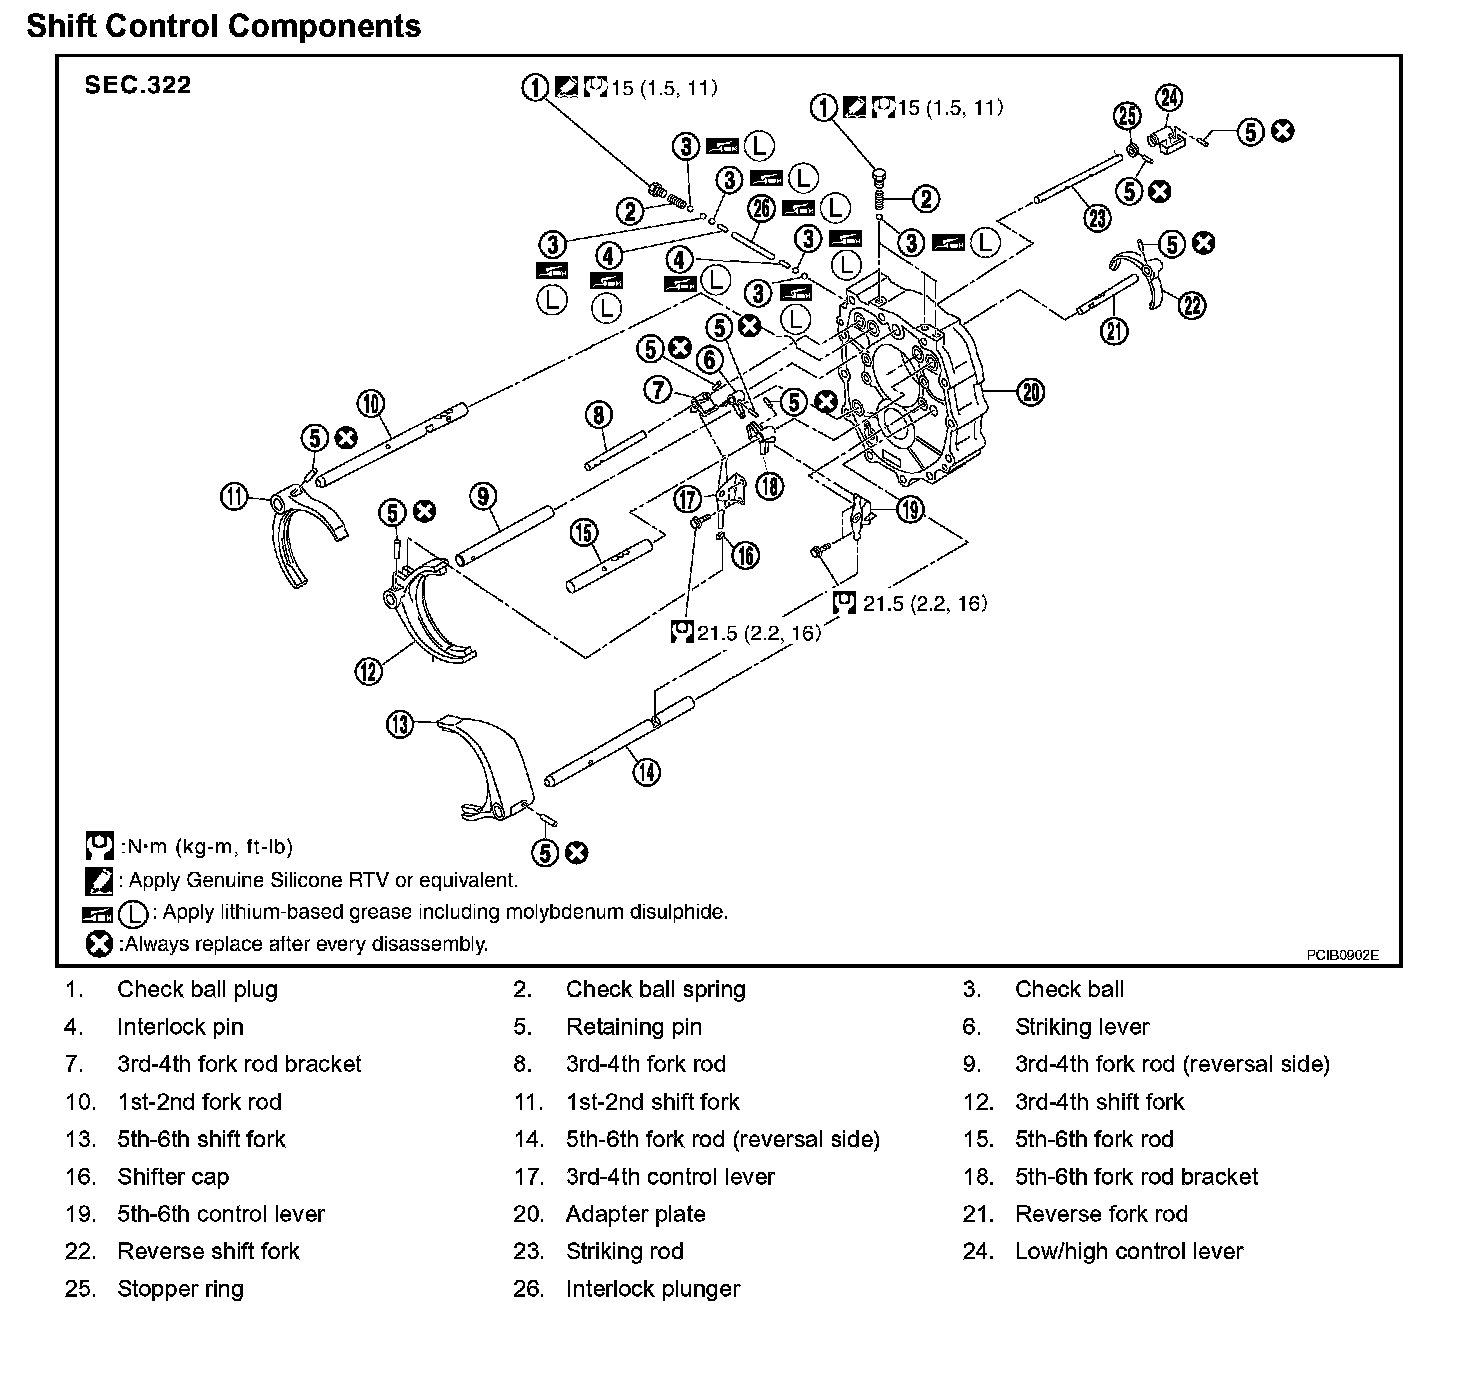
20. Install control lever housing to the rear extension and then tighten mounting bolts to the specified torque. Refer to MT-24, "Shift Control Components".
CAUTION: Do not hold control lever housing to prevent bushing of control lever housing from deformation when moving transmission assembly.

21. Install return spring plungers and return springs into the rear extension, apply recommended sealant to threads of return spring plugs, and then tighten return spring plugs to the specified torque. Refer to MT-24, "Shift Control Components".
^ Use Genuine Silicone RTV or the equivalent.

CAUTION: The right and left return springs and return spring plungers are different, so make sure they are installed correctly.

22. Install shift check pin as a one unit with the control bracket to rear extension and then tighten mounting bolts to the specified torque. Refer to MT-24, "Shift Control Components".
23. Install plunger to the rear extension, and then screwing PNP switch and back-up lamp switch to the rear extension with 1-2 pitches. Apply recommended sealant to threads of switches, and tighten switches to the specified torque. Refer to MT-21, "Case Components".
^ Use Genuine Silicone RTV or the equivalent.

24. Install retaining pin into the control rod, using a pin punch.
CAUTION: Do not reuse retaining pin.

25. Install check ball and check select spring into the rear extension.

26. Install rear extension upper cover gasket and rear extension upper cover to rear extension.
CAUTION:
^ Do not reuse rear extension upper cover gasket.
^ Avoid tangling check select spring.
27. Tighten rear extension upper cover bolts to the specified torque in order as shown on the figure. Refer to MT-21, "Case Components".