Drum Brake System: Adjustments
Fig. 9 Release Brake Adjuster:
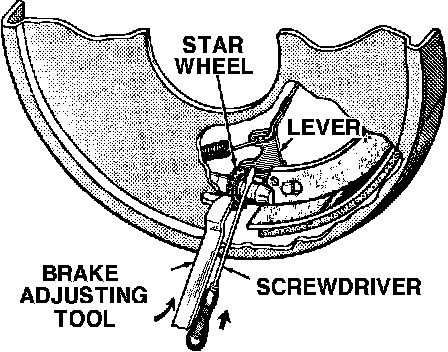
Fig. 6 Release type brake adjuster:

NOTE: Normally self adjusting drum brakes will not require manual adjustment but in the event of a brake reline it is advisable to make the initial adjustment manually to speed up the adjusting time.
1. Jack up vehicle so all wheels are free to turn.
2. Remove rear adjusting hole cover from brake supports of vehicle.
3. Be sure parking brake lever is fully released, then back off parking brake cable adjustment so there is slack In cable.
4. Insert adjusting tool C-3784 or equivalent, into star wheel of adjusting screw. Move handle of tool upward until a slight drag is felt when road wheel is rotated.
5. Insert a thin screwdriver or piece of welding rod into brake adjusting hole and push adjusting lever out of engagement with star wheel.
CAUTION: Care should be taken so as not to bend adjusting lever or distort lever spring.
6. While holding adjusting lever out of engagement, back off star wheel to insure a free wheel with no brake shoe drag.
7. Repeat above adjustment at the other rear wheel. Install adjusting hole covers in brake supports.
8. Adjust parking brake after wheel brake adjustment.
CAUTION: It is important to follow the above sequence to avoid the possibility of the parking brake system causing brake drag, if the parking brakes are adjusted before the service brakes.