2706IN General Information on the Vehicle Battery
WM 2706IN General information on the vehicle battery
Tools

Technical values

Information
NOTICE
A battery charger for providing an external power supply or for jump-lead starting is connected directly to the battery in the vehicle.
- Risk of damage to the battery sensor.
- Battery sensor sends incorrect battery values to the vehicle electrical system.
-> Always connect a battery charger for providing an external power supply or for jump-lead starting to the defined connections in the engine compartment. => 2X00IN Battery trickle charging
Information
The AGM (Absorbent Glass Mat) battery is a maintenance-free , sealed battery.
- This battery must not be opened. If the battery is opened, it must be replaced.
- There is a serial number and a part number on the top of the battery at the right-hand side.

Serial number and part number on battery
- If the battery is replaced, both numbers must be entered in the gateway control unit under: Gateway/Maintenance, repairs/Change battery.
- The battery size and battery manufacturer must also be entered when changing the battery.
Information
- To prevent contact corrosion, only approved bolts, nuts, washers, etc. should be used. These elements have a special surface coating and must be stored separately.
The battery is one of the most important electrical components in the vehicle. Fault-free functioning of the battery contributes greatly to customer satisfaction. To guarantee long and efficient operation, the battery must be checked and maintained according to the description in this information.
Besides the start function, the battery also has the tasks of buffer and supplier of electrical power for the entire vehicle electrical system.
An AGM (Absorbent Glass Mat) battery is used as standard on the Panamera (G1). The AGM battery offers the following advantages, for example:
- Sealed, valve-regulated battery
- High-cycle battery
- High cold-start performance
- Cannot leak or tilt
- Totally maintenance-free
- Shake-resistant
- No acid leakage if the housing is damaged
- Flexible installation and safe to handle
- High load capacity and longer service life
- Ideal for Start/Stop function
Treatment of the battery
Maintenance-free battery:
Information
- The tightening torque for the battery terminals is 5 Nm (3.5 ftlb.).
- If the battery is to be reconnected, proceed according to => 90 Work instructions after disconnecting the battery.
Low-maintenance battery:
Information
- Battery terminals do not need to be greased.
- The battery terminal clamps must only be attached manually without using excessive force to prevent damage to the battery housing.
- The tightening torque for the battery terminals is 5 Nm (3.5 ftlb.).
- If the battery is to be reconnected, proceed according to => 90 Work instructions after disconnecting the battery.
- To ensure that the battery does not leak, it is essential to ensure that the original plugs supplied with the battery are screwed into the battery openings.
- In the event of loss or damage, only original plugs of the same design should be used.
- The plugs must be fitted with an O-ring seal.
Warning notes and safety regulations for lead-acid batteries
1. -1- Fire, sparks, naked flames and smoking are forbidden:
- Avoid sparking when using cables and electrical devices.
- Avoid short circuits.
- In batteries with central venting, there is an increased concentration of detonating gas at the hose opening. The venting hose must not be bent or blocked by dirt.

Battery symbols
2. -2- Wear eye protection
3. -3- Keep children away from acids and batteries.
4. -4- Risk of causticisation.
- Battery acid is highly caustic, therefore wear protective gloves.
- Do not tip battery; acid can emerge from the vent opening.
Information
- First aid: Rinse acid splashes in the eyes immediately with clean water for a few minutes. Consult a doctor immediately. Neutralise acid splashes on the skin or clothing immediately with soap suds and rinse again with plenty of water. If acid has been drunk unintentionally, consult a doctor immediately.
5. -5- Observe information on the battery in this information and in the Driver's Manual.
6. -6- Risk of explosion:
- A highly explosive detonating gas mixture occurs when charging batteries.
7. -7- Waste disposal:
- Hand in old batteries at a collection point.
8. -8- Never dispose of old batteries in the domestic rubbish.
Notes on removing and installing the battery
Information
- The battery is located under the left front seat.
- In order to avoid triggering the siren in vehicles with an additional alarm siren, the battery must be disconnected while the ignition is on.
- All loads must be switched off beforehand. Remove ignition key.
- Never disconnect battery with engine running.
- Never start engine without a securely connected battery.
- The battery terminal clamps must only be attached by hand without using excessive force to prevent damage to the battery housing.
- Check that the battery is seated correctly after installation. Otherwise, a loose battery presents risks such as: - Reduced service life due to vibration damage. - Possible damage to the grid plates of the battery. - Damage to the battery housing from mounting parts (possible acid leakage, with high subsequent costs). - Inadequate crash safety.
Principle of operation of central venting

Central venting
Information
- State of the art batteries are fitted with central venting -A-.
- The gas generated during charging emerges centrally through an opening on the upper cover side. The backfire protection is integrated at the same position, which prevents the ignition of the combustible gas present in the battery.
- In batteries with hose/pipe -A- for the central venting, ensure that the hose is not pinched. Only then can the battery be freely vented.
Central venting
Visual inspection
A visual inspection of the battery must be performed before taking measurements, e.g. measuring the open-circuit voltage, or before carrying out the battery load test.
This inspection can be used to determine:
- Whether the housing of the battery is damaged. The leak-free operation and function of the battery cannot be guaranteed if the housing is damaged.
- Whether the battery terminals (battery line connections) are damaged. Contact of the line connections cannot be guaranteed if the battery terminals are damaged. This can cause a line fire and malfunctions in the electrical system.
Checking battery vent hose
Information
- Make sure the vent hose -A- is not kinked or damaged. If in doubt, replace it.
- Vent hose -A- must be inserted in the battery and in the battery box.
Central venting
Checking acid level
1. Switch ignition off and remove ignition key.
2. Move front left seat back and up as far as possible. Move backrest fully forward.
3. Disengage front trim panel at the rear -arrow A- , then unclip it by pulling it forward -arrow B-.

Unclipping trim panel for front seat frame
4. Unclip the right and left carpet trim -arrows-.

Unclipping carpet trims
5. Unscrew the two fastening screws -1-.

Loosening seat
6. Fold the seat back as far as possible -arrow A-. With the seat folded, move it forward again using fore/aft adjustment -arrow B-.
7. Open the four tension hooks on the battery box cover using a screwdriver.
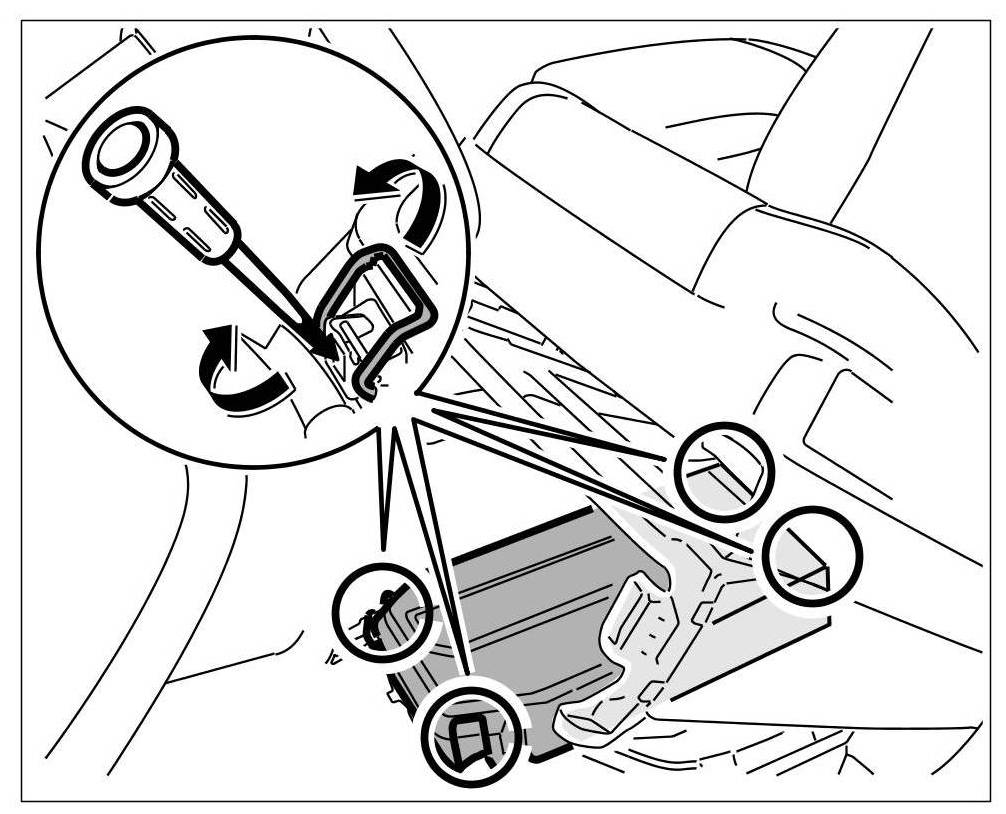
Opening battery box cover
8. Unclip wire harness for seat at the battery box.
9. Remove battery box cover with vent duct.
Low-maintenance battery
WARNING
Improper handling of batteries.
- Risk of injury and damage to the environment
-> The accident prevention regulations must be strictly observed when handling battery acids.
-> Wear suitable protective clothing and protective glasses.
-> Only use a torch to illuminate the inside of the battery. Never illuminate the inside of the battery with a naked flame.
-> Do not handle a naked flame or lighted cigarettes near batteries.
-> Observe the disposal regulations for batteries and sulphuric acid when disposing of batteries.
Information
- Use a commercially available battery filling bottle.
- The correct acid level of the battery is an important factor for long and efficient operation of the battery.
- When the acid level is too low, a capacity loss (performance loss) of the battery occurs, which is caused by the cell plates drying out. If the cell plates are not surrounded by electrolyte (battery acid), this will lead to corrosion of the lead plates, the plate bridges and the cell connectors. The result of the corrosion is that battery functioning cannot be guaranteed. The battery will become unserviceable.
- If the acid level is too high, damage can occur by the battery acid (sulphuric acid/water mixture) leaking out of the battery.
1. Unscrew battery plugs.
2. Shine a torch into the battery. The acid level of the battery must be at the protruding lug.
- If the acid level is too low, refill with distilled water using the battery filling bottle.
3. Screw in battery plugs again and ensure that they are seated correctly.
4. Remount battery cover.
Maintenance-free battery
Information
- The maintenance-free battery has an inspection glass.
- The charge state and acid level of the battery can be checked through the inspection glass -B-.
- If a battery is more than 5 years old and the indicator of the inspection glass is colourless, replace the battery.
- If the battery has been charged, air bubbles can form under the inspection glass. Before carrying out a visual inspection, tap carefully on the inspection glass with something like the handle of a screwdriver.
Maintenance-free battery
Three different colour indications are possible:
Maintenance-free battery

Checking acid density
WARNING
Improper handling of batteries.
- Risk of injury and damage to the environment
-> The accident prevention regulations must be strictly observed when handling battery acids.
-> Wear suitable protective clothing and protective glasses.
-> Only use a torch to illuminate the inside of the battery. Never illuminate the inside of the battery with a naked flame.
-> Do not handle a naked flame or lighted cigarettes near batteries.
-> Observe the disposal regulations for batteries and sulphuric acid when disposing of batteries.
Information
- Only for low-maintenance batteries.
Information
- Use commercially available battery acid tester.
- The acid density test provides information about the state of the battery in conjunction with the battery load test.
- The temperature of the battery acid must be at least 10°C.
The density of the acid must be checked as follows in all battery cells (low-maintenance battery) :
1. Switch off ignition and remove ignition key.
2. Unscrew all battery plugs (plugs of the battery cells).
3. Dip the acid siphon or the pipette into the battery cell and take up the battery acid.
4. Read off the density of the acid in kg/dm3; on the scale of the battery acid tester and compare with the following table.


The acid density must be at least 1.24 kg/dm3; in normal climatic zones.
- If the acid density is too low, charge battery.
- After charging the battery, repeat the acid density test.
The measured values for the acid density of the individual battery cells must not differ by more than 0.03 kg/dm3; from each other.

Example 1: The acid density in cell 4 is too low.
Example 2: The acid density in cells 4 and 5 is too low. The acid density deviations between the battery cells is greater than 0.03 kg/dm3;.
- If the nominal values are not achieved, replace battery.
- If the nominal values are achieved, screw in the original plugs again.
WARNING
Incorrect handling of safety bolts
- Danger of injury
- Loss of torque
-> Always use new fastening screws and nuts following removal.
-> Observe specified tightening torques.
-> Carry out a visual inspection of all re-used parts.
5. Replace the battery box cover carefully. The cover must be mounted properly.

Fitting battery box cover
6. Attach the four tension hooks on the battery box cover and close using the screwdriver.
7. Clip in wire harness for seat at the battery box.
WARNING
Incorrect handling of safety bolts
- Danger of injury
- Loss of torque
-> Always use new fastening screws and nuts following removal.
-> Observe specified tightening torques.
-> Carry out a visual inspection of all re-used parts.
8. Move the folded seat towards the rear -arrow A- and then fold it forward -arrow B-.

Folding and screwing down seat
9. Tighten fastening screws -1-. => Tightening torque: 45 Nm (33 ftlb.)
10. Clip in the right and left carpet trim -arrows- until they engage securely.

Clipping in carpet trims
11. Clip in the front seat trim at the front seat frame and at the side trim panel -arrow A-.

Clipping in trim panel for front seat frame
12. Press the front seat trim down -arrow B- until the locking lugs engage securely on the seat frame.
Open-circuit voltage measurement
Information
- Compared with the value from PIWIS Tester 2 9818 , the battery voltage can be measured using a hand-held multimeter.
- Proceed as follows:
Information
The open-circuit voltage measurement should be read out using PIWIS Tester 2 9818 in the Gateway control unit by selecting Energy management , Quick closed-circuit current measurement in the menu.
1. Switch off ignition and remove ignition key.
2. Disconnect ground strap on the battery.
Information
- After charging and waiting for at least 2 hours, during which time the battery should neither be loaded nor charged:
3. Measure the battery voltage with a hand-held multimeter.
- The battery open-circuit voltage should not fall below 12.5V.
- If the hand-held multimeter shows 12.5V or more, the battery voltage is OK.
- If the hand-held multimeter shows a battery voltage below 12.5V: Charge battery.
Battery load test
Information
- The acid density test provides information about the state of the battery in conjunction with the battery load test.
- A battery test device is required for the load test.
- The battery need not be removed or disconnected.
- The battery must be charged before the load test is performed.
Carry out battery load test:
1. Switch off ignition and remove ignition key.
2. Observe the information in the operating instructions of the battery test device.
3. Connect the clamps of the test lines to the battery terminals as described in the operating instructions of the test device.
- As the load current varies, the current must be set depending on the battery capacity (operating instructions of test device).
4. Perform the battery load test in accordance with the operating instructions.
- The result of the battery load test is a voltage value that must be compared with the specified minimum voltage (limit value).

5. If the minimum voltage is not attained, replace battery.
Remarks on battery load test:
The battery voltage sinks during this test due to the severe load on the battery.
If the battery is in order, the voltage value only decreases to the minimum voltage.
If the battery is faulty, the battery voltage will sink very quickly below the specified minimum voltage.
After the test has taken place, the low voltage value remains over a long period of time; the voltage increases again slowly.
Charging battery
WARNING
Highly inflammable or explosive materials
- Danger of fire or explosion
-> Avoid contact with hot parts or sources of ignition.
-> Use suction to remove ignitable vapours.
-> Attach warning sign in a clearly visible position.
Information
- A battery charging device is required.
- Observe charging device operating instructions.
- The battery must have a minimum temperature of 0°C.
- If possible, do not fast charge batteries as this can damage them.
- If exhaustively discharged batteries are charged quickly, they will not take up a charge current or they will be identified too early as full due to the so-called "surface charge".
NOTICE
A battery charger for providing an external power supply or for jump-lead starting is connected directly to the battery in the vehicle.
- Risk of damage to the battery sensor.
- Battery sensor sends incorrect battery values to the vehicle electrical system.
-> Always connect a battery charger for providing an external power supply or for jump-lead starting to the defined connections in the engine compartment. => 2X00IN Battery trickle charging
1. Switch off battery charging device.
2. Switch off ignition and remove ignition key.
3. Connect wires from the charger to the external power supply points.
4. Set the charge current on the battery charging device according to the battery capacity.
5. Switch on battery charging device.
Procedure for charging exhaustively discharged batteries:
Batteries which are not in operation for a long period of time discharge.
A battery is exhaustively discharged if the open-circuit voltage has sunk below 11.6 V.see open-circuit voltage measurement
In exhaustively discharged batteries, the battery acid (sulphuric acid and water mixture) consists of virtually only water, as the sulphuric acid proportion is considerably reduced.
Exhaustively discharged batteries sulphatise, i.e. the entire plate surfaces of the batteries harden.
If exhaustively discharged batteries are immediately recharged after an exhaustive discharge, the sulphatisation recedes again.
If these batteries are not recharged, the plates continue to harden and charge take-up ability is limited. A reduction in the battery performance is the result.
Exhaustively discharged batteries must be charged with a low charge current as follows:
- Set charge current to maximum 10% of battery capacity, i.e. with a 95 Ah battery the charge current is max. 9.5 A.
6. Charge battery.
Battery trickle charge
Information
- When working or carrying out tests on the vehicle or when the vehicle is in the workshop, a battery charger with a rated current of at least 40 A must be connected.
- As soon as the vehicle is unlocked, e.g. the vehicle is in the workshop or salesroom, it must be trickle charged with a battery charging device.
1. Switch off battery charging device.
2. Switch off ignition and remove ignition key.
3. Remove cover for jump lead starting terminal.

Removing cover for jump lead starting terminal
4. Open protective cover on the positive terminal -+- -A-.

Opening protective cover
5. First, connect the positive cable from the charging device to the positive terminal for jump lead starting -+-. => Tightening torque: 3.5 ftlb.
6. Connect the negative cable from the charging device to the ground point for jump lead starting - - -. => Tightening torque: 3.5 ftlb.
7. Set the charge current on the battery charging device according to the battery capacity.
8. Switch on battery charging device.
Connecting the battery for trickle charging
A suitable battery charging device must be connected to the vehicle electrical system when performing the following tasks. All unnecessary loads must be switched off.
When working on the vehicle for more than 15 minutes
When running a diagnosis using the Porsche System Tester
When adjusting the headlights
When working on or with the Infotainment system
If the doors, bonnet and rear lid are open for a long period of time or if these components are actuated frequently