407719 Removing and installing front anti-roll bar
WM 407719 Removing and installing front anti-roll bar
Technical values

Preliminary work
1. Remove front-axle support -> 400819 Removing and installing front-axle support - section on "Removing" 400819 Removing and installing front-axle support.
Removing front anti-roll bar

Overview
1. Get a second mechanic to secure the anti-roll bar to prevent it from falling.
2. Screw off fastening nut -2- for suspension/stabiliser -1-.

Suspension/stabiliser mounting
3. Press suspension/stabiliser -1- outwards.
4. Remove anti-roll bar.
Installing front anti-roll bar
WARNING
Wheel bearing housing raised incorrectly
- Risk of squashing
- Risk of damage to components
-> Wear personal protective gear.
-> Do not raise the wheel suspension higher than the normal vehicle position (vehicle resting on wheels).
Information
The anti-roll bar must be positioned before tightening the fastening screws on the anti-roll bar support (=front-axle support) so that the highest point of the anti-roll bar is positioned at a distance from the frame support (not the fold!) of -Y-.
The dimension -Y- is => Control value: 93 mm.
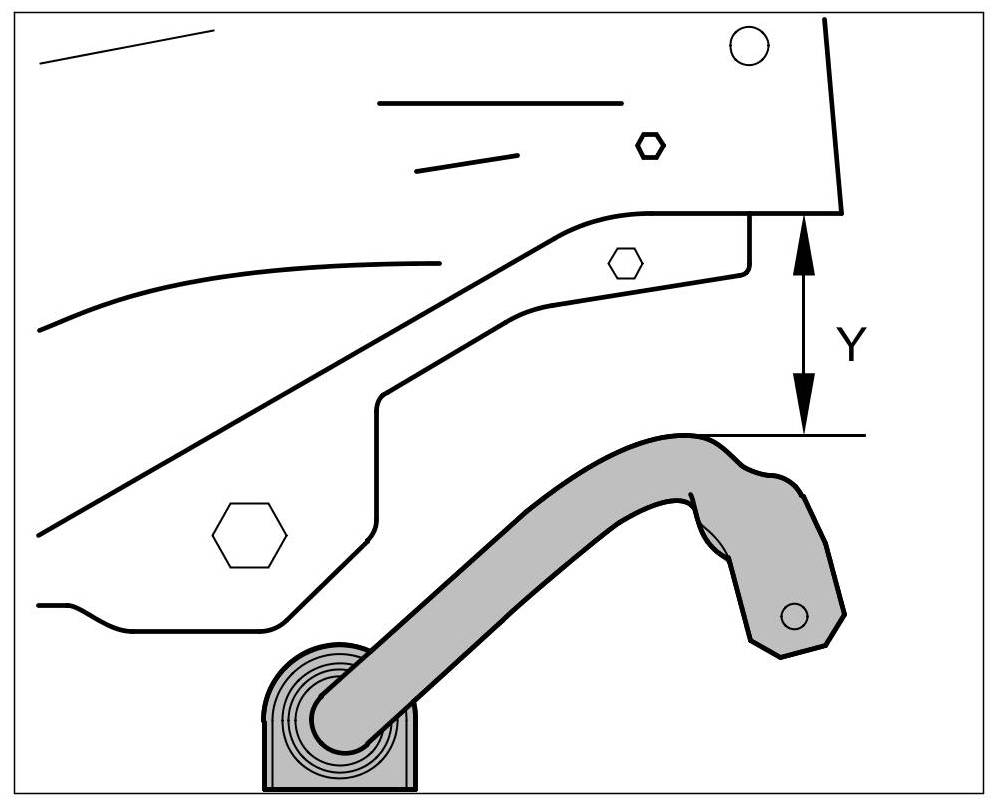
Installation dimension of anti-roll bar
This ensures that the position of the anti-roll bar in the support corresponds to the normal vehicle position.
Information
- All the threaded joints on the axle must be tightened in vehicle position. Vehicle position means: vehicle standing on its wheels, or the wheel suspension is raised using a universal vehicle lift. Dimension -X- , from lower edge of wing to middle of axle corresponds to vehicle position. For details of current height values, see -> 4495TW Adjustment values for suspension alignment 4495TW Adjustment values for suspension alignment. Always observe the following points!

Dimension X - centre of wheel to lower edge of wing (rear axle shown)
Steel springs
- The vehicle position is reached at the front axle by placing the vehicle onto the wheels in a suitable work area (wheel alignment platform, workshop pit).
Air suspension
- The vehicle position is reached at the front axle (with air suspension) by bleeding the respective air spring using the Porsche System Tester and carefully lifting the respective wheel bearing housing. -> 4301IN Bleeding and filling the levelling system 4301IN Bleeding and filling the levelling system
- Use an intermediate layer (hard rubber)! Do not damage the brake cover plate.

Raising wheel carrier (air suspension)
- Screws and nuts are Geomet-coated and must not be greased.
- Grease the toothing of the drive shaft slightly with aluminium paste Optimoly TA.
- Drive shafts must not be left hanging from the joint stop! Tie up.
- Use new screws and lock nuts.
- Use correct tightening torques and torque angles. -> 4X00IN00 Tightening torques for front axle
1. The anti-roll bar is installed in reverse order to removal.
Subsequent work
1. Install front-axle support -> 400819 Removing and installing front-axle support - section on "Installing" 400819 Removing and installing front-axle support.
2. Lower the vehicle.