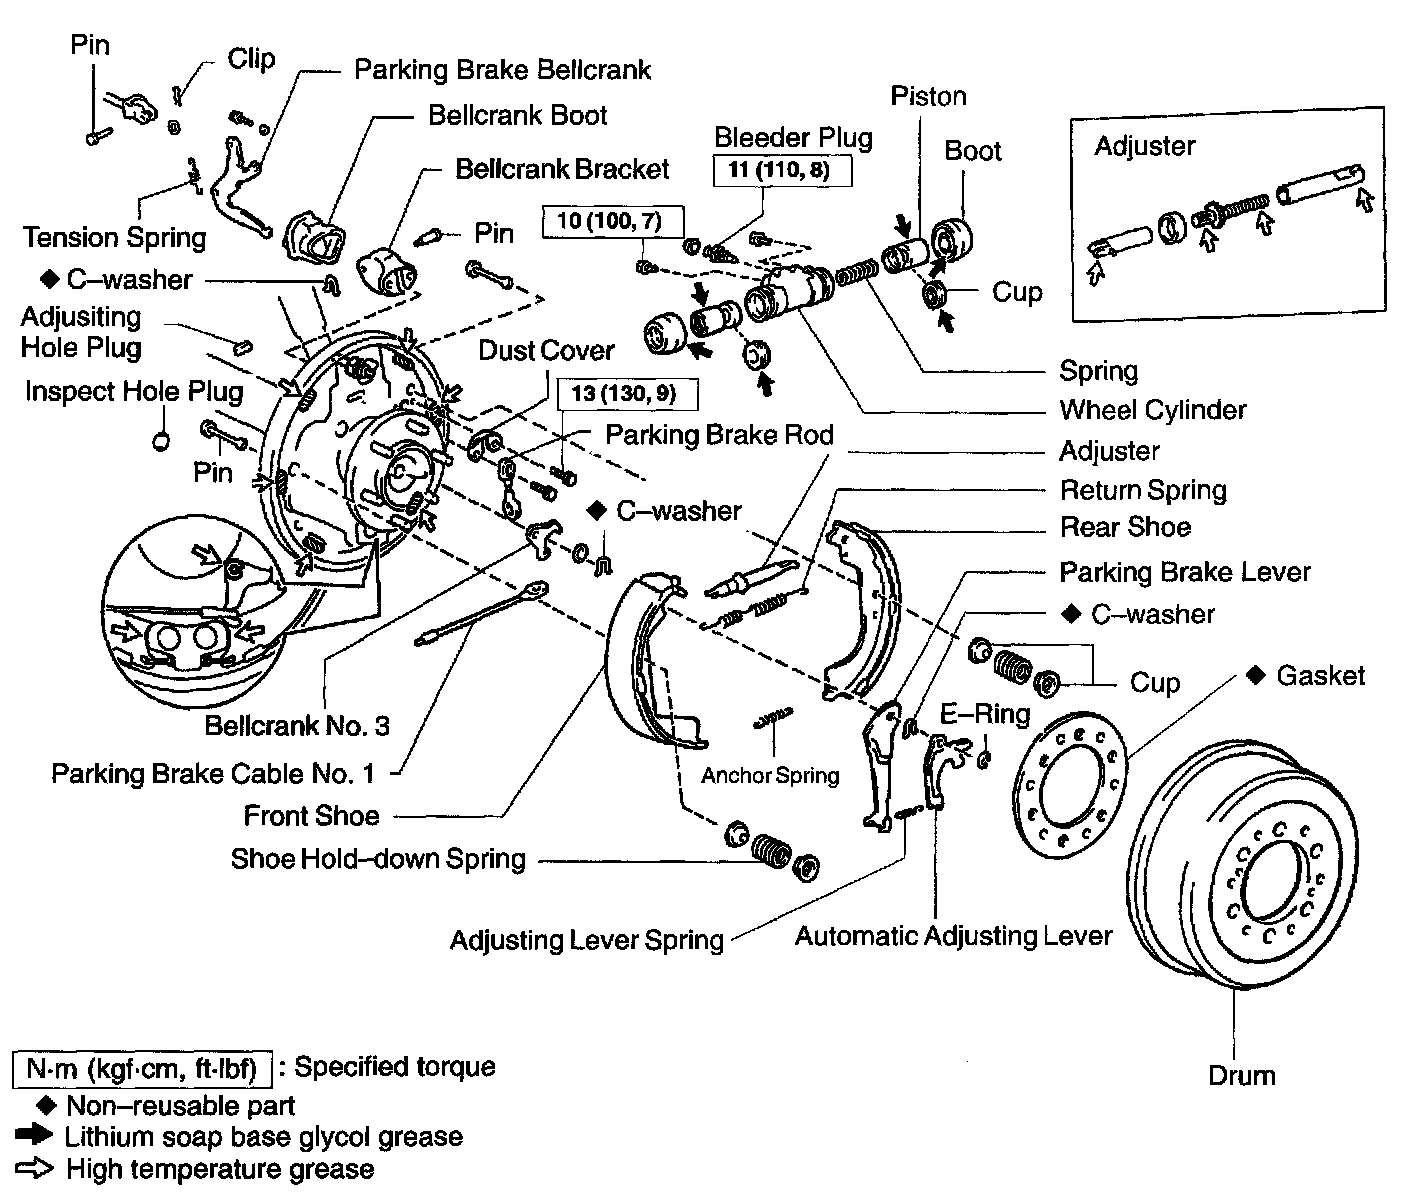
Drum Brake System: Service and Repair
REMOVAL
HINT: Pre runner is the described.
RZN191L-TRPDKAB, RZN196L-CRPDKAB, RZN196L-PRPDKAB, VZN195L-CRPDKAB, VZN195L-PRPDKAB

1. INSPECT SHOE LINING THICKNESS
Remove the inspection hole plug, and check the shoe lining thickness through the hole.
If less than minimum, replace the shoes.
Minimum thickness: 1.0 mm (0.039 inch)
2. REMOVE REAR WHEEL
Torque: 103 Nm (1,050 kgf-cm, 76 ft. lbs.)

3. REMOVE BRAKE DRUM
a. Release the parking brake lever and remove the brake drum.
HINT: If the brake drum cannot be removed easily, do the following steps.
b. Remove the adjusting hole plug from the backing plate.
c. Insert a screwdriver through the hole in the backing plate, and hold the automatic adjusting lever away from the adjusting bolt.
d. Using another screwdriver, reduce the brake shoe adjustment by turning the adjusting bolt.
4. REMOVE REAR SHOE

a. Using SST, disconnect the return spring.
SST 09703-30010

b. Using SST, remove the shoe hold-down spring, 2 cups and pin.
SST 09718-00010
c. Disconnect the anchor spring from the rear shoe and remove the rear shoe.
d. Remove the anchor spring from the front shoe.

5. REMOVE FRONT SHOE
a. Using SST, remove the shoe hold-down spring, 2 cups and pin.
SST 09718-00010
b. Remove the return spring from the front shoe.
c. Disconnect the parking brake cable No. 1 from the parking brake bellcrank No. 3.
d. Remove the front shoe with adjuster.
e. Disconnect the parking brake cable No. 1 from the front shoe.
6. REMOVE ADJUSTER FROM FRONT SHOE
a. Remove the adjusting lever spring.
b. Remove the adjuster.
Remove E-Ring And C-Washer:

7. REMOVE AUTOMATIC ADJUSTING LEVER AND PARKING BRAKE LEVER
a. Remove the E-ring.
b. Remove the automatic adjusting lever.
c. Remove the C-washer.
d. Remove the parking brake lever.
8. REMOVE AND DISASSEMBLE PARKING BRAKE BELLCRANK
a. Remove the clip and disconnect the parking brake cable.
b. Remove the tension spring.

c. Using a screwdriver, remove the C-washer and bellcrank No. 3 from the backing plate with parking brake rod.
d. Remove the 2 bolts, parking brake bellcrank and dust cover.
Torque: 13 Nm (130 kgf-cm, 9 ft. lbs.)
e. Remove the bellcrank boot from the bellcrank bracket.

f. Remove the C-washer and pin.
g. Remove the parking brake bellcrank from the bellcrank bracket.

9. REMOVE WHEEL CYLINDER
a. Using SST, disconnect the brake line. Use a container to catch the brake fluid.
SST 09023-00100
Torque: 15 Nm (155 kgf-cm, 11 ft. lbs.)
b. Remove the 2 bolts and the wheel cylinder.
Torque: 10 Nm (100 kgf-cm, 7 ft. lbs.)
10. DISASSEMBLE WHEEL CYLINDER
a. Remove the 2 boots, 2 pistons and spring.
b. Remove the 2 piston cups from each piston.
INSPECTION
1. INSPECT DISASSEMBLED PARTS
Inspect the disassembled parts for wear, rust or damage.
2. MEASURE BRAKE DRUM INSIDE DIAMETER
Standard inside diameter: 295.0 mm (11.614 inch)
Maximum inside diameter: 297.0 mm (11.693 inch)
3. MEASURE BRAKE SHOE LINING THICKNESS
Standard thickness: 6.0 mm (0.236 inch)
Minimum thickness: 1.0 mm (0.039 inch)
4. INSPECT REAR BRAKE LINING AND DRUM FOR PROPER CONTACT
INSTALLATION
Installation is in the reverse order of removal.
NOTICE: Apply lithium soap base glycol grease and high temperature grease to the parts indicated by the arrows.

1. ADJUST BELLCRANK
a. Lightly pull the bellcrank in direction A until there is no slack at part B.
b. In this condition, turn the adjusting bolt so that dimension C will be 0.4 - 0.8 mm (0.016 - 0.031 inch).
c. Lock the adjusting bolt with the lock nut.
d. Connect the parking brake cable to the parking brake bellcrank and install the clip.
e. Install the tension spring.
2. CHECK OPERATION OF AUTOMATIC ADJUSTING MECHANISM
3. CHECK CLEARANCE BETWEEN BRAKE SHOES AND DRUM
Shoe clearance: 0.6 mm (0.024 inch)
4. FILL BRAKE RESERVOIR WITH BRAKE FLUID
5. BLEED BRAKE SYSTEM
6. CHECK FOR LEAKS