Overhaul
DISASSEMBLY1. w/ Vertical adjuster:
REMOVE VERTICAL ADJUSTER KNOB
Using a screwdriver, remove the clip and vertical adjuster knob.
HINT: Tape the screwdriver tip before use.
2. REMOVE RECLINING ADJUSTER RELEASE HANDLE

Using a screwdriver, remove the reclining adjuster release handle.
HINT: Tape the screwdriver tip before use.
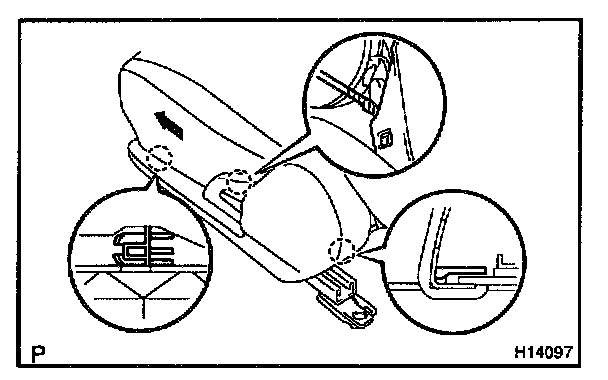
3. REMOVE FRONT SEAT CUSHION SHIELD
Remove the front seat cushion shield as shown in the illustration.
4. REMOVE FRONT SEAT CUSHION INNER SHIELD
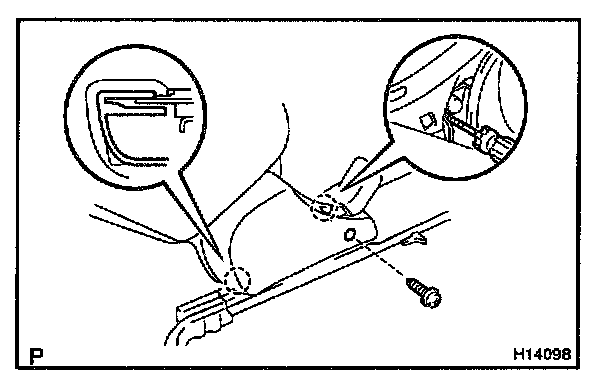
Remove the screw and front seat cushion inner shield as shown in the illustration.
5. REMOVE FRONT SEAT INNER BELT
a. Cut off the clamp and connector.
b. Remove the bolt and front seat inner belt.
6. REMOVE SEAT CUSHION ASSEMBLY
a. Remove the 4 bolts and seat cushion assembly.
b. Remove the hog rings.
c. Disengage that seat cushion cover hooks and remove the seat cushion frame.
d. Remove the hog rings between the seat cushion cover and seat cushion pad.
e. Remove the seat cushion cover from the seat cushion pad.
7. REMOVE SEATBACK ASSEMBLY
a. Remove the hog rings.
b. Turn over the seatback cover.
c. Remove the 4 bolts and seatback assembly
d. Remove the hog rings between the seat back cover and the seatback pad.
e. Remove the seatback cover and the seatback pad from the seatback frame.
8. REMOVE SEAT TRACK HANDLE
Using a screwdriver, remove the seat track handle.
HINT: Tape the screwdriver tip before use.
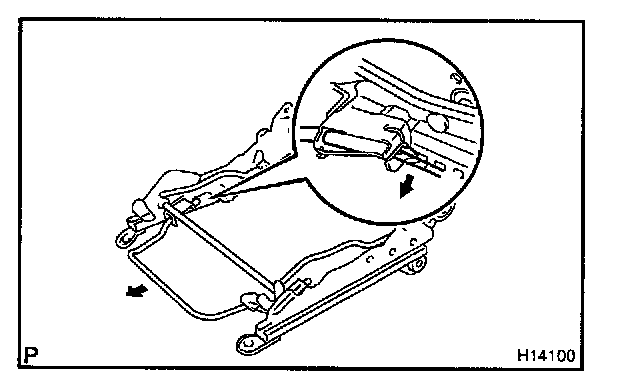
9. REMOVE RECLINING CONNECTING PIPE
10. DISASSEMBLE OUTER AND INNER TRACK
a. Using a screwdriver, remove the E-ring.
b. Disassemble the outer track and inner track.
REASSEMBLY
1. ASSEMBLE OUTER TRACK AND INNER TRACK
Assemble the outer track and inner track with a new E-ring.
2. INSTALL SEAT TRACK HANDLE
3. INSTALL RECLINING CONNECTING PIPE
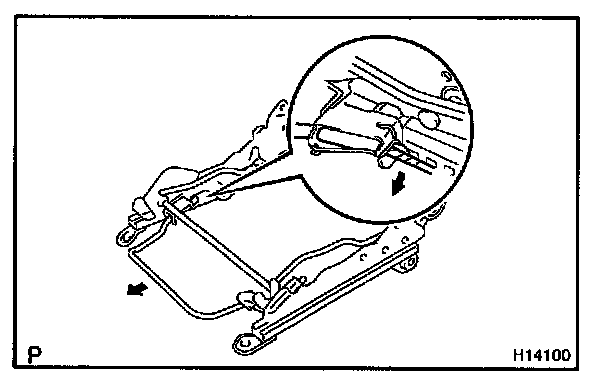
a. Adjust the reclining lock positions of the seat adjusters.
b. Slide the seat adjusters to the most front position.
c. Place the adjusters on a spacer to adjust the seat rail in parallel and install the connecting pipe.
HINT: When installing the connecting pipe while raising up the adjusters, the lock position adjusted in step-(a) may become detached. When this happens, locking cannot be done properly.
4. INSTALL FRONT SEAT INNER BELT
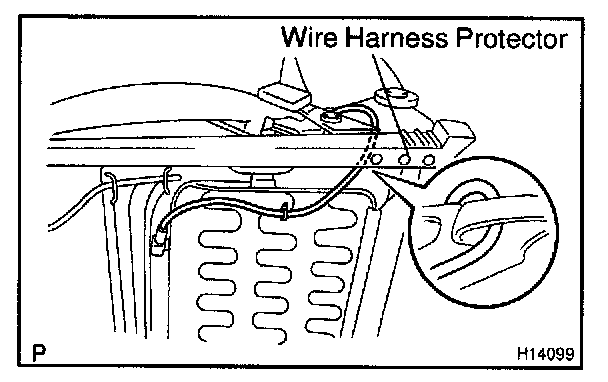
a. Pass the wire harness of the front seat inner belt through the wire harness protector of the seat cushion assembly and install the front seat inner belt.
Torque: 42 N.m (430 kgf.cm, 30 ft.lbf)
b. Install the front seat inner belt wire harness to the seat cushion frame.
5. INSTALL SEATBACK COVER
a. Install the seatback pad to the seatback frame.
b. Install the seatback cover to the seatback pad with new hog rings.
HINT: When installing the hog rings, take care not to have wrinkles on the cover as much as possible.
6. INSTALL SEAT CUSHION ASSEMBLY
a. Install the seat cushion cover to the seat cushion pad with new hog rings.
HINT: When installing the hog rings, take care not to have wrinkles on the cover as much as possible.
b. Install the seat cushion frame to the seat cushion cover with pad.
c. Engage the seat cushion hooks and install new hog rings.
HINT: When installing the hog rings, take care not to have wrinkles on the cover as much as possible.
d. Install the seat cushion assembly with the 4 bolts.
Torque: 21 N.m (210 kgf.cm, 15 ft.lbf)
7. INSTALL SEAT BACK ASSEMBLY
a. Install the seatback assembly with the 4 bolts.
Torque: 43 N.m (440 kgf.cm, 32 ft.lbf)
b. Pull down the seatback cover closed.
c. Install new hog rings.
HINT: When installing the hog rings, take care not to twist them as much as possible.
8. INSTALL FRONT SEAT CUSHION INNER SHIELD
9. INSTALL FRONT SEAT CUSHION SHIELD
10. INSTALL RECLINING ADJUSTER RELEASE HANDLE
11. w/ Vertical adjuster:
INSTALL VERTICAL ADJUSTER KNOB