Component Inspection
NOTE: This article contains corrected data processed from TSB# PG001-05.
INSPECTION


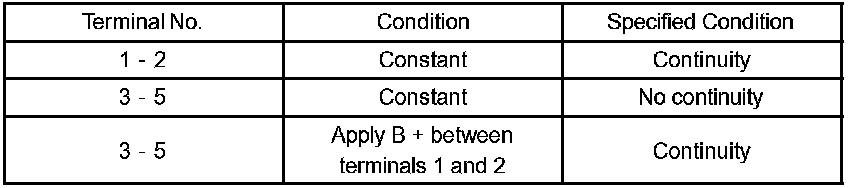
1. INSPECT POWER WINDOW REGULATOR MASTER SWITCH ASSEMBLY
a. Check the continuity between each terminal of the connector.
NOTICE: Whether the operation is good or bad can be judged by the basic function check, because the continuity cannot be checked by UP/DOWN operation of the driver side switch.
If the continuity is not as specified, replace the switch.


2. INSPECT POWER WINDOW REGULATOR SWITCH ASSEMBLY
a. Check the continuity between each terminal of the connector when operating the switch.
If the continuity is not as specified, replace the switch.


3. INSPECT POWER WINDOW REGULATOR MOTOR ASSEMBLY LH
NOTICE:
- Be sure not to apply the battery voltage to terminal 2, 3 and 6 of the power window regulator motor assembly LH connector, because it might damage the pulse sensor and the limit switch.
- Be sure to reset the power window regulator motor assembly (initial position setting of the limit switch) when the power window regulator motor assembly LH is installed to the regulator.
a. Inspect the operation of the front LH side power window regulator motor assembly.
(1) When adding the battery voltage to each connector terminal, check that the motor operates smoothly.
b. Check the PTC operation inside the power window regulator motor.
NOTICE: Work must be perform with the power window regulator and door glass installed to the vehicle.
(1) Set the DC 400 A probe to terminal 4 or 5 of the wire harness.
NOTICE: Match the arrow mark of the probe with the current direction.
(2) Set the door glass at the fully closed position.
(3) When approximately 60 seconds have passed after fully closing the door glass, check how long the current when pressing the power regulator switch UP again (at initial time) takes to change from approximately 16 - 34 A to less than 1 A.
Standard: Approximately 4 - 90 seconds
(4) When approximately 60 seconds have passed after the cutoff checking, check that the door glass will go down when the power regulator switch is pressed DOWN.


4. INSPECT POWER WINDOW REGULATOR MOTOR ASSEMBLY RH
a. Inspect the operation of the front RH side power window regulator motor assembly.
(1) When adding the battery voltage to each connector terminal, check that the motor operates smoothly.
b. Check the PTC operation inside the power window regulator motor.
NOTICE: Work must be perform with the power window regulator and door glass installed to the vehicle.
(1) Set the DC 400 A probe to terminal 4 or 5 of the wire harness.
NOTICE: Match the arrow mark of the probe with the current direction.
(2) Set the door glass at the fully closed position.
(3) When approximately 60 seconds have passed after fully closing the door glass, check how long the current when pressing the power regulator switch UP again (at initial time) takes to change from approximately 16 - 34 A to less than 1 A.
Standard: Approximately 4 - 90 seconds
(4) When approximately 60 seconds have passed after the cutoff checking, check that the door glass will go down when the power regulator switch is pressed DOWN.


5. INSPECT POWER WINDOW REGULATOR MOTOR ASSEMBLY LH
a. Inspect the operation of the rear LH side power window regulator motor assembly.
(1) When adding the battery voltage to each connector terminal, check that the motor operates smoothly.
b. Check the PTC operation inside the power window regulator motor.
NOTICE: Work must be perform with the power window regulator and door glass installed to the vehicle.
(1) Set the DC 400 A probe terminal 4 or 5 of the wire harness.
NOTICE: Match the arrow mark of the probe with the current direction.
(2) Set the door glass at the fully closed position.
(3) When approximately 60 seconds have passed after fully closing the door glass, check how long the current when pressing the power regulator switch UP again (at initial time) takes to change from approximately 16 - 34 A to less than 1 A.
Standard: Approximately 4 - 90 seconds
(4) When approximately 60 seconds have passed after the cutoff checking, check that the door glass will go down when the power regulator switch is pressed DOWN.


6. INSPECT POWER WINDOW REGULATOR MOTOR ASSEMBLY RH
a. Inspect the operation of the rear RH side power window regulator motor assembly.
(1) When adding the battery voltage to each connector terminal, check that the motor operates smoothly.
b. Check the PTC operation inside the power window regulator motor.
NOTICE: Work must be perform with the power window regulator and door glass installed to the vehicle.
(1) Set the DC 400 A probe to terminal 4 or 5 of the wire harness.
NOTICE: Match the arrow mark of the probe with the current direction.
(2) Set the door glass at the fully closed position.
(3) When approximately 60 seconds have passed after fully closing the door glass, check how long the current when pressing the power regulator switch UP again (at initial time) takes to change from approximately 16 - 34 A to less than 1 A.
Standard: Approximately 4 - 90 seconds
(4) When approximately 60 seconds have passed after the cutoff checking, check that the door glass will go down when the power regulator switch is pressed DOWN.

7. INSPECT POWER WINDOW RELAY ASSEMBLY
a. Inspect the power window relay continuity.
If the continuity is not as specified, replace the relay.