Front Strut Assembly
FRONT SHOCK ABSORBER WITH COIL SPRINGComponents:
Components:

REMOVAL
1. REMOVE FRONT WHEEL
2. REMOVE FRONT WIPER ARM HEAD CAP
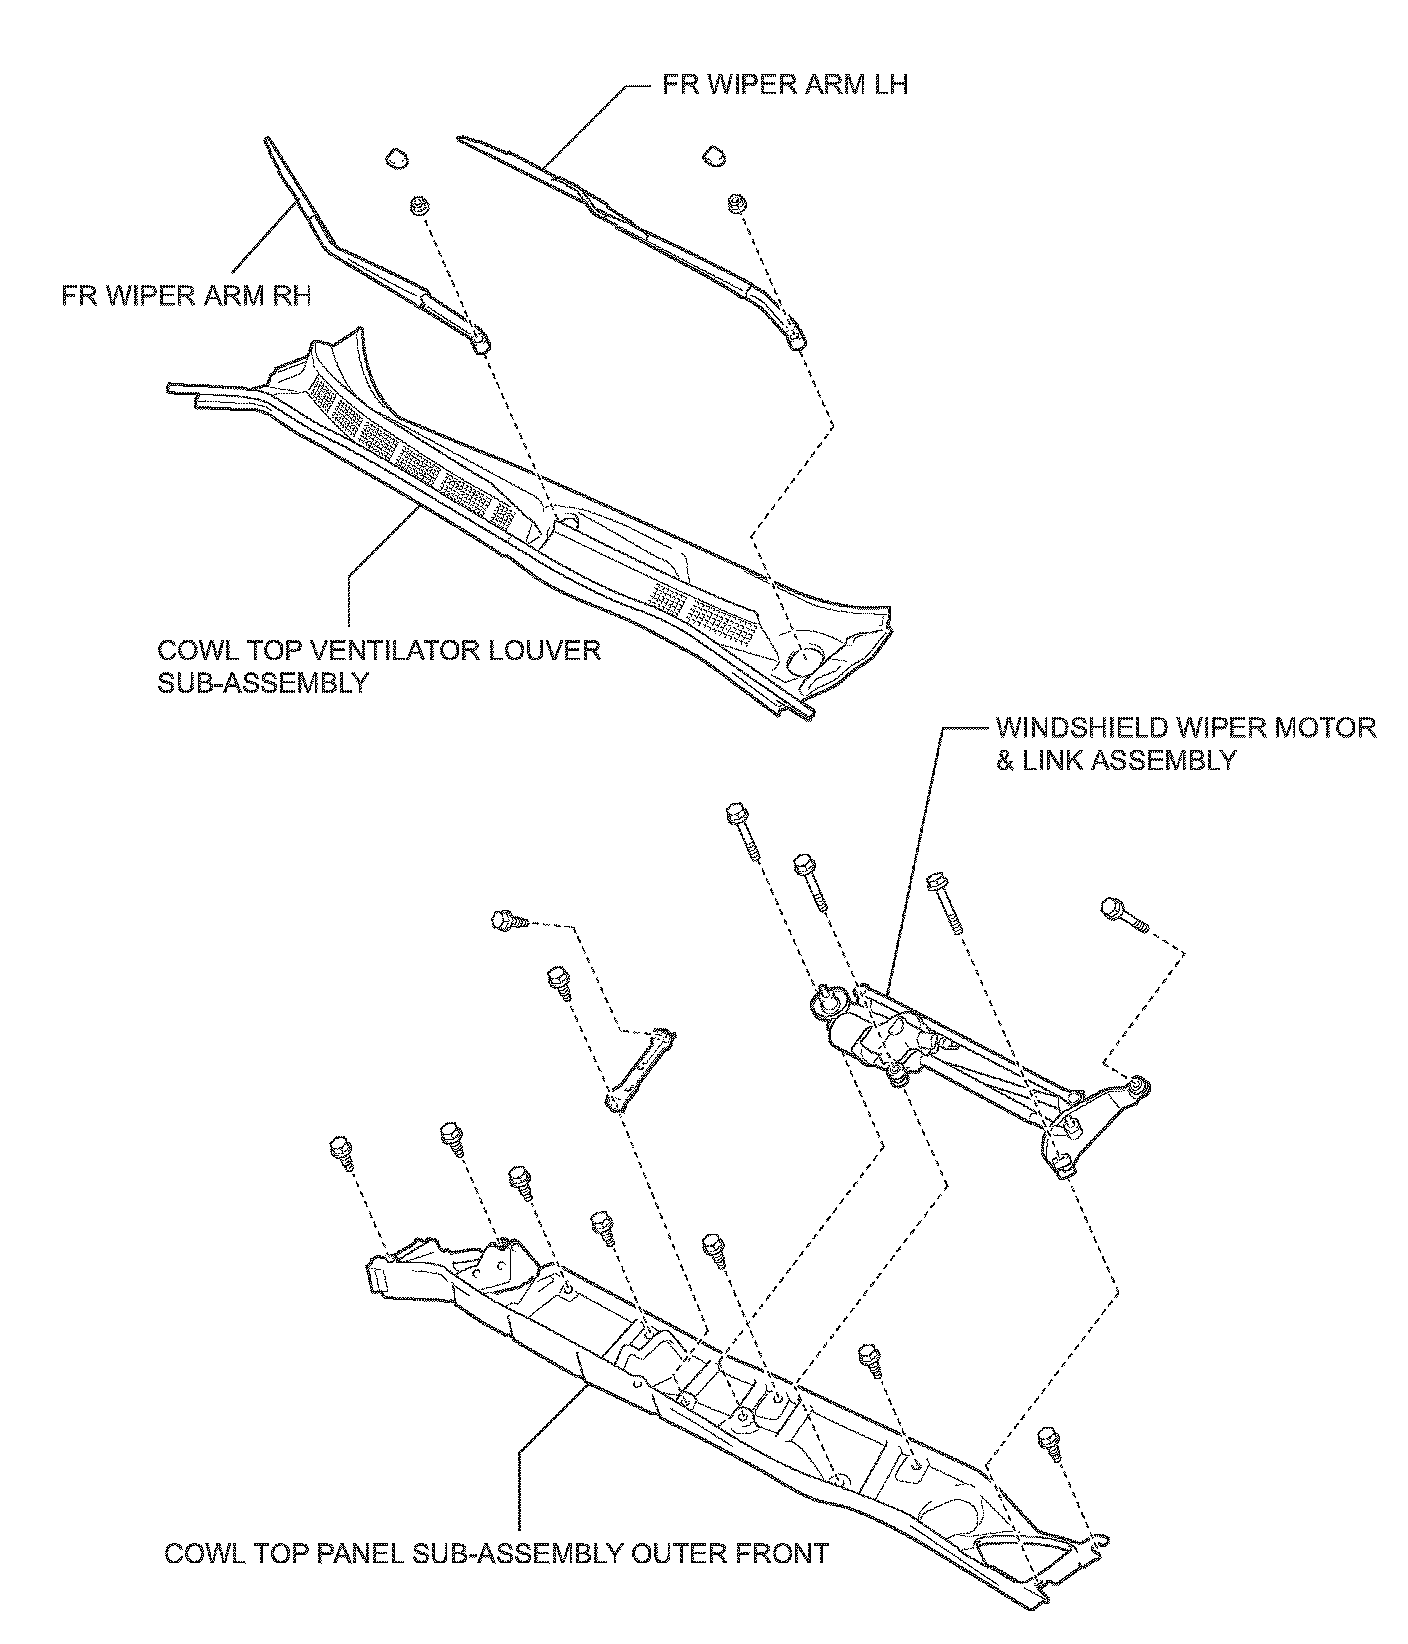
3. REMOVE FIR WIPER ARM RH
4. REMOVE FIR WIPER ARM LH
5. REMOVE COWL TOP VENTILATOR LOUVER SUB ASSEMBLY
6. REMOVE WINDSHIELD WIPER MOTOR & LINK ASSEMBLY
7. REMOVE COWL TOP PANEL SUB-ASSEMBLY OUTER FRONT
HINT: When removing or installing the front shock absorber with coil spring RH, it is necessary to remove the cowl top panel sub-assembly outer front.
a. Disconnect the wire harness from the cowl top panel sub-assembly outer front.

b. Remove the 9 bolts, cowl top brace and cowl top panel sub-assembly outer front.

8. REMOVE FRONT STABILIZER LINK ASSEMBLY LH
a. Remove the nut and disconnect the front stabilizer link assembly LH from the shock absorber assembly front LH.
HINT: If the ball joint turns together with the nut, use a hexagon (6 mm) wrench to hold the stud.

9. REMOVE FRONT SHOCK ABSORBER WITH COIL SPRING
a. Loosen the lock nut.
NOTICE:
^ Do not loosen the nut except for the purpose of disassembling the shock absorber assembly front LH with coil spring.
^ Do not remove the lock nut.

b. Remove the bolt, and disconnect the front flexible hose No.1 and speed sensor front LH.

c. Remove the 2 nuts and 2 bolts on the lower side of the front shock absorber with coil spring.
NOTICE: When removing the bolt, hold the nut not to rotate.

d. Remove the 3 nuts on the upper side of the front shock absorber with coil spring.
e. Remove the front shock absorber with the coil spring.
DISASSEMBLY
1. FIX FRONT SHOCK ABSORBER WITH COIL SPRING
a. Install 2 nuts and a bolt to the bracket at the lower side of the front shock absorber with coil spring and secure it in a vise.

2. REMOVE FRONT SUSPENSION SUPPORT SUB-ASSEMBLY LH
a. Using SST, compress the front coil spring LH.
SST 09727-30021 (09727-00010, 09727-00021, 09727-00031)
NOTICE: Do not use an impact wrench. It will damage the SST.
HINT: Use 2 SST of the same type.
b. Remove the lock nut and the front suspension support sub-assembly.
3. REMOVE FRONT SUSPENSION SUPPORT LH BEARING
4. REMOVE FRONT COIL SPRING SEAT UPPER LH
5. REMOVE FRONT COIL SPRING INSULATOR UPPER LH
6. REMOVE FRONT COIL SPRING LH
7. REMOVE FRONT SPRING BUMPER LH
8. REMOVE FRONT COIL SPRING INSULATOR LOWER LH
9. REMOVE SHOCK ABSORBER ASSEMBLY FRONT LH
INSPECTION

1. INSPECT SHOCK ABSORBER ASSEMBLY FRONT LH
a. Compress and extend the shock absorber rod and check that there is no unusual resistance or unusual sound during operation.
If there is any abnormality, replace the shock absorber assembly front LH with a new one.
NOTICE: When disposing of the shock absorber assembly front LH, see DISPOSAL.
REASSEMBLY
1. INSTALL SHOCK ABSORBER ASSEMBLY FRONT LH
2. INSTALL FRONT COIL SPRING INSULATOR LOWER LH
a. Install the front coil spring insulator lower LH onto the shock absorber assembly front LH.
3. INSTALL FRONT SPRING BUMPER LH
a. Install the front spring bumper LH to the piston rod.

4. INSTALL FRONT COIL SPRING LH
a. Using SST compress the front coil spring LH.
SST 09727-30021 (09727-00010, 09727-00021, 09727-00031)
NOTICE: Do not use an impact wrench. It will damage the SST.
HINT: Use 2 SST of the same type.
b. Install the front coil spring LH to the shock absorber assembly front LH.
HINT: Fit the front coil spring insulator lower LH into the gap of the shock absorber assembly front LH.

5. INSTALL FRONT COIL SPRING INSULATOR UPPER LH
a. Install the front coil spring insulator upper LH as shown in the illustration.

6. INSTALL FRONT COIL SPRING SEAT UPPER LH
a. Install the front coil spring seat upper LH to the shock absorber assembly front LH with the mark facing to the outside of the vehicle.

7. INSTALL FRONT SUSPENSION SUPPORT LH BEARING
a. Install the front suspension support LH bearing.

8. INSTALL FRONT SUSPENSION SUPPORT SUB ASSEMBLY LH
a. Install the front suspension support sub-assembly LH with the mark facing to the outside of the vehicle.
b. Temporarily tighten a new lock nut.
INSTALLATION
1. INSTALL FRONT SHOCK ABSORBER WITH COIL SPRING
a. Install the front shock absorber with coil spring as shown in the illustration.

b. Install the 3 nuts to the upper side of the front shock absorber with coil spring.
Torque: 80 Nm (816 kg-cm, 59 ft. lbs.)

c. Install the 2 bolts and 2 nuts to the lower side of the front shock absorber with coil spring.
Torque: 210 Nm (2,140 kg-cm, 155 ft. lbs.)
NOTICE: When installing the bolt, hold the nut not to rotate.

d. Fully tighten the lock nut.
Torque: 49 Nm (500 kg-cm, 36 ft. lbs.)

e. Install the front flexible hose No.1 and speed sensor front LH with the bolt.
Torque: 19 Nm (1189 kg-cm, 14 ft. lbs.)

2. INSTALL FRONT STABILIZER LINK ASSEMBLY LH
a. Install the front stabilizer link assembly LH with the nut.
Torque: 74 Nm (755 kg-cm, 55 ft. lbs.)
HINT: If the ball joint turns together with the nut, use a hexagon (6 mm) wrench to hold the stud.

3. INSTALL COWL TOP PANEL SUB-ASSEMBLY OUTER FRONT
a. Install the cowl top brace and cowl top panel sub assembly outer front with the 9 bolts.
Torque: 7.5 Nm (76 kg-cm, 66 inch lbs.)
b. Connect the wire harness to the cowl top panel subassembly outer front.
4. INSTALL WINDSHIELD WIPER MOTOR & LINK ASSEMBLY
5. INSTALL FR WIPER ARM LH
6. INSTALL FR WIPER ARM RH
7. INSTALL FRONT WHEEL
Torque: 103 Nm (1,050 kg-cm, 76 ft. lbs.)
8. INSPECT AND ADJUST FRONT WHEEL ALIGNMENT
DISPOSAL
1. DISPOSE OF SHOCK ABSORBER ASSEMBLY FRONT LH
HINT: Dispose the RH side by the same procedures as the LH side.
a. Fully extend the shock absorber rod.

b. Using a drill, make a hole in the cylinder as shown in the illustration to discharge the gas inside.
CAUTION:
^ When drilling, chips may fly out, work carefully.
^ The gas is colorless, odorless and nonpoisonous.