Installation
WINDSHIELD / WINDOWGLASS: WINDSHIELD GLASS: INSTALLATION
1. CLEAN WINDSHIELD GLASS
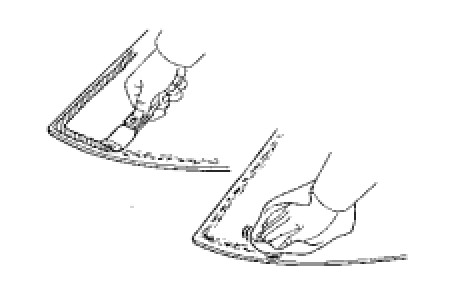
(a) Using a scraper, remove the damaged stoppers, dam and adhesive from the windshield glass.
(b) Clean the outer circumference of the windshield glass with a non-residue solvent.
NOTICE:
* Do not touch the windshield glass surface after cleaning it.
* Even if using a new windshield glass, clean the windshield glass with a non-residue solvent.
2. CLEAN VEHICLE BODY

(a) Clean and shape the contact surface of the vehicle body.
(1) Using a knife, cut away any rough adhesive on the contact surface of the vehicle body to ensure the appropriate surface shape.
NOTICE:
Do not damage the vehicle body.
HINT
Leave as much adhesive on the vehicle body as possible.
(2) Clean the contact surface of the vehicle body with a shop rag or piece of cloth saturated with cleaner.
HINT
Clean the vehicle body even if all the adhesive has been removed.
3. INSTALL WINDSHIELD GLASS STOPPER NO. 1
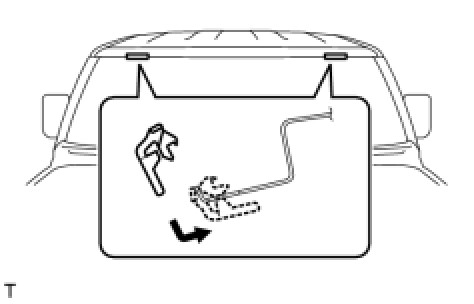
(a) Install 2 new stoppers onto the vehicle body, as shown in the illustration.
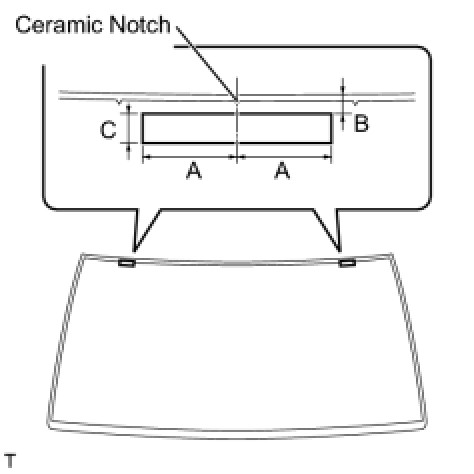
4. INSTALL WINDSHIELD GLASS STOPPER NO. 2
(a) Apply Primer G to the installation parts of the stoppers.
NOTICE:
* Allow the primer to dry for 3 minutes or more.
* Throw away any leftover Primer G.
* Do not apply too much Primer G.
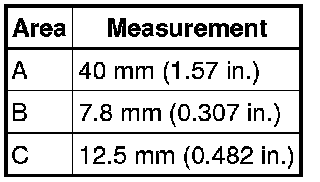
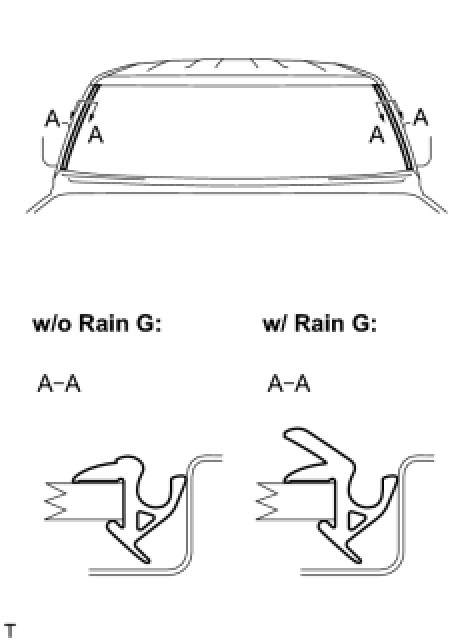
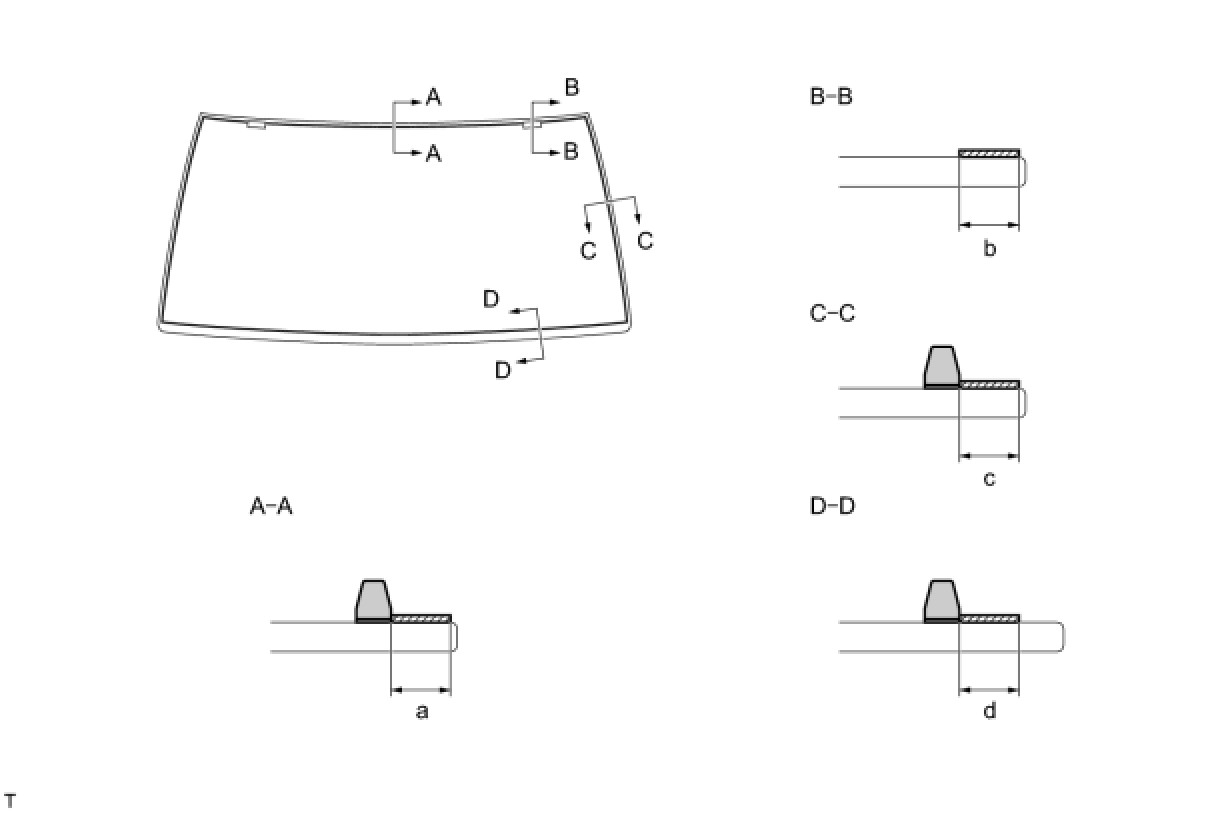
(b) Install 2 new stoppers onto the windshield glass, as shown in the illustration.
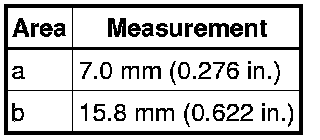
Specification:
5. INSTALL WINDSHIELD OUTSIDE MOULDING
(a) Using a brush or sponge, coat the edge of the glass and the contact surface with Primer G.
NOTICE:
* Allow the primer coating to dry for 3 minutes or more.
* Do not coat the adhesive with Primer G.
* Throw away any leftover Primer G.
(b) Install the moulding onto the windshield glass, as shown in the illustration.
6. INSTALL WINDOW GLASS ADHESIVE DAM
(a) Apply Primer G to the installation parts of new dams.
NOTICE:
* Allow the primer to dry for 3 minutes or more.
* Throw away any leftover Primer G.
* Do not apply too much Primer G.
(b) Install 3 new dams by applying double-sided tape all the way around the windshield glass except where the stoppers are installed, as shown in the illustration.

Specification:
7. INSTALL WINDSHIELD GLASS
(a) Position the windshield glass.
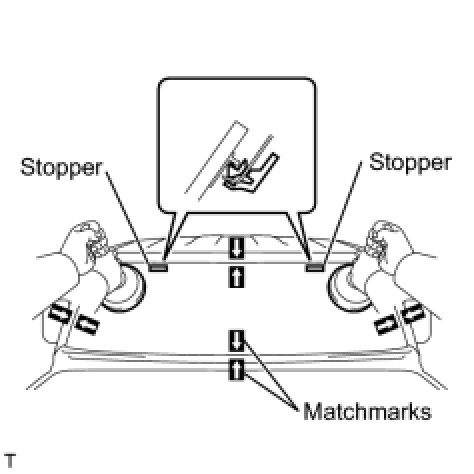
(1) Using suction cups, place the windshield glass in the correct position.
(2) Check that the entire contact surface of the windshield glass rim is perfectly even.
(3) Place matchmarks on the windshield glass and vehicle body.
NOTICE:
Check that the stoppers are correctly attached to the vehicle body.
HINT
When reusing a windshield glass, check and correct the matchmark positions.
(4) Using suction cups, remove the windshield glass.
(b) Using a brush, apply Primer M to the exposed part of the vehicle body.
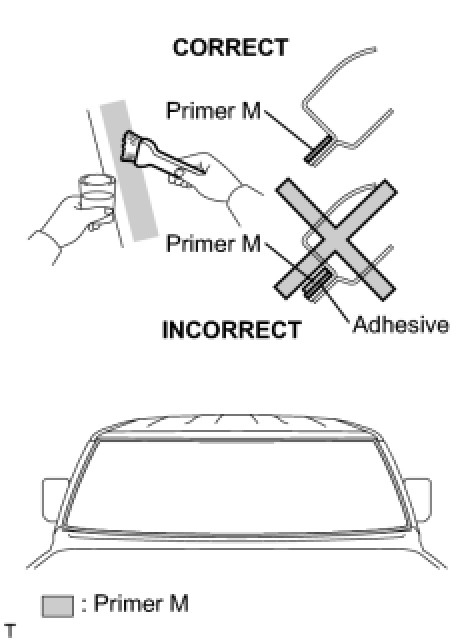
NOTICE:
* Allow the primer to dry for 3 minutes or more.
* Do not apply Primer M to the adhesive.
* Throw away any leftover Primer M.
* Do not apply too much Primer M.
(c) Using a brush or sponge, apply Primer G to the edge of the windshield glass and the contact surface.
Specification:

NOTICE:
* Allow the primer to dry for 3 minutes or more.
* Throw away any leftover Primer G.
* Do not apply too much Primer G.
HINT
If Primer G is applied to any areas other than those specified, wipe off the primer with a clean shop rag or piece of cloth before it dries.
(d) Apply adhesive.
Adhesive:
Toyota Genuine Windshield Glass Adhesive or the equivalent
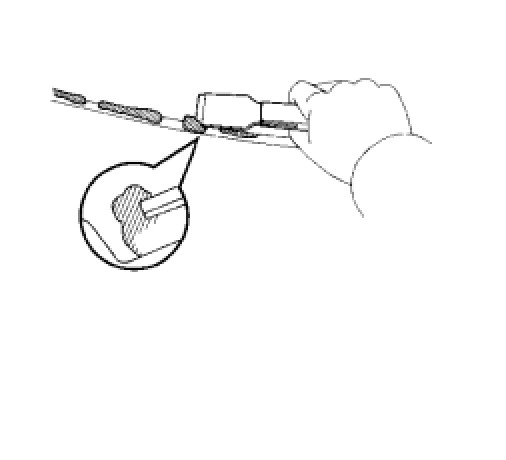
(1) Cut the tip off the cartridge nozzle, as shown in the illustration.

HINT
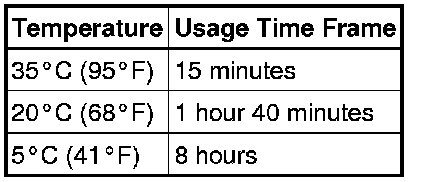
After cutting off the tip, use all adhesive within the times indicated in the table below.
Usage time frame:
(2) Load the sealer gun with the cartridge.
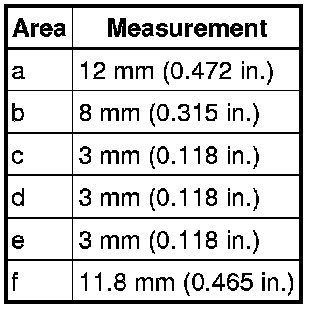
(3) Apply adhesive to the windshield glass, as shown in the illustration.
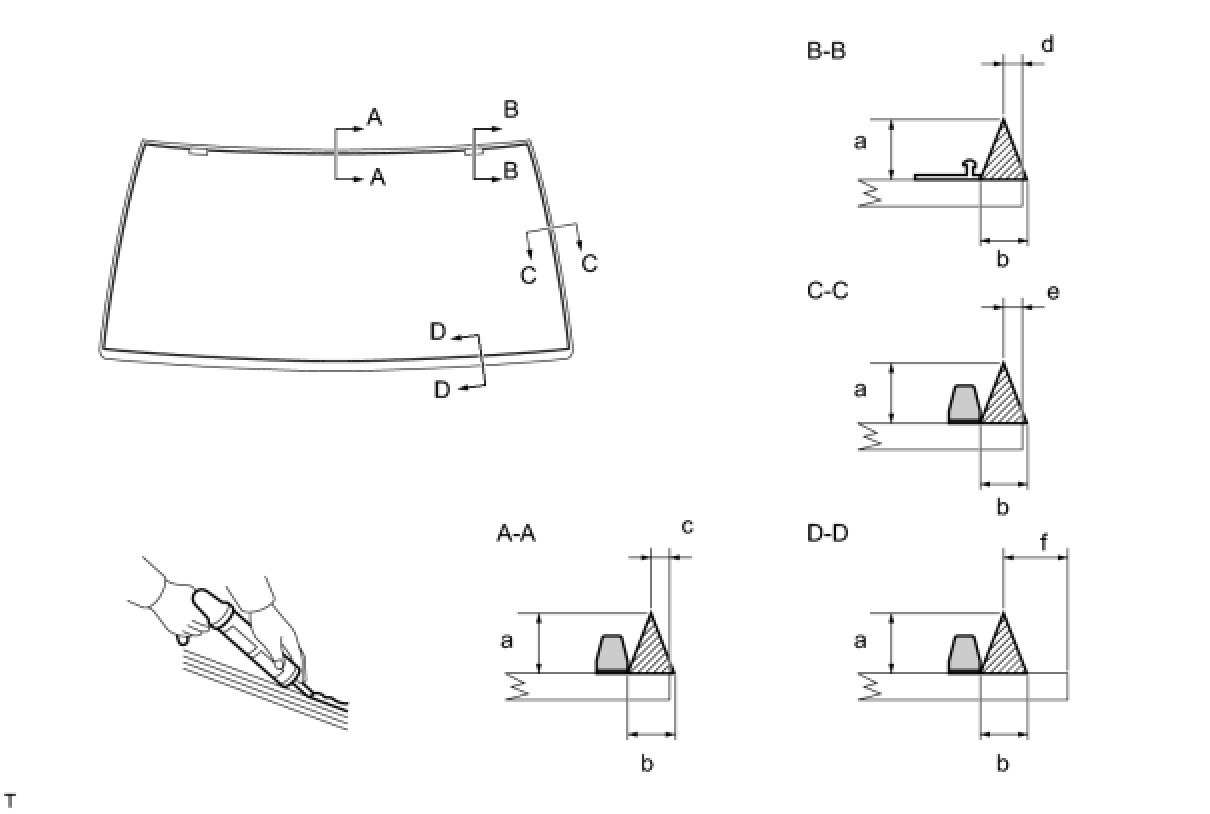
Specification:
(e) Install the windshield glass onto the vehicle body.
(1) Using suction cups, position the windshield glass so that the matchmarks are aligned. Gently press it in along the rim.
NOTICE:
* Allow the primer to dry for 3 minutes or more.
* Check that the stoppers are attached to the vehicle body correctly.
* Check that there is a small gap between the vehicle body and the windshield glass.
(2) Gently press the front surface of the windshield glass to ensure that the windshield glass is securely fitted to the vehicle body.
(3) Using a scraper, remove any excessive or protruding adhesive.
HINT
Apply adhesive to the windshield glass rim.
NOTICE:
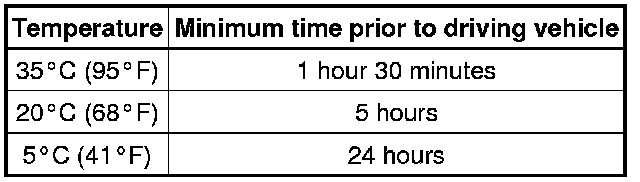
Do not drive the vehicle within the time indicated in the table below.
Minimum time:
8. INSTALL WINDSHIELD OUTSIDE LOWER MOULDING
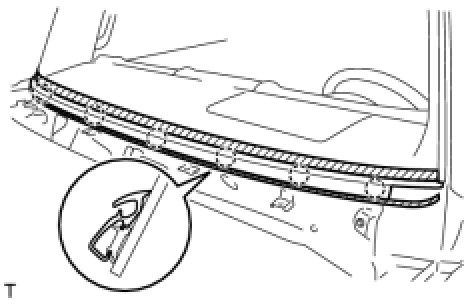
(a) Engage the 6 claws and install the windshield outside lower moulding.
9. CHECK FOR LEAKAGE AND REPAIR
(a) Conduct a leak test by applying water to the adhesive portions after the adhesive has completely hardened.
(b) Seal any leakage with auto glass sealer.
10. INSTALL ROOF SIDE GARNISH PROTECTOR
11. INSTALL FRONT PILLAR OUTER GARNISH
12. INSTALL ROOF DRIP SIDE FINISH MOULDING RETAINER
13. INSTALL WINDSHIELD OUTSIDE UPPER MOULDING SUB-ASSEMBLY
14. INSTALL ROOF HEADLINING
15. INSTALL ROOM LIGHT ASSEMBLY Installation
16. INSTALL INNER REAR VIEW MIRROR ASSEMBLY Installation
17. INSTALL INNER REAR VIEW MIRROR STAY HOLDER COVER Installation
18. INSTALL VISOR HOLDER Installation
19. INSTALL VISOR ASSEMBLY RH Installation
20. INSTALL VISOR ASSEMBLY LH Installation
21. INSTALL FRONT PILLAR GARNISH RH Installation
22. INSTALL FRONT PILLAR GARNISH LH Installation
23. INSTALL VISOR SUB-ASSEMBLY RH Installation
24. INSTALL VISOR SUB-ASSEMBLY LH Installation
25. INSTALL ASSIST GRIP ASSEMBLY Installation
26. INSTALL ASSIST GRIP PLUG Installation
27. INSTALL FRONT DOOR OPENING TRIM WEATHERSTRIP RH Installation
28. INSTALL FRONT DOOR OPENING TRIM WEATHERSTRIP LH Installation
29. INSTALL ROOF SIDE RAIL GARNISH RH Installation
30. INSTALL ROOF SIDE RAIL GARNISH LH Installation
31. INSTALL ROOF SIDE INNER GARNISH COVER RH Installation
32. INSTALL ROOF SIDE INNER GARNISH COVER LH Installation
33. INSTALL COWL SIDE TRIM BOARD RH Installation
34. INSTALL COWL SIDE TRIM BOARD LH Installation
35. INSTALL FOOTREST CLIP Installation
36. INSTALL FRONT FLOOR FOOTREST Installation
37. INSTALL ACCESS DOOR SCUFF PLATE RH Installation
38. INSTALL ACCESS DOOR SCUFF PLATE LH Installation
39. INSTALL FRONT DOOR SCUFF PLATE RH Installation
40. INSTALL FRONT DOOR SCUFF PLATE LH Installation
41. INSTALL COWL TOP VENTILATOR LOUVER LH Installation
42. INSTALL COWL TOP VENTILATOR LOUVER RH Installation
43. INSTALL COWL TOP VENTILATOR LOUVER SUB-ASSEMBLY Installation
44. INSTALL FRONT FENDER SIDE PANEL UPPER LH Installation
45. INSTALL FRONT FENDER SIDE PANEL UPPER RH Installation
46. INSTALL ANTENNA ORNAMENT Installation
47. INSTALL ROOF ANTENNA POLE SUB-ASSEMBLY Installation
48. INSTALL FRONT WIPER ARM AND BLADE ASSEMBLY LH Installation
49. INSTALL FRONT WIPER ARM AND BLADE ASSEMBLY RH (CENTER SIDE) Installation
50. INSTALL FRONT WIPER ARM AND BLADE ASSEMBLY RH Installation
51. INSTALL WINDSHIELD WIPER ARM COVER Installation
52. CONNECT CABLE TO NEGATIVE BATTERY TERMINAL
Torque : 3.9 Nm (40 kgf-cm, 35 in-lbf)