Timing Chain Cover Assembly Overview
Timing Chain Cover Assembly Overview
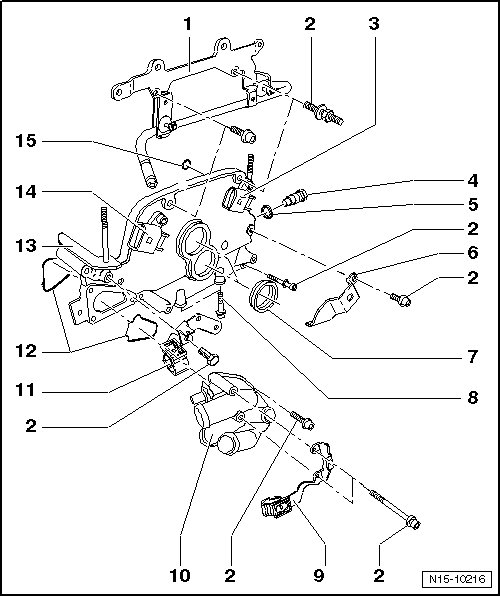
1 Wiring Harness Bracket
• For the wiring harness.
• With coolant pipe.
• Coolant hose connection diagram. Refer to => [ Coolant Hose Connection Diagram ] [1][2]Diagrams.
2 Bolt, 8 Nm
• Used to install the timing chain cover.
• Stud bolt for the ground connection.
3 Camshaft Position (CMP) Sensor 2 (G163)
• For the exhaust camshaft.
• Before disconnecting, mark the allocation of the connector to the component.
4 Chain Tensioner, 40 Nm
• For the camshaft roller chain - item 9 - in the => [ Cylinder Head and Cover Assembly Overview ] Cylinder Head and Cover Assembly Overview.
• Only rotate the engine with the chain tensioner installed.
5 Seal
• Replace if damaged or leaking.
6 Bracket
7 Seals
• For the camshaft adjustment valve 1, - item 11 - and the camshaft adjustment valve 1 (exhaust), - item 12 - in the => [ Cylinder Head and Cover Assembly Overview ] Cylinder Head and Cover Assembly Overview.
• Replace if damaged or leaking.
• Installing, refer to => [ Timing Chain Cover Seal, Installing ].
8 Bolt, 23 Nm
9 Bracket
• For the wiring harness.
10 Coolant Thermostat Housing
• Assembly overview, refer to => [ Coolant Thermostat Housing Assembly Overview ] Service and Repair.
• Coolant hose connection diagram. Refer to => [ Coolant Hose Connection Diagram ] [1][2]Diagrams.
11 Bracket
• For the wiring harness.
12 Seal
• Always replace.
13 Timing Chain Cover
• Install sealant (D 176 501) on the sealing surfaces.
• Preparing the cylinder head gasket for installation. Refer to => [ Cylinder Head Gasket, Preparing for Assembly ] Cylinder Head.
14 Camshaft Position (CMP) Sensor (G40)
• For the intake camshaft.
• Before disconnecting, mark the allocation of the connector to the component.
15 O-ring
• For the oil channel seal.
• Always replace.
• Lubricate before assembling.
Timing Chain Cover Seal, Installing

Special tools, testers and auxiliary items required
• Fitting sleeve (3378)
• Thrust pad (3253/6)
- Do not lubricate the seal.
- Install the seal using (3378) into the cover - 1 - and pull in flush using (3253/6).