Ignition Coil: Service and Repair
Ignition Coil
Special tools, testers and auxiliary items required
• Ignition Coil Puller (T40039)
Removing cylinder 1, 2 and 3:
- Remove bolts - 5 and 6 - and separate electrical connections at ignition coils.

- Remove ignition coil (cylinder 1) using ignition coil puller (T40039).

Removing from cylinder 4:
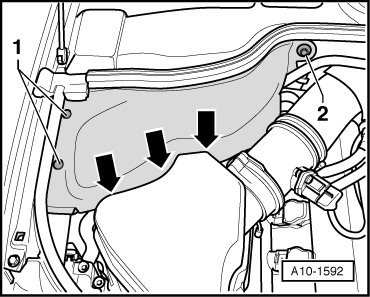
- Remove clips - 1 -.
- remove bolts - 2 - and remove cover.
- Disconnect electrical connector - 1 - from mass air flow (MAF) sensor (G70).
- Open hose clamp - 2 -.
- Remove air filter box - arrows -.

- Remove bolts - 5 and 6 - and separate electrical connections at ignition coils.
- Remove ignition coil (cylinder 4) using ignition coil puller (T40039).
Removing from cylinder 5 and 6:
- Remove bolts - 5 and 6 - and separate electrical connections at ignition coils.

- Remove ignition coils (cylinder 5 and 6) using ignition coil puller (T40039).
Removing from cylinder 7 and 8:
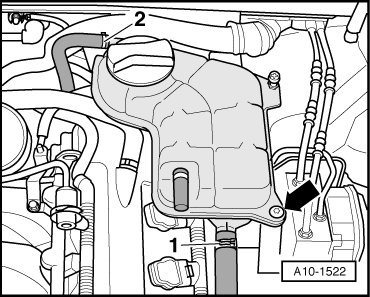
- Remove coolant reservoir - arrow - and set it aside with coolant hoses - 1 - and - 2 -.
- Remove bolts - 5 and 6 - and separate electrical connections at ignition coils.
- Remove ignition coils (cylinder 7 and 8) using the ignition coil puller (T40039).
Installing the ignition coils
Installation is performed in reverse order.