Coolant Reservoir: Service and Repair
Coolant Recovery Reservoir Replacement (LZE, LGD)
Removal Procedure
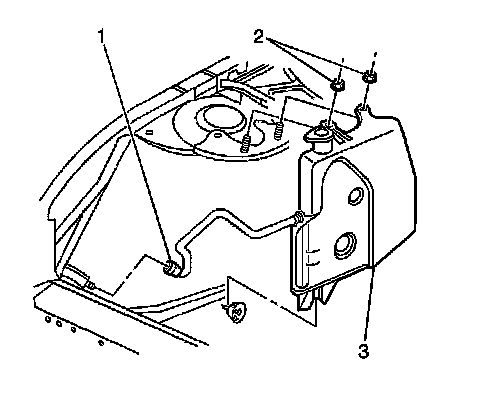
1. Reposition the reservoir hose clamp (1).
2. Remove the reservoir hose from the radiator overflow neck.
3. Remove the coolant recovery reservoir nuts (2) from the shock tower studs.
4. Remove the coolant recovery reservoir (3) from the lower retainer and the shock tower studs.
5. Drain the coolant from the recovery reservoir in to a clean container.
Installation Procedure
1. Install the coolant recovery reservoir (3) onto the lower retainer and the shock tower studs.
Caution: Refer to Fastener Caution (Fastener Caution).
2. Install the coolant recovery reservoir nuts (2) to the shock tower studs and tighten to 3.3 Nm (29 lb in).
3. Lubricate the reservoir hose with clean water. Route the hose to the radiator overflow neck fitting.
4. Install the coolant reservoir hose (1) to the overflow neck fitting.
5. Install the reservoir hose and clamp (1), with the clamp tabs at the 11 o'clock position, to the radiator overflow fitting on the radiator filler neck. The hose end must be flush against the radiator filler neck. Seat the clamp squarely between the radiator filler neck and the flared end of the fitting.
6. Fill the coolant recovery reservoir to the proper level.