Installation
METER / GAUGE / DISPLAY: CLOCK: INSTALLATION
1. INSTALL CLOCK SUB-ASSEMBLY (w/o Navigation System)
(a) Connect the connector.

(b) Install the cover with the 9 screws.

(c) Engage the 5 claws.

(d) Install the panel with the 6 screws.

2. INSTALL RADIO RECEIVER ASSEMBLY (w/o Navigation System) Installation
3. INSTALL NO. 2 RADIO BRACKET (w/o Navigation System) Installation
4. INSTALL NO. 1 RADIO BRACKET (w/o Navigation System) Installation
5. INSTALL INTEGRATION CONTROL PANEL WITH RADIO RECEIVER ASSEMBLY (w/o Navigation System) Installation
6. INSTALL CLOCK ASSEMBLY (w/ Navigation System for DVD)
(a) Check that the wire harness is in the position shown in the illustration.
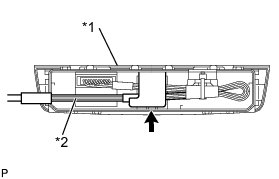
Text in Illustration

(b) Engage the 2 clips and install the clock assembly.
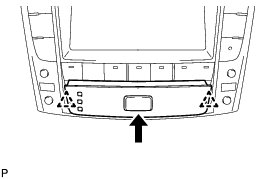
7. INSTALL CLOCK ASSEMBLY (w/ Navigation System for HDD)
(a) Check that the wire harness is in the position shown in the illustration.
Text in Illustration
(b) Engage the 2 clips and install the clock assembly.

(c) Check that the wire harness is in the position shown in the illustration.

8. INSTALL RADIO RECEIVER ASSEMBLY (w/ Navigation System) Installation
9. INSTALL NO. 2 RADIO BRACKET (w/ Navigation System) Installation
10. INSTALL NO. 1 RADIO BRACKET (w/ Navigation System) Installation
11. INSTALL DISPLAY AND NAVIGATION MODULE DISPLAY WITH RADIO RECEIVER ASSEMBLY (w/ Navigation System) Installation
12. INSTALL CENTER LOWER INSTRUMENT CLUSTER FINISH PANEL Installation
13. INSTALL NO. 3 INSTRUMENT PANEL REGISTER ASSEMBLY Installation
14. INSTALL FRONT ASH RECEPTACLE BOX SUB-ASSEMBLY (w/ Ashtray) Installation
15. INSTALL INSTRUMENT PANEL COIN BOX (w/o Ashtray) Installation
16. INSTALL CONSOLE PANEL SUB-ASSEMBLY (for Automatic Transmission) Installation
17. INSTALL UPPER NO. 2 CONSOLE PANEL GARNISH (for Automatic Transmission) Installation
18. INSTALL UPPER NO. 1 CONSOLE PANEL GARNISH (for Automatic Transmission) Installation
19. INSTALL FRONT CONSOLE PANEL SUB-ASSEMBLY (for Manual Transmission) Installation
20. INSTALL REAR CONSOLE PANEL SUB-ASSEMBLY (for Manual Transmission) Installation
21. INSTALL SHIFT LEVER KNOB SUB-ASSEMBLY (for Automatic Transmission) Installation
22. INSTALL SHIFT LEVER KNOB SUB-ASSEMBLY (for Manual Transmission) Installation
23. CONNECT CABLE TO NEGATIVE BATTERY TERMINAL (w/ Navigation System for HDD)
24. ADJUST CLOCK