Powermaster III Unit, Remove
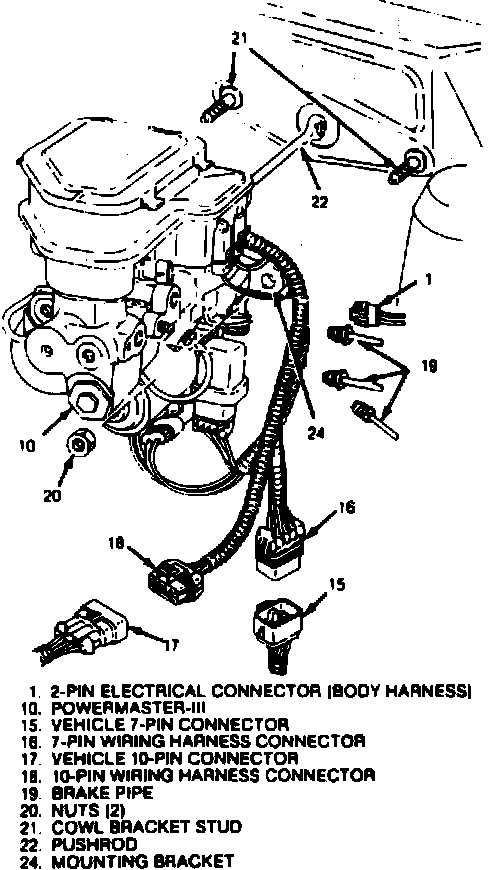
Fig. 78 Powermaster III Brake Tube, Mounting & Electrical Connections:
Do not use wiring harness to aid in lifting or supporting of Powermaster III unit.
1. Depressurize Powermaster III, refer to DEPRESSURIZING POWERMASTER III.
2. Disconnect 7-pin connector (15), from Powermaster III harness connector (16), Fig. 78.
3. Disconnect 10-pin connector (17), from Powermaster III wiring harness connector (18).
4. Disconnect 2-pin connector (1), from fluid level sensor switch (2).
5. Remove three brake pipes (19), from Powermaster III unit. Plug open lines and fittings to prevent fluid loss and contamination.
6. Remove hair pin clip (located inside vehicle), and pushrod (22), from brake pedal.
7. Remove two attaching nuts (20), from cowl bracket studs, then remove Powermaster III unit.
8. Reverse procedure to install, noting the following:
a. Torque two cowl bracket attaching nuts to 15-25 ft. lbs.
b. Torque tube-to-Powermaster III unit nuts to 10-15 ft. lbs.
c. Bleed Powermaster III unit, refer to DEPRESSURIZING POWERMASTER III.