Suction Pipe Replacement
Suction Pipe Replacement
Special Tools
* J 39400-A Halogen Leak Detector
* J 45689 A/C Quick Connect Joint Tool
Removal Procedure
1. Recover the refrigerant from the system. Refer to Refrigerant Recovery and Recharging (Refrigerant Recovery and Recharging).
2. Remove the liquid line. Refer to Liquid Line Replacement (w/C57) (Liquid Line Replacement (w/C57)).
3. Remove the suction line clamp screw from the strut tower.
4. Raise and support the vehicle. Refer to Lifting and Jacking the Vehicle (Service and Repair).
5. Remove the suction line quick connect fitting from the mid-section A/C lines. Refer to Air Conditioning Line/Tube Connector Removal/Replacement (Air Conditioning Line/Tube Connector Removal/Replacement).
6. Lower the vehicle.
7. Remove the suction line quick connect fitting from the strut tower bracket. Refer to Air Conditioning Line/Tube Connector Removal/Replacement (Air Conditioning Line/Tube Connector Removal/Replacement).
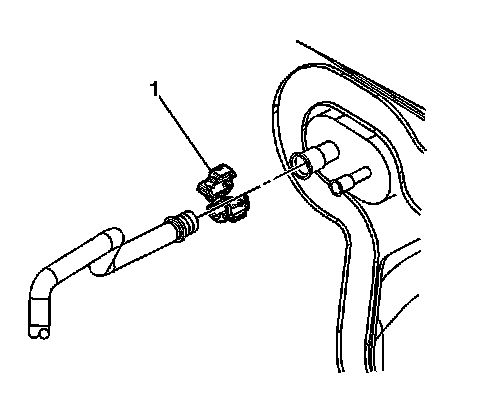
8. Remove the suction line quick connect fitting (1) from the evaporator. Refer to Air Conditioning Line/Tube Connector Removal/Replacement (Air Conditioning Line/Tube Connector Removal/Replacement).
9. Remove the suction line from the vehicle.
10. Remove and discard the O-rings from the suction line.
Installation Procedure
1. Install new O-rings to the suction line. Refer to O-Ring Replacement (Service and Repair).
2. Install the suction line to the vehicle.
3. Install a quick connect fitting (1) to the suction line at the evaporator. Refer to Air Conditioning Line/Tube Connector Removal/Replacement (Air Conditioning Line/Tube Connector Removal/Replacement).
4. Install a quick connect fitting to the suction line at the strut tower. Refer to Air Conditioning Line/Tube Connector Removal/Replacement (Air Conditioning Line/Tube Connector Removal/Replacement).
5. Raise and support the vehicle. Refer to Lifting and Jacking the Vehicle (Service and Repair).
6. Install a quick connect fitting to the suction line at the mid-section A/C lines. Refer to Air Conditioning Line/Tube Connector Removal/Replacement (Air Conditioning Line/Tube Connector Removal/Replacement).
7. Lower the vehicle.
Caution: Refer to Fastener Caution (Fastener Caution).
8. Install the suction clamp screw to the strut tower.
Tighten the screw to 1 Nm (9 lb in).
9. Install the liquid line. Refer to Liquid Line Replacement (w/C57) (Liquid Line Replacement (w/C57)).
10. Evacuate and recharge the A/C system. Refer to Refrigerant Recovery and Recharging (Refrigerant Recovery and Recharging).
11. Leak test the fittings of the component using J 39400-A .