Engine Fuel Pipes
Engine Compartment Fuel Pipes:
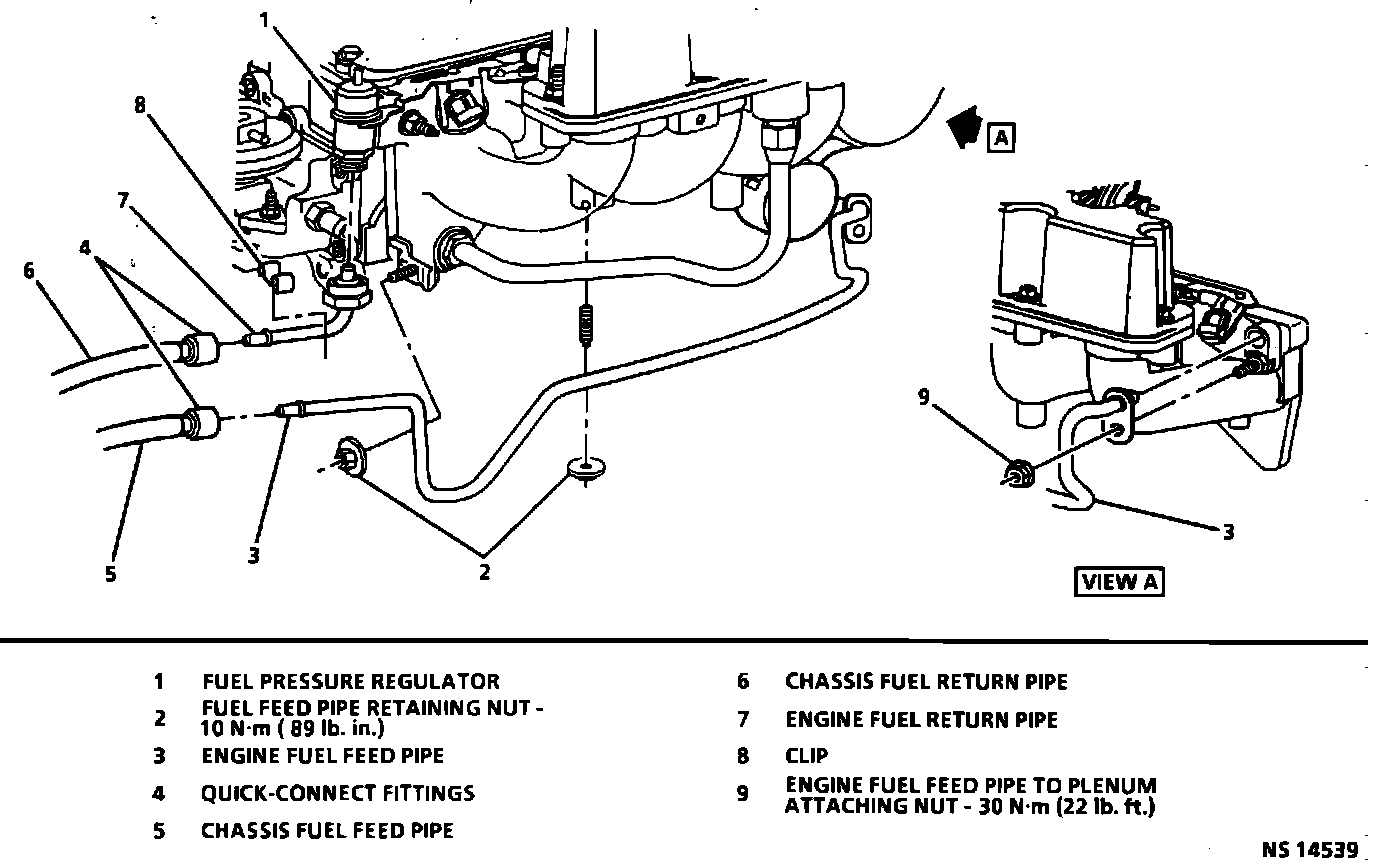
TOOLS REQUIRED
J 37088-A Or equivalent
WARNING:
- To Reduce the Risk of Fire and Personal Injury: Do Not attempt to repair sections of nylon fuel pipes. If damaged, replace.
- If nylon fuel feed or return pipes become kinked, and cannot be straightened, they must be replaced.
REMOVE OR DISCONNECT
1. Perform Fuel Pressure Release Procedure.
2. Quick-connect fittings.
3. Plug fuel feed and return pipes as required.
4. Engine fuel feed and return pipe clip.
Clean
Clean all engine fuel pipe connections and surrounding areas before disconnecting to avoid possible contamination of the fuel system.
5. Engine fuel feed pipe to lower manifold attaching nut.
5. Engine fuel return pipe from fuel pressure regulator.
- Discard O-ring.
INSTALL OR CONNECT
1. Lubricate new O-Ring with clean engine oil, then install fuel return pipe to fuel pressure regulator.
Tighten
Fuel return pipe fittings to 30 Nm (22 lb. ft.).
2. Lubricate new O-Ring with clean engine oil, then position engine fuel feed pipe to lower manifold.
3. Engine fuel feed retaining nuts (2) over fuel pipe.
- Finger tighten only.
4. Engine fuel feed pipe to lower manifold nut.
Tighten
Fuel feed pipe retaining nuts to 10 Nm (89 lb. in.).
Fuel feed pipe to lower manifold nut to 30 Nm (22 lb. in.).
5. Engine fuel feed and return pipe clip.
6. Quick-connect fittings.
7. Tighten fuel filler cap.
8. Negative battery cable.
INSPECT
Turn ignition switch to "ON," position for two seconds, then turn to "OFF" for ten seconds. Again turn to "ON" position, and check for fuel leaks.