Fuel Pressure Regulator: Service and Repair
REMOVAL PROCEDURE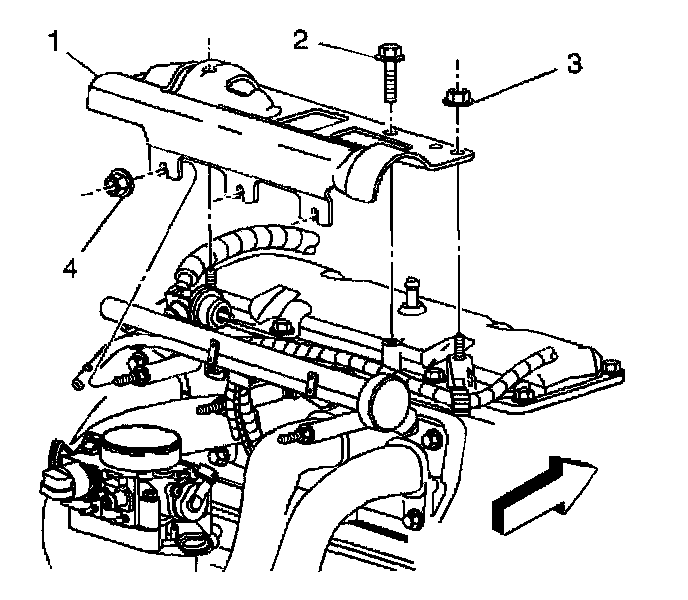
1. Relieve the fuel system pressure. Refer to Fuel Pressure Relief Procedure.
2. Remove the air cleaner outlet resonator.
3. Remove the air cleaner resonator bracket (1).
4. Disconnect the vacuum hose from the fuel pressure regulator.
5. Disconnect the fuel return pipe from the fuel pressure regulator.

6. Remove the pressure regulator attaching screw (7).
IMPORTANT: If the fuel pressure regulator is to be reinstalled, inspect the filter screen for contamination. If contamination is found, remove and discard the filter screen.
7. Remove the pressure regulator assembly (6) and the O-rings (8). Discard the O-rings.
INSTALLATION PROCEDURE
1. Lubricate the new pressure regulator O-rings (8) with clean engine oil.
2. Install the O-rings on the pressure regulator (6).
NOTE: Refer to Fastener Notice in Service Precautions.
3. Install the pressure regulator attaching screw (7) coated with the appropriate thread-locking material.
Tighten
Tighten the pressure regulator attaching screw to 9.5 N.m (84 lb in).
4. Connect the vacuum hose to the fuel pressure regulator.
5. Connect the fuel return pipe to the fuel pressure regulator.
Tighten
Tighten the fuel return pipe fitting to 33 N.m (24 lb ft).
6. Install the air cleaner resonator bracket.
Tighten
6.1. Tighten the bracket side nut (4) to 10 N.m (89 lb in).
6.2. Tighten the bracket upper nut (3) to 25 N.m (18 lb ft).
6.3. Tighten the bracket bolt (2) to 25 N.m (18 lb ft).
7. Install the air cleaner outlet resonator.
8. Connect the negative battery cable.
9. Inspect for leaks:
^ Turn ON the ignition for 2 seconds.
^ Turn OFF the ignition for 10 seconds.
^ Turn ON the ignition.
^ Inspect for fuel leaks.