Resonator: Service and Repair
AIR CLEANER OUTLET RESONATOR REPLACEMENTREMOVAL PROCEDURE
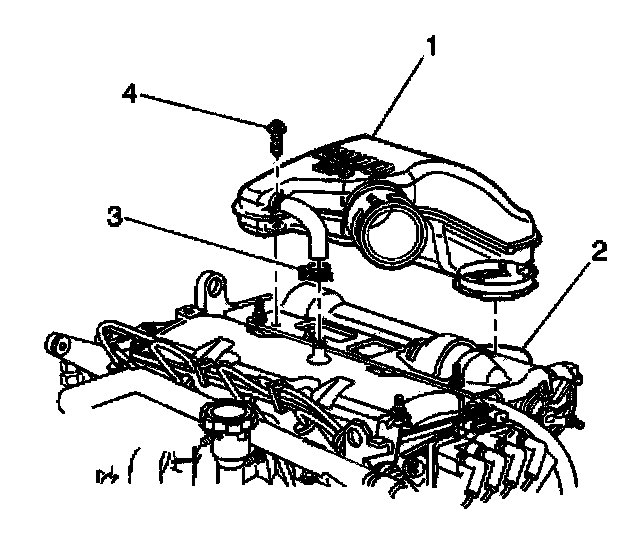
1. Remove the air cleaner outlet resonator mounting screw (4).
2. Disconnect the air cleaner outlet resonator clamp at the throttle body (2).
3. Remove the air cleaner outlet duct from air cleaner outlet resonator and air cleaner assembly.
4. Disconnect the crankcase vent hose clamp (3) and the crankcase vent hose from the top of the engine.
5. Remove the air cleaner outlet resonator (1).
INSTALLATION PROCEDURE
IMPORTANT: Apply a few drops of clean engine oil to the crankcase vent hose before installation.
1. Connect the crankcase vent hose and crankcase vent hose clamp (3) to the top of the engine.
IMPORTANT: Ensure that the air cleaner outlet resonator seals to the throttle body.
2. Install the air cleaner outlet resonator (1) to the throttle body (2).
NOTE: Refer to Fastener Notice in Service Precautions.
3. Install the air cleaner outlet resonator mounting screw (4).
Tighten
^ Tighten the air cleaner outlet resonator mounting screw to 10 N.m (89 lb in).
^ Tighten the air cleaner outlet resonator clamp to 5 N.m (44 lb in).
4. Install the air cleaner outlet duct to the air cleaner outlet resonator and the air cleaner assembly.
Tighten
Tighten the air cleaner outlet duct clamps to 5 N.m (44 lb in).