Fuel Injector: Service and Repair
REMOVAL PROCEDURE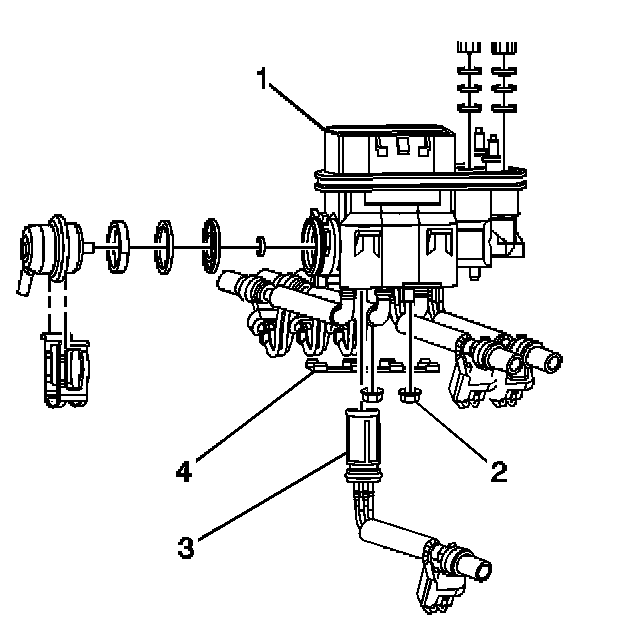
1. Relieve the fuel system pressure. Refer to Fuel Pressure Relief Procedure.
2. Remove the upper intake manifold assembly.
3. Remove the fuel meter body assembly (1).
4. Remove the injector assembly retainer (4) and the injector retainer lock nuts (2).
5. While pulling the injector tube downward, push with a small tip punch down between the injector terminals until the injector (3) is removed.
NOTE: Use care in removing the fuel injectors to prevent damage to the electrical connector terminals.
The fuel injector is serviced as a complete assembly only.
Also since the injectors are electrical components, these injectors should not be immersed in any type of liquid solvent or cleaner as damage may occur. Fuel injector cleaning is not recommended.
INSTALLATION PROCEDURE
1. Lubricate the O-ring seals with engine oil on the new fuel injector assembly (3).
IMPORTANT: Each injector is calibrated for a specific flow rate. Order the correct injector for the application being serviced when replacing the fuel injectors.
2. Install the fuel injector assembly (3) into the fuel meter body (1).
3. Install the injector assembly retainer (4) and the injector retainer lock nuts (2).
NOTE: Refer to Fastener Notice in Service Precautions.
Tighten
Tighten the injector retainer lock nuts to 3 N.m (27 lb in).
4. Install the fuel meter body assembly.