Seat Replacement - Bucket
Seat Replacement - Bucket
Removal Procedure
Caution: Refer toSIR Caution in Cautions and Notices.
1. Disable the SIR system. Refer to SIR Disabling and Enabling Zone 7 and to SIR Disabling and Enabling Zone 9 in SIR.
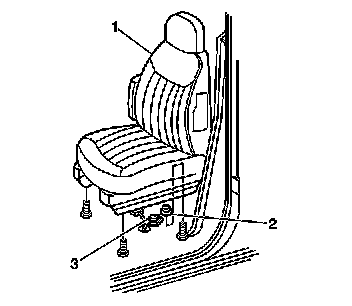
2. Disconnect the seat belt electrical connector (3) from the body wiring harness.
3. Disconnect the power seat connector from the body wiring harness 6-way power seat only.
4. Disconnect both seat back and seat cushion heated seat element connectors from the harness.
5. For the passenger seat only, remove the front under-seat storage tray. Refer to Storage Tray Replacement - Right Front Seat (Storage Tray Replacement - Right Front Seat) .
6. Remove the front seat anchor nuts (2).
7. Remove the front seat (1) from the vehicle.
Installation Procedure
Important: Ensure that the front seat stud washers are in place when installing the seat. Smaller diameter washers should be located on the forward front seat studs.
1. Install the front seat (1) to the vehicle.
Notice: Refer to Fastener Notice in Cautions and Notices.
2. Install the front seat anchor nuts (2).
Tighten the nuts to 40 N.m (30 lb ft).
3. Install the under-seat storage tray. Refer to Storage Tray Replacement - Right Front Seat (Storage Tray Replacement - Right Front Seat) .
4. Install the power seat connector to the body wiring harness 6-way power seat only.
5. Install the seat belt electrical connector (3) to the body wiring harness.
6. Install both the heater element electrical connectors to the body wiring harness.
7. Enable the SIR system. Refer to SIR Disabling and Enabling Zone 9 and to SIR Disabling and Enabling Zone 9 in SIR.