Part 4
Engine Replacement Continued 74 - 131
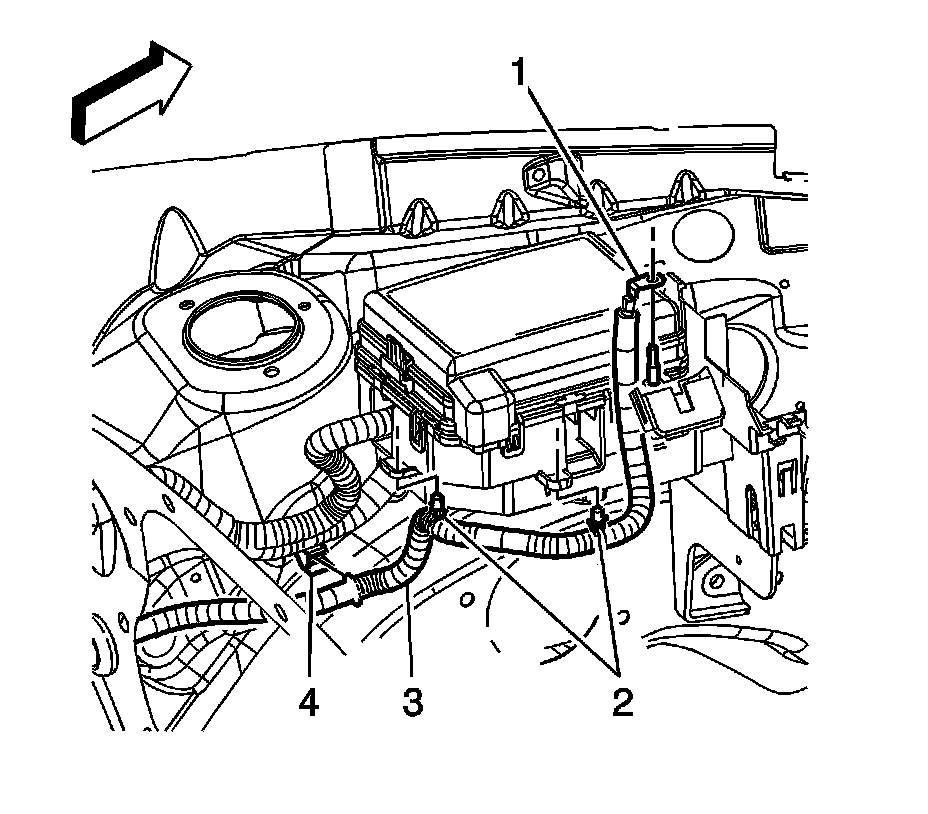
Installation Procedure

74. Install the engine harness clip (1) to the transaxle stud.
75. Install the engine harness clip nut (2).
Tighten the nut to 10 N.m (89 lb in).

76. If equipped with a manual transaxle perform the following steps. Install the engine harness ground terminal (4) to the stud.
77. Install the positive/negative cable (3) terminal to the stud.
78. Install the positive/negative battery cable ground nut (2).
Tighten the nut to 10 N.m (89 lb in).
79. Connect the following electrical connectors:
* CKP sensor (1)
* Oil pressure sensor (5)
* Knock sensor (6)

80. If equipped with a automatic transaxle perform the following steps. Install the engine harness ground terminal (3) to the stud.
81. Install the positive/negative cable (2) terminal to the stud.
82. Install the positive/negative battery cable ground nut (1).
Tighten the nut to 10 N.m (89 lb in).
83. Connect the following electrical connectors:
* CKP sensor (4)
* Oil pressure sensor (5)
* Knock sensor (6)
84. Install the starter.

85. If equipped with a automatic transaxle perform the following steps. Install the engine harness clips (3, 5) to the intake manifold.
86. Install the engine harness clip (1) to the oil level indicator tube bracket.

87. If equipped with a manual transaxle perform the following steps, install the engine harness clips (2, 4) to the intake manifold.
88. Install the engine harness clip (1) to the oil level indicator tube bracket.

89. Connect the ignition control module electrical connector.

90. Connect the following electrical connectors:
* TAC (1)
* MAP sensor
* Fuel injector harness (2)
* Generator (3)

91. Install the brake booster vacuum hose.
92. Position the brake booster vacuum hose clamp at the engine.

93. Position the engine coolant heater cord, if necessary.
94. If equipped with a automatic transaxle, install the engine coolant heater cord straps to the engine harness, if equipped.

95. If equipped with a manual transaxle, install the engine coolant heater cord clips (1) to the camshaft cover, if equipped.

96. Connect the engine coolant heater cord, if equipped.

97. Install the radiator outlet hose to the engine.
98. Position the radiator outlet hose clamp at the engine.

99. Install the heater inlet and outlet hoses to the thermostat housing.
100. Position the heater inlet and outlet hose clamps at the thermostat housing.

101. Install the engine harness clip (1) to the EVAP purge solenoid bracket.

102. Connect the EVAP purge solenoid electrical connector (1).

103. Install the radiator inlet hose to the engine.
104. Position the radiator inlet hose clamp at the engine.
105. Install the radiator inlet hose to the engine.
106. Position the radiator inlet hose clamp at the engine.

107. Position and install the ECM bracket to the studs.
108. Install the ECM bracket nuts (1) and bolts (2).
* Tighten the bolts to 25 N.m (18 lb ft).
* Tighten the nuts to 10 N.m (89 lb in).
109. Install the positive battery cable terminal (1) to the junction block stud.

110. Install the positive/negative battery cable terminal (2) to the stud.
111. Install the junction block terminal nut (1).
Tighten the nut to 15 N.m (11 lb ft).
112. Close the junction block terminal cover.

113. Connect the engine harness electrical connector (2) to the ECM.

114. Connect the body harness electrical connector (1) to the ECM.

115. Install the ECM/TCM cover.
116. Raise the vehicle.

117. Connect the cooling fan electrical connector.
118. Install the catalytic converter.
119. Install the left side engine splash shield.
120. Install the engine drive belt.
121. Install the windshield washer solvent reservoir.

122. Connect the EVAP line to the EVAP purge solenoid.

123. Connect the fuel feed line to the fuel rail.
124. Connect the negative battery cable.
125. Perform the engine prelubing procedure.
126. Fill the cooling system.
127. Check the automatic transaxle fluid, if equipped, add as needed.
128. Check the manual transaxle fluid, if equipped, add as needed.
129. Install the air cleaner assembly.
130. Close the hood.
131. Check the front alignment.