Direct/Coast Clutch, Reaction Carrier Assemble
Direct/Coast Clutch, Reaction Carrier Assemble
* J 23327 Clutch Spring Compressor
* J 41236 Coast Clutch Return Spring Compressor Adapter
* J 41232 Direct Clutch Return Spring Compressor Adapter
* J 36850 TRANSJEL(TM)
* J 41234-1 Input Shaft Seal Installer Pusher
* J 41234-2 Input Shaft Seal Installer Protector
* J 41234-3 Input Shaft Seal Installer Sizer
1. In order to aid in the assembly, lubricate the seal with transmission fluid.
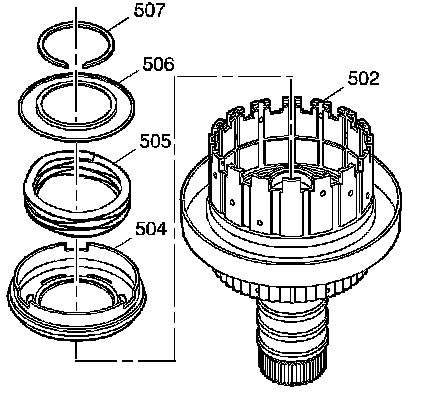
2. Assemble the coast clutch piston and seal assembly (504) into the input housing (502).
Important: You must assemble the spring retainer with the inner lip facing up.
3. Assemble the coast clutch release spring (505) and spring retainer (506) into the input housing (502).

4. Compress the coast clutch return spring retainer (506). Use the J 41236 and J 23327 or equivalent.
5. Assemble the coast clutch spring retainer snap ring (507) onto the input housing (502).
6. Remove the J 41236 and J 23327.

7. In order to aid in the assembly, lubricate the seal with transmission fluid.
8. Assemble the direct clutch piston and seal assembly (518) into the input housing (502).
9. Assemble the direct clutch return spring assembly (519) into the input housing with the snap ring retaining tabs facing up.

10. Compress the direct clutch spring assembly. Use the J 41232 and J 23327 or equivalent.
11. Assemble the direct clutch snap ring (520) into the input housing (502).
12. Remove the J 41232 and J 23327.

Important: Assemble the steel plates (508) with the splines in the input housing grooves that are machined to the pistons.
13. Assemble the 4 steel coast clutch plates (508) and the 4 new fiber coast clutch plates (509) into the input housing in alternating order, beginning with a steel plate (508).

14. Place the sprag outer race (512) on the bench with the flat side down and the side with the snap ring groove up.
15. Place one end bearing (514) into the outer race.
16. While rotating the sprag slowly, assemble the sprag clutch (515) into the sprag outer race. Keep the four notches up and the flat side down.
17. Assemble the other end bearing (514) on top of the sprag clutch.
18. Assemble the snap ring (516) into the sprag outer race (512) in order to retain the sprag clutch and end bearings.
Important: The snap ring side of the assembly faces up when installing the sprag clutch onto the input sun gear shaft. The flat side of the sprag outer race functions as the backing plate for the coast clutch.
19. While rotating the input sun gear shaft clockwise in order to help seat the sprags, assemble the sprag clutch and outer race assembly onto the input sun gear shaft (511).

Important: The input sun gear shaft (511) must only rotate clockwise.
20. Verify the correct operation of the sprag clutch by holding the sprag clutch outer race (512) and rotating the input sun gear shaft (511).

21. Assemble the thrust bearing (510) on the underside of the input sun gear shaft.
22. Retain the thrust bearing with J 36850 or equivalent.
23. Assemble the input sun gear shaft and sprag clutch assembly (511 and 512) into the input housing. The splines on the input sun gear shaft engage with the coast clutch fiber plates.

Important: Direct clutch plates are model dependent. Refer to Clutch Plate Selection Specifications to determine correct plate quantity. Then refer to either the above illustration for 6 plate or the following illustration for 5 plate installation sequence.
24. Assemble the 6 steel (521) and 6 new fiber (522) direct clutch plates into the input housing in alternating order beginning with a steel plate (521).
25. Assemble the direct clutch backing plate (523) onto the input housing with the flat side down.
26. Assemble the snap ring (517) in order to retain the input sun shaft and sprag clutch assembly and the direct clutch plates.

Important: Direct clutch plates are model dependent. Refer to Clutch Plate Selection Specifications to determine correct plate quantity. Then refer to either of the above illustration for 6 plate or 5 plate installation sequence.
27. Assemble the 7 steel (521) and 5 new fiber 522) direct clutch plates into the input housing in alternating order beginning with a steel plate (521). Note the location of the 4th and 5th fiber plates. 3 steel plates will be installed together.
28. Assemble the direct clutch backing plate (523) onto the input housing with the flat side down.
29. Assemble the snap ring (517) in order to retain the input sun shaft and sprag clutch assembly and the direct clutch plates.

30. Assemble the thrust bearing (524) on the top of the sprag clutch assembly. Retain with J 36850 or equivalent.
31. Assemble the reaction carrier shaft and shell assembly (526) onto the input housing. The splines on the inside of the shell engage the direct clutch fiber plates.

32. Assemble the thrust bearing (527) onto the top of the reaction carrier shaft and shell assembly.
33. Assemble the reaction carrier sun gear and shell assembly (529) onto the reaction shaft shell.
Important: Rotate the reaction carrier during assembly in order to mesh the sun gear with the pinion gears.
34. Assemble the reaction carrier assembly (531) onto the reaction sun gear.

35. Assemble the reaction carrier assembly to input sun gear thrust bearing (532) onto the reaction carrier assembly.
36. Assemble the input sun gear (533) onto the input sun gear shaft.
37. Assemble the input sun gear snap ring (534) onto the input sun gear shaft.

Important: When assembling the four new Teflon seals (500) onto the input shaft, begin with the seal closest to the housing.
38. Slide the J 41234-2 over the input shaft, and position the J 41234-2 at the seal groove closest to the housing. Coat the J 41234-2 with transmission fluid.
39. Guide a new seal onto the J 41234-2 and slide the seal into the seal groove with the J 41234-1.
40. Repeat the above procedure for each seal. Adjust the J 41234-2 as necessary for each seal groove.
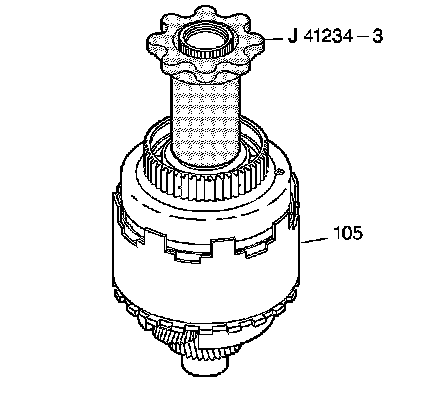
41. Size the seals with the J 41234-3.
42. Leave the J 41234-3 in place for at least five minutes. If possible, leave the J 41234-3 in place until you install the assembly (105) into the transmission case.